Policies_Network_RIP(ENH)_Snwls
Configuring RIP in SonicOS Enhanced
Routing Information Protocol (RIP) is a distance-vector routing protocol that is commonly used in small homogeneous networks. Using RIP, a router will periodically send its entire routing table to its closest neighbor, which passes the information to its next neighbor, and so on. Eventually, all routers within the network will have the information about the routing paths. When attempting to route packets, a router will check the routing table and select the path that requires the fewest hops.
SonicWALL appliances support RIPv1 or RIPv2 to advertise its static and dynamic routes to other routers on the network. Changes in the status of VPN tunnels between the SonicWALL and remote VPN gateways are also reflected in the RIPv2 advertisements. Choose between RIPv1 or RIPv2 based on your router’s capabilities or configuration. RIPv1 is an earlier version of the protocol that has fewer features, and it also sends packets via broadcast instead of multicast. RIPv2 packets are backwards-compatible and can be accepted by some RIPv1 implementations that provide an option of listening for multicast packets. The RIPv2 Enabled (broadcast) selection broadcasts packets instead of multicasting packets, and is for heterogeneous networks with a mixture of RIPv1 and RIPv2 routers.
The images in this section are displaying management interfaces running SonicOS 5.9 and higher firmware versions.
To configure RIP, refer to the following subsections:
To configure the Route Advertisement for RIP, perform the following steps:
1. Expand the Network tree and click RIP (ENH). The RIP (ENH) page displays.

2. Click the Edit Icon (![]() ) for an interface. The Edit Route Advertising Settings dialog box displays.
) for an interface. The Edit Route Advertising Settings dialog box displays.
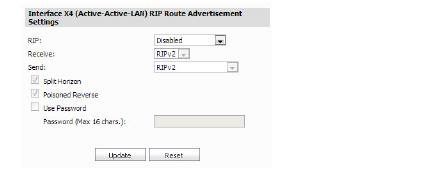
3. Select the RIP type from the RIP drop-down menu:
– Disabled
– Send and Receive
– Send Only
– Receive Only
– Passive
4. Select the Receive type from the Receive drop-down menu:
– RIPv1 Enabled
– RIPv2 Enabled
5. Select a Send type from the Send drop-down menu:
– RIPv1
– RIPv2 - v1 Compatible
– RIPv2
6. Select or Deselect the checkboxes for Split Horizon, Poisoned Reverse, and (or) Use Password to meet your configuration requirements. If the Use Password checkbox is clicked, enter a password in the Password text-field.
7. Click the Update button.
8. Click the Edit icon for the OSPF status.
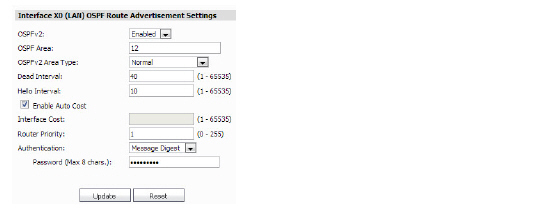
9. Click the OSPFv2 drop-down menu, and select Disable, Enable, or Passive.
10. Enter numeric value for the OSPF Area.
11. Click the OSPFv2 Area Type drop-down menu, then select Normal, St.ub Area, Totally Stubby Area, Not-so-Stubby Area, or Totally Stubby NSSA
12. Enter the Dead Interval (1-65535).
13. Enter the Hello Interval (1-65535).
14. If desired for your configuration, enable the Auto Cost checkbox. Configure the Auto Cost settings
a.Enter the Interface Cost.
b.Enter the Router Priority.
c.Click the Authentication drop-down menu and select Disable, Simple Password, or Message Digest.
d.Provide a password.
For appliances running SonicOS versions 5.6 and higher, VPN Tunnel Interfaces can be configured for advanced routing. To do so, you must enable advanced routing for the tunnel interface on the Advanced tab of its configuration. See the Generic VPN Configuration in SonicOS Enhanced for more information.
After you have enabled advanced routing for a Tunnel Interface, it is displayed in the list with the other interfaces in the Advanced Routing table on the Network > RIP (ENH) page.
The RIP configurations for Tunnel Interfaces are very similar to the configurations for traditional interfaces with the addition of two new options that are listed at the bottom of the RIP configuration window under a new Global Unnumbered Configuration heading.
When running SonicOS version 5.9 or higher, a BGP drop-down menu is available under the Advanced Routing Services heading. This menu gives you the options to enable or disable the BGP feature and is only available if the Use Advanced Routing checkbox is clicked.
Global Unnumbered Configuration
Because Tunnel Interfaces are not physical interfaces and have no inherent IP address, they must “borrow” the IP address of another interface. Therefore, the advanced routing configuration for a Tunnel Interface includes the following options for specifying the source and destination IP addresses for the tunnel:
• IP Address Borrowed From - The interface whose IP address is used as the source IP address for the Tunnel Interface.
Note The borrowed IP address must be a static IP address.
• Remote IP Address - The IP address of the remote peer to which the Tunnel Interface is connected. In the case of a SonicWALL-to-SonicWALL configuration with another Tunnel Interface, this should be the IP address of the borrowed interface of the Tunnel Interface on the remote peer.
Note The IP Address Borrowed From and Remote IP Address values apply to both RIP for the Tunnel Interface.
Guidelines for Configuring Tunnel Interfaces for Advanced Routing
The following guidelines will ensure success when configuring Tunnel Interfaces for advanced routing:
• The borrowed interface must have a static IP address assignment.
• The borrowed interface cannot have RIP enabled on its configuration.
Tip SonicWALL recommends creating a VLAN interface that is dedicated solely for use as the borrowed interface. This avoids conflicts when using wired connected interfaces.
• The IP address of the borrowed interface should be from a private address space, and should have a unique IP address in respect to any remote Tunnel Interface endpoints.
• The Remote IP Address of the endpoint of the Tunnel Interface should be in the same network subnet as the borrowed interface.
• The same borrowed interface may be used for multiple Tunnel Interfaces, provided that the Tunnel interfaces are all connected to different remote devices.
• When more than one Tunnel Interface on an appliance is connected to the same remote device, each Tunnel Interface must use a unique borrowed interface.
Depending on the specific circumstances of your network configuration, these guidelines may not be essential to ensure that the Tunnel Interface functions properly. But these guidelines are SonicWALL best practices that will avoid potential network connectivity issues.
To configure the Global RIP settings, perform the following:

15. Enter a Default Metric (1-15).
16. Enter an Administrative Distance (1-255)
17. Select or deselect the desired checkboxes and enter metrics for the following:
– Originate Default Route
– Redistribute Static Routs
– Redistribute Connected Networks
– Redistribute OSPF Routs
– Redistribute Remote VPN Networks
18. Click the Update button.
To configure the Global OSPFv2 for RIP, perform the following:
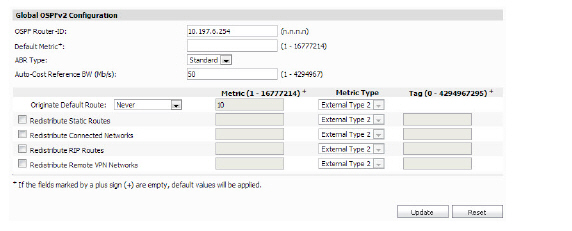
1. Enter the OSPF Router ID in the text-field.
2. Enter the Default Metric in the text-field (1-16777214)
3. Click the ABR Type drop-down menu, select Standard, Cisco, IBM, or Shortcut.
4. Enter the Auto-Cost Reference BW in Mb per second (1-4294967)
5. In the Originate Default Route menu, select Never, or When WAN is up, or Always.
6. Select or deselect the checkboxes and enter the Metric, Metric Type, and Tag for the Global OSPFv2 configuration:
– Redistribute Static Routes
– Redistribute Connected Networks
– Redistribute RIP Routes
– Redistribute Remote VPN Networks
7. When you are finished, click Update. The settings are changed for the SonicWALL appliance. To clear all screen settings and start over, click Reset.