Policies_Network_Settings_Snwls
Configuring Network Settings in SonicOS Standard
The following sections describe how to configure network settings in SonicOS Standard:
• Configuring Basic Network Settings in SonicOS Standard
• Configuring Web Proxy Forwarding
• Configuring Intranet Settings
• Configuring Routing in SonicOS Standard
• Configuring RIP in SonicOS Standard
• Configuring Ethernet Settings
Configuring Basic Network Settings in SonicOS Standard
The Network settings page is used to configure the network addressing mode, LAN settings, WAN settings, DMZ settings, and the DNS server address(es). SonicOS Standard supports six network addressing modes. For all of these modes, first configure the universal settings:
• LAN Settings for all Network Addressing Modes
Then configure the settings for the appropriate network addressing mode:
Note Making changes to this page causes the SonicWALL appliance will automatically restart. We recommend scheduling the tasks to run when network activity is low.
LAN Settings for all Network Addressing Modes
For all six of the network addressing modes supported in SonicOS Standard, complete the following basic network settings:
1. Enter the IP address assigned to the LAN interface in the SonicWALL LAN IP Address field and the subnet the IP address belongs to in the LAN Subnet Mask field.
2. To add an additional subnet, enter the IP address and subnet in the Network Gateway and Subnet Mask fields and click Add Subnet.
3. Enter the IP address of the router that provides Internet access to SonicWALL appliance in the WAN Gateway (Router) Address field.
The SonicWALL WAN IP Address and WAN Subnet Mask are automatically set to the SonicWALL LAN IP Address. and LAN Subnet Mask, respectively.
When you select Standard Mode (also known as Transparent Mode), Network Address Translation (NAT) is disabled. All nodes on the LAN or WorkPort that will access or be accessed from the Internet must use valid, Internet-accessible IP addresses.
To configure a SonicWALL appliance for standard network addressing, perform the following steps:
1. On the Network > Settings, select Standard from the Network Addressing Mode area.
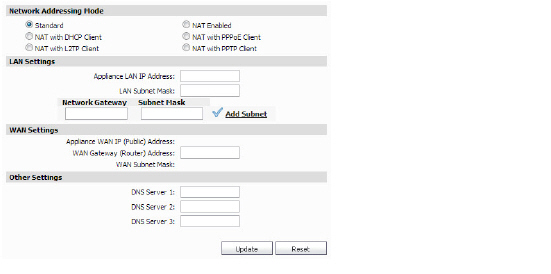
2. Configure the LAN Settings as described in the LAN Settings for all Network Addressing Modes.
3. Enter the IP addresses of the DNS servers in the DNS Server 1-3 fields.
Note SonicWALL appliances require the IP address of at least one DNS server to function properly.
4. When you are finished, click Update. The settings are changed for the selected SonicWALL appliance. To clear all screen settings and start over, click Reset.
NAT provides anonymity to machines on the LAN or WorkPort by connecting the entire network to the Internet using a single IP address. This provides security to the internal machines by hiding them from the outside world and conserves IP addresses.
When using NAT, we recommend using internal network IP addresses from a special range. The following IP address ranges are reserved for private IP networks and are not routed on the Internet:
10.0.0.0 - 10.255.255.255
172.16.0.0 - 172.31.255.255
192.168.0.0 - 192.168.255.255
If your network uses IP addresses that are not registered to your organization and are not within the private IP address ranges, the servers on the Internet to which those IP addresses belong will not be accessible from your network. For example, if an IP address on your network is 185.5.20.105 and it is not registered to your organization, the server that uses that IP address on the Internet will not be accessible from your network.
Note If you choose to use NAT, but need to make some machines available to the outside world, use One-to-One NAT. One-to-One NAT maps external IP addresses to private IP addresses. For more information, refer to the Configuring One-to-One NAT.
To configure a SonicWALL appliance for NAT, perform the following steps:
1. On the Network > Settings page, select NAT Enabled from the Network Addressing Mode area.

2. Configure the LAN Settings as described in the LAN Settings for all Network Addressing Modes.
3. Configure the following WAN Settings:
– SonicWALL WAN IP (NAT Public) Address—Public IP address used to access the Internet. All activity on the Internet will appear to originate from this address. This IP address must be valid and is generally supplied by your Internet Service Provider (ISP).
– WAN Gateway (Router) Address—Address of the router that attaches the LAN to the Internet.
– WAN Subnet Mask—Determines the subnet to which the public IP address belongs. This is generally supplied by your ISP.
4. Enter the IP addresses of the DNS servers in the DNS Server 1-3 fields.
Note SonicWALL appliances require the IP address of at least one DNS server to function properly.
5. When you are finished, click Update. The settings are changed for the selected SonicWALL appliance. To clear all screen settings and start over, click Reset.
When you select the NAT with DHCP Client mode, the SonicWALL appliance uses DHCP to obtain a dynamic IP address from the ISP and NAT. For more information on NAT, refer to the NAT-Enabled Mode.
To configure a SonicWALL appliance for NAT with a DHCP client, perform the following steps:
1. On the Network > Settings, page, select NAT with DHCP Client from the Network Addressing Mode area.
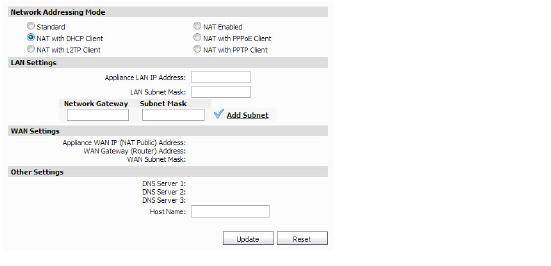
2. Configure the LAN Settings as described in LAN Settings for all Network Addressing Modes.
3. The WAN settings and the DNS server IP addresses are automatically provided by the DHCP server of the service provider. You do not need to configure any parameters in the WAN Settings area.
4. In the Other Settings area, enter the name of the DHCP server in the Host Name field.
5. When you are finished, click Update. The settings are changed for each selected SonicWALL appliance. To clear all screen settings and start over, click Reset.
When you select the NAT with PPPoE Client mode, the SonicWALL appliance uses PPP over Ethernet (PPPoE) to connect to the Internet. PPPoE is required by some ISPs to authenticate users over broadband Internet access devices (e.g., DSL, cable modems, wireless). Note that when using NAT for the PPPoE client, the password appears in clear text.
Note When this mode is selected, the SonicWALL LAN IP Address is used as the gateway address for computers on the LAN or WorkPort.
To configure a SonicWALL appliance for NAT with PPPoE, perform the following steps:
1. On the Network > Settings, page, select NAT with PPPoE Client from the Network Addressing Mode area.
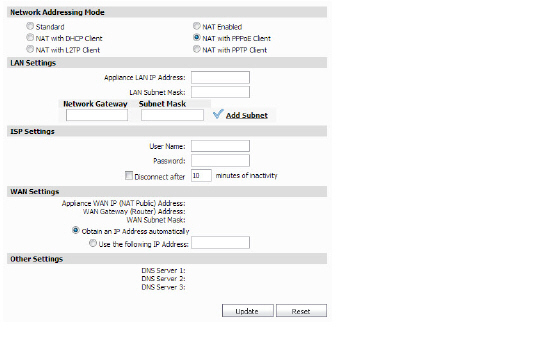
2. Configure the LAN Settings as described in the LAN Settings for all Network Addressing Modes.
3. Configure the following ISP Settings:
– User Name—username provided by the ISP.
– Password—password used to authenticate the username with the ISP. This field is case-sensitive.
4. To specify how long the SonicWALL appliance waits before disconnecting from the Internet, select the Disconnect after minutes of inactivity checkbox and enter the amount of time in the inactivity field.
5. Select from the following:
– To configure the SonicWALL appliance(s) to dynamically obtain an IP address, select Obtain an IP Address automatically.
– To configure the SonicWALL appliance(s) to use a fixed IP address, select Use the following IP Address and enter the IP address.
6. When you are finished, click Update. The settings are changed for the selected SonicWALL appliance. To clear all screen settings and start over, click Reset.
When you select the NAT with L2TP Client mode, the SonicWALL appliance uses Layer Two Tunneling Protocol (L2TP) to connect to the Internet.
Note When this mode is selected, the SonicWALL LAN (WorkPort) IP Address is used as the gateway address for computers on the LAN or WorkPort.
To configure a SonicWALL appliance for NAT with L2TP, perform the following steps:
1. On the Network > Settings, page, select NAT with L2TP Client from the Network Addressing Mode area.
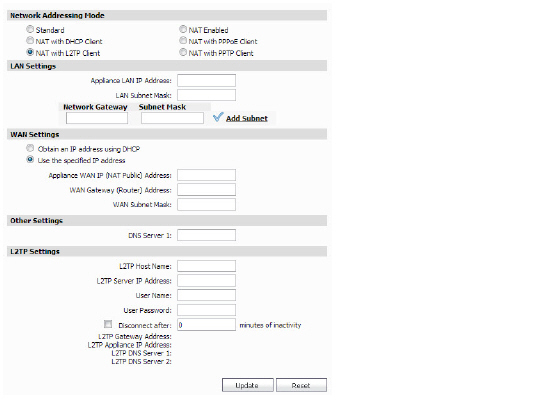
2. Configure the LAN Settings as described in the LAN Settings for all Network Addressing Modes.
3. Select from the following WAN settings:
– To configure the SonicWALL appliance to dynamically obtain an IP address, select Obtain an IP address using DHCP.
: •: To renew the IP address, click Renew Lease.
: •: To release the IP address, click Release.
– To configure the SonicWALL appliance to use fixed settings, select Use the specified IP address and enter the following:
: •: SonicWALL WAN IP (NAT Public) Address—Public IP address used to access the Internet. All activity on the Internet will appear to originate from this address. This IP address must be valid and is generally supplied by your Internet Service Provider (ISP).
: •: WAN Gateway (Router) Address—Address of the router that attaches the LAN to the Internet.
: •: WAN Subnet Mask—Determines the subnet to which the public IP address belongs. This is generally supplied by your ISP.
4. Enter the IP address of the DNS server in the DNS Server 1 field.
5. Configure the following ISP L2TP Settings:
– L2TP Host Name—this information is provided by your ISP.
– L2TP Server IP Address—this information is provided by your ISP.
– User Name—username provided by the ISP.
– Password—password used to authenticate the username with the ISP. This field is case-sensitive.
6. To specify how long the SonicWALL appliance waits before disconnecting from the Internet, select the Disconnect after minutes of inactivity checkbox and enter the amount of time in the inactivity field.
7. When you are finished, click Update. The settings are changed for the selected SonicWALL appliance. To clear all screen settings and start over, click Reset.
When you select the NAT with PPTP Client mode, the SonicWALL appliance uses Point-to-Point Tunneling Protocol (PPTP) to connect to the Internet.
When this mode is selected, the SonicWALL LAN (WorkPort) IP Address is used as the gateway address for computers on the LAN or WorkPort.
To configure a SonicWALL appliance for NAT with PPTP, perform the following steps:
1. On the Network > Settings, page, select NAT with PPTP Client from the Network Addressing Mode area.
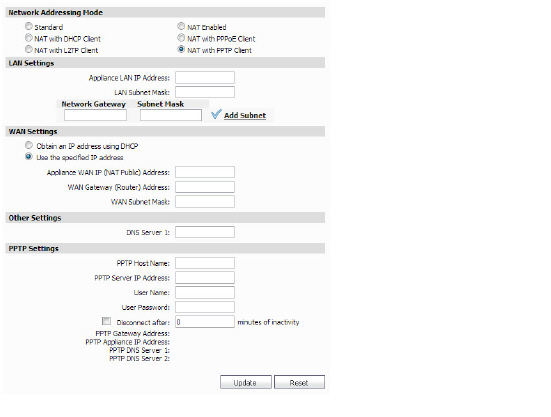
2. Configure the LAN Settings as described in the LAN Settings for all Network Addressing Modes.
3. Select from the following WAN settings:
– To configure the SonicWALL appliance to dynamically obtain an IP address, select Obtain an IP address using DHCP.
: •: To renew the IP address, click Renew Lease.
: •: To release the IP address, click Release.
– To configure the SonicWALL appliance to use fixed settings, select Use the specified IP address and enter the following:
: •: SonicWALL WAN IP (NAT Public) Address—Public IP address used to access the Internet. All activity on the Internet will appear to originate from this address. This IP address must be valid and is generally supplied by your Internet Service Provider (ISP).
: •: WAN Gateway (Router) Address—Address of the router that attaches the LAN to the Internet.
: •: WAN Subnet Mask—Determines the subnet to which the public IP address belongs. This is generally supplied by your ISP.
4. Enter the IP address of the DNS server in the DNS Server 1 field.
5. Configure the following ISP PPTP Settings:
– PPTP Host Name—this information is provided by your ISP.
– PPTP Server IP Address—this information is provided by your ISP.
– User Name—username provided by the ISP.
– User Password—password used to authenticate the username with the ISP. This field is case-sensitive.
6. To specify how long the SonicWALL appliance waits before disconnecting from the Internet, select the Disconnect after minutes of inactivity checkbox and enter the amount of time in the inactivity field.
7. When you are finished, click Update. The settings are changed for the selected SonicWALL appliance. To clear all screen settings and start over, click Reset.
Note Dynamic DNS forwarding settings are identical in SonicOS Standard and Enhanced. For configuration information, refer to the Configuring Dynamic DNS in the SonicOS Enhanced section of this chapter.
Configuring Web Proxy Forwarding
Note Web proxy forwarding settings are identical in SonicOS Standard and Enhanced. For configuration information, refer to the Configuring Web Proxy Forwarding Settings in the SonicOS Enhanced section of this chapter.