Policies_Firewall_AppControlAdvanced_Snwls
Configuring App Control Advanced Policies
The Firewall > App Control Advanced page provides an alternate method of adding App Control policies. The configuration method on the Firewall > App Control Advanced page allows granular control of specific categories, applications, or signatures. This includes granular logging control, granular inclusion and exclusion of users, groups, or IP address ranges, and schedule configuration. The settings here are global policies and independent from any custom App Rules policy, and do not need to be added to an App Rules policy to take effect.
You can configure the following settings on this page:
• Select a category, an application, or a signature.
• Select blocking, logging, or both as the action.
• Specify users, groups, or IP address ranges to include in or exclude from the action.
• Set a schedule for enforcing the controls.
The Firewall > App Control Advanced screen provides application signatures management for all supported firewalls running SonicOS 5.9 or higher firmware.
Only 50 rows can be displayed in this page. To view additional rows, use the pagination controls to the right of the Items field.

The Firewall > App Control Advanced page provides an App Control View Style section. When you select Application or Signature in the Viewed By field in this section, the listed items are displayed as links in the App Control Advanced section. You can click these links for more details about the application or signature. A summary is provided, as well as information from Wikipedia, if available.
Note When All is selected in the Category pull-down list while Viewed By is set to Category, and then one of the category links is clicked, the View Style settings are changed to select that category in the Category pull-down list and set Viewed By to Application, displaying all the applications in that category.
See the following sections:
• Viewing App Control Advanced Status
• Enabling App Control on Network Zones
• Configuring App Control Advanced Global Settings
• Configuring Policies on Firewall > App Control Advanced
• Sorting App Control Advanced Items
Viewing App Control Advanced Status
The App Control Status section at the top of the page displays the date of the most recent signature database available in MySonicWALL. This database contains thousands of signatures for application viruses and other malware being tracked by SonicWALL. SonicWALL appliances periodically synchronize with MySonicWALL to download updates to the database.

The Status section also displays the expiration date of the App Control Service license. If the service expires, no new signatures are downloaded to the appliance from MySonicWALL.
A link to the Network > Zones page is provided next, for convenient navigation. You must enable App Control on each zone where you want it to inspect network traffic. If App Control is not enabled on any zones, a warning is displayed here. See Enabling App Control on Network Zones for a description of enabling App Control on a network zone.
Enabling App Control on Network Zones
You must enable App Control on each zone where you want to use App Control Advanced policies to inspect network traffic. A link to the Network > Zones page is provided on the Firewall > App Control Advanced page for convenient navigation.
Note App Control policies are applied to traffic within a network zone only if you enable the App Control Service for that zone. App Rules policies are independent, and not affected by the App Control setting for network zones.
To enable App Control on a network zone:
1. In the TreeControl, select the unit or group to configure.
2. On the Policies tab, on the Firewall > App Control Advanced page, click Network > Zones in the App Control Status section at the top of the page.
3. On the Network > Zones page, click the Edit icon for the desired zone. The Edit Network Zone screen displays.

4. Select the Enable App Control Service checkbox.
5. Click OK. The Modify Task Description and Schedule window displays.
6. A description is automatically added in the Description field. Optionally change the description.
7. For Schedule, select one of the following radio buttons and set any associated fields:
• Default – Use the default schedule configured for the Agent that manages this unit
• Immediate – Enable the configuration immediately
• At – Select the exact time to enable the configuration by using the pull-down lists for the hour, minute, time zone, month, and year. If your GMS deployment includes Agents in different time zones, you can select among them in the time zone pull-down list. Select the date from the calendar.
8. Click Accept to enable the configuration on this schedule. Click Cancel to exit without saving the configuration.
Configuring App Control Advanced Global Settings
App Control is a licensed service, and you must also enable it to activate the functionality. The Firewall > App Control Advanced page provides the following global settings:
• Enable App Control – Globally enable App Control
• Configure App Control Settings – Configure a global exclusion list for App Control
• Update App Control Signature Database – Synchronize signatures with MySonicWALL
• Reset App Control Settings & Policies – Delete all App Control configuration and policies for the selected unit or for all units in the selected group

See the following sections:
• Enabling App Control Globally
• Configuring an App Control Advanced Exclusion List
• Synchronizing the Signature Database
• Resetting App Control to Factory Defaults
To globally enable App Control Advanced policies:
1. In the TreeControl, select the unit or group to configure.
2. On the Policies tab, navigate to the Firewall > App Control Advanced page.
3. In the App Control Global Settings area, select the Enable App Control checkbox to globally enable App Control.
App Control policies are applied to traffic within a network zone only if you enable the App Control Service for that zone. See Enabling App Control on Network Zones for a description of enabling App Control on a network zone.
4. Click the Update button. The Modify Task Description and Schedule window displays.
5. A description is automatically added in the Description field. Optionally change the description.
6. For Schedule, select one of the following radio buttons and set any associated fields:
• Default – Use the default schedule configured for the Agent that manages this unit
• Immediate – Enable App Control Advanced policies immediately
• At – Select the exact time to enable App Control Advanced policies by using the pull-down lists for the hour, minute, time zone, month, and year. If your GMS deployment includes Agents in different time zones, you can select among them in the time zone pull-down list. Select the date from the calendar.
7. Click Accept to enable App Control Advanced policies on this schedule. Click Cancel to exit without saving the configuration.
Configuring an App Control Advanced Exclusion List
To configure a exclusion list for App Control Advanced policies:
1. In the TreeControl, select the unit or group to configure.
2. On the Policies tab, navigate to the Firewall > App Control Advanced page.
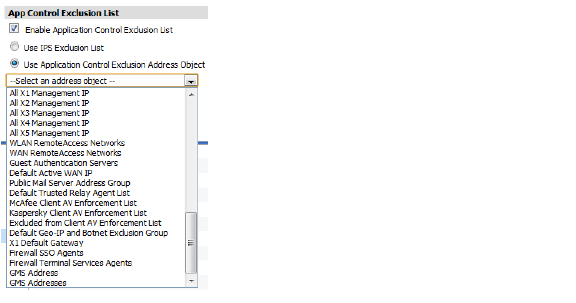
3. In the App Control Global Settings area, click Configure App Control Settings to bring up the App Control Exclusion List window.

4. Select the Enable Application Control Exclusion List to activate the exclusion options in the window.
5. To use the IPS exclusion list, which can be configured from the Security Services > Intrusion Prevention page, select the Use IPS Exclusion List radio button.
6. To use an address object for the exclusion list, select the Use Application Control Exclusion Address Object radio button, and then select an address object from the pull-down list.
7. Click OK. The Modify Task Description and Schedule window displays.
8. A description is automatically added in the Description field. Optionally change the description.
9. For Schedule, select one of the following radio buttons and set any associated fields:
• Default – Use the default schedule configured for the Agent that manages this unit
• Immediate – Enable the exclusion list immediately
• At – Select the exact time to enable the exclusion list by using the pull-down lists for the hour, minute, time zone, month, and year. If your GMS deployment includes Agents in different time zones, you can select among them in the time zone pull-down list. Select the date from the calendar.
10. Click Accept to enable the exclusion list on this schedule. Click Cancel to exit without saving the configuration.
Synchronizing the Signature Database
To synchronize the signature database with MySonicWALL:
1. In the TreeControl, select the unit or group to configure.
2. On the Policies tab, navigate to the Firewall > App Control Advanced page.
3. In the App Control Global Settings area, click Update App Control Signature Database. The Modify Task Description and Schedule window displays.
4. A description is automatically added in the Description field. Optionally change the description.
5. For Schedule, select one of the following radio buttons and set any associated fields:
• Default – Use the default schedule configured for the Agent that manages this unit
• Immediate – Synchronize the database immediately
• At – Select the exact time to synchronize the database using the pull-down lists for the hour, minute, time zone, month, and year. If your GMS deployment includes Agents in different time zones, you can select among them in the time zone pull-down list. Select the date from the calendar.
6. Click Accept to synchronize the database on this schedule. Click Cancel to exit without saving the configuration.
Resetting App Control to Factory Defaults
To reset App Control settings and policy configuration to the factory default values for the selected unit or for all units in the selected group:
1. In the TreeControl, select the unit or group to configure.
2. On the Policies tab, navigate to the Firewall > App Control Advanced page.
3. In the App Control Global Settings area, click the Reset App Control Settings & Policies button.
4. Click OK in the confirmation dialog box. The Modify Task Description and Schedule window displays.
5. A description is automatically added in the Description field. Optionally change the description.
6. For Schedule, select one of the following radio buttons and set any associated fields:
• Default – Use the default schedule configured for the Agent that manages this unit
• Immediate – Perform the reset immediately
• At – Select the exact time to perform the reset using the pull-down lists for the hour, minute, time zone, month, and year. If your GMS deployment includes Agents in different time zones, you can select among them in the time zone pull-down list. Select the date from the calendar.
7. Click Accept to perform the reset on this schedule. Click Cancel to exit without saving the configuration.