Policies_SSLVPN_ClientSettings_Snwls
The Policies > SSL VPN > Client Settings page allows the administrator to enable SSL VPN access on zones and configure the client address range information and NetExtender client settings. It also displays which zones have SSL VPN access enabled.
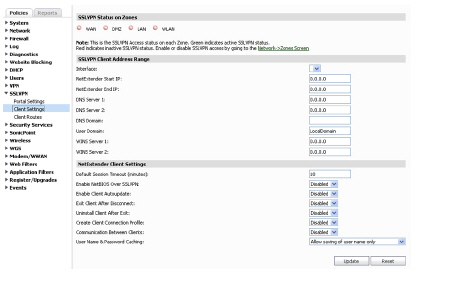
The following tasks are configured on the SSL VPN > Client Settings page:
• Configuring Zones for SSL VPN Access
• Configuring the SSL VPN Client Address Range
• Configuring NetExtender Client Settings
Configuring Zones for SSL VPN Access
All of the zones on the SonicWALL security appliance are displayed in the SSL VPN Status on Zones section of the SSL VPN > Client Settings page. SSL VPN access must be enabled on a zone before users can access the Virtual Office web portal. A green button to the left of the name of the zone indicates that SSL VPN access is enabled. A red button indicates that SSL VPN access is disabled. To change the SSL VPN access for a zone, simply click the name of the zone on the SSL VPN > Client Settings page.
SSL VPN Access can also be configured on the Network > Zones page by clicking the configure icon for the zone.
Note WAN management must be enabled on the zone to terminate SSL VPN sessions. Even though the zone has SSL VPN enabled, if the management interface is disabled, SSL VPN will not work correctly.
Configuring the SSL VPN Client Address Range
The SSL VPN Client Address Range defines the IP address pool from which addresses will be assigned to remote users during NetExtender sessions. The range needs to be large enough to accommodate the maximum number of concurrent NetExtender users you wish to support plus one (for example, the range for 15 users requires 16 addresses, such as 192.168.200.100 to 192.168.200.115).
Note The range must fall within the same subnet as the interface to which the SRA appliance is connected, and in cases where there are other hosts on the same segment as the SRA appliance, it must not overlap or collide with any assigned addresses.
To configure the SSL VPN Client Address Range, perform the following steps:
1. Navigate to the SSL VPN > Client Settings page.
In the NetExtender Start IP field, enter the first IP address in the client address range.
3. In the NetExtender End IP field, enter the last IP address in the client address range.
4. In the DNS Server 1 field, enter the IP address of the primary DNS server, or click the Default DNS Settings to use the default settings.
5. (Optional) In the DNS Server 2 field, enter the IP address of the backup DNS server.
6. (Optional) In the DNS Domain field, enter the domain name for the DNS servers.
7. In the User Domain field, enter the domain name for the users. The value of this field must match the domain field in the NetExtender client.
8. (Optional) In the WINS Server 1 field, enter the IP address of the primary WINS server.
9. (Optional) In the WINS Server 2 field, enter the IP address of the backup WINS server.
10. In the Interface pull-down menu, select the interface to be used for SSL VPN services.
Note The IP address range must be on the same subnet as the interface used for SSL VPN services.
11. Click the Zone name at the top of the page to enable SSL VPN access on it with these settings. The indicator should be green for the Zone you want to enable.
12. Click Accept.
Configuring NetExtender Client Settings
NetExtender client settings are configured on the bottom of the SSL VPN > Client Settings page. The following settings to customize the behavior of NetExtender when users connect and disconnect.
• Default Session Timeout (minutes)—The default timeout value for client inactivity, after which the client’s session is terminated.
• Enable Web Management over SSLVPN—Allows NetExtender clients to perform web management tasks over the SSLVPN. This option is available in SonicOS 6.1 and above.
• Enable SSH Management over SSLVPN—Allows NetExtender clients to perform Secure Shell (SSH) management tasks over the SSLVPN. This option is available in SonicOS 6.1 and above.
• Enable NetBIOS Over SSLVPN—Allows NetExtender clients to broadcast NetBIOS to the SSL VPN subnet.
• Enable Client Autoupdate—The NetExtender client checks for updates every time it is launched.
• Exit Client After Disconnect—The NetExtender client exits when it becomes disconnected from the SSL VPN server. To reconnect, users will have to either return to the SSL VPN portal or launch NetExtender from their Programs menu.
• Uninstall Client After Disconnect—The NetExtender client automatically uninstalls when it becomes disconnected from the SSL VPN server. To reconnect, users will have to return to the SSL VPN portal.
• Create Client Connection Profile—The NetExtender client will create a connection profile recording the SSL VPN Server name, the Domain name and optionally the username and password.
• Communication Between Clients—Enables NetExtender clients that are connected to the same server to communicate.
• User Name & Password Caching—Provide flexibility in allowing users to cache their usernames and passwords in the NetExtender client. The three options are Allow saving of user name only, Allow saving of user name & password, and Prohibit saving of user name & password. These options enable administrators to balance security needs against ease of use for users.