Policies_SecurityServices_IntrusionPrevention_Snwls
Configuring the SonicWALL Intrusion Prevention Service
The Intrusion Prevention Service (IPS) is a subscription-based service that is frequently updated to protect your networks from new attacks and undesired uses that expose your network to potential risks such as Instant Messaging (IM) or Peer-to-Peer (P2P) applications.
For information on adding the IPS to SonicWALL appliances, refer to the Upgrading Licenses.
This section contains the following subsections:
• SonicWALL Deep Packet Inspection
• Enabling Intrusion Prevention Services
• Manual Upload of Keyset and Signature Files
SonicWALL Intrusion Prevention Service (SonicWALL IPS) delivers a configurable, high performance Deep Packet Inspection engine for extended protection of key network services such as Web, Email, file transfer, Windows services and DNS. SonicWALL IPS is designed to protect against application vulnerabilities as well as worms, Trojans, and peer-to-peer, spyware and backdoor exploits. The extensible signature language used in SonicWALL’s Deep Packet Inspection engine also provides proactive defense against newly discovered application and protocol vulnerabilities. SonicWALL IPS offloads the costly and time-consuming burden of maintaining and updating signatures for new hacker attacks through SonicWALL’s industry-leading Distributed Enforcement Architecture (DEA). Signature granularity allows SonicWALL IPS to detect and prevent attacks based on a global, attack group, or per-signature basis to provide maximum flexibility and control false positives.
SonicWALL Deep Packet Inspection
Deep Packet Inspection looks at the data portion of the packet. The Deep Packet Inspection technology includes intrusion detection and intrusion prevention. Intrusion detection finds anomalies in the traffic and alerts the administrator. Intrusion prevention finds the anomalies in the traffic and reacts to it, preventing the traffic from passing through.
Deep Packet Inspection is a technology that allows a SonicWALL Security Appliance to classify passing traffic based on rules. These rules include information about layer 3 and layer 4 content of the packet as well as the information that describes the contents of the packet’s payload, including the application data (for example, an FTP session, an HTTP Web browser session, or even a middleware database connection). This technology allows the administrator to detect and log intrusions that pass through the SonicWALL Security Appliance, as well as prevent them (i.e. dropping the packet or resetting the TCP connection). SonicWALL’s Deep Packet Inspection technology also correctly handles TCP fragmented byte stream inspection as if no TCP fragmentation has occurred.
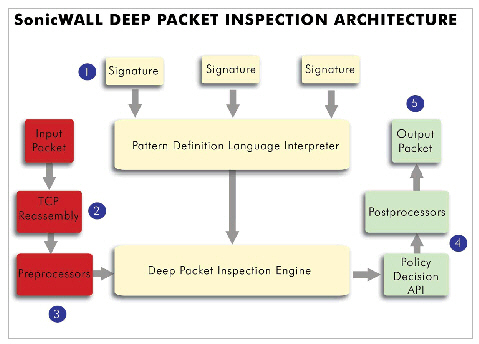
How SonicWALL’s Deep Packet Inspection Architecture Works
Deep Packet Inspection technology enables the SonicWALL firewall appliance to investigate farther into the protocol to examine information at the application layer and defend against attacks targeting application vulnerabilities. This is the technology behind SonicWALL Intrusion Prevention Service. SonicWALL’s Deep Packet Inspection technology enables dynamic signature updates pushed from the SonicWALL Distributed Enforcement Architecture.
The following steps describe how the SonicWALL Deep Packet Inspection Architecture works:
1. Pattern Definition Language Interpreter uses signatures that can be written to detect and prevent against known and unknown protocols, applications and exploits.
2. TCP packets arriving out-of-order are reassembled by the Deep Packet Inspection framework.
3. Deep Packet Inspection engine preprocessing involves normalization of the packet’s payload. For example, a HTTP request may be URL encoded and thus the request is URL decoded in order to perform correct pattern matching on the payload.
4. Deep Packet Inspection engine postprocessors perform actions which may either simply pass the packet without modification, or could drop a packet or could even reset a TCP connection.
5. SonicWALL’s Deep Packet Inspection framework supports complete signature matching across the TCP fragments without performing any reassembly (unless the packets are out of order). This results in more efficient use of processor and memory for greater performance.
If TCP packets arrive out of order, the SonicWALL IPS engine reassembles them before inspection. However, SonicWALL’s IPS framework supports complete signature matching across the TCP fragments without having to perform complete reassembly. SonicWALL’s unique reassembly-free matching solution dramatically reduces CPU and memory resource requirements.
Enabling Intrusion Prevention Services
To configure IPS settings for one or more SonicWALL appliances, perform the following steps:
1. Select the global icon, a group, or a SonicWALL appliance.
2. Expand the Security Services tree and click Intrusion Prevention. The Intrusion Prevention page appears.
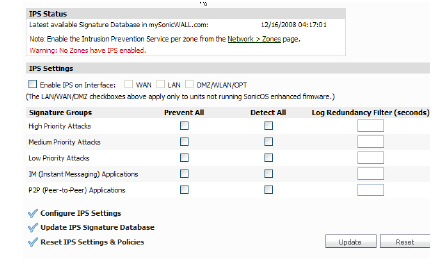
3. Check the Enable IPS checkbox to enable the service.
4. Select the check boxes of the interface ports to monitor.
5. Configure the following settings for High Priority Attacks in the IPS Settings area:
– To to detect, log, and prevent all high priority attacks, select the Prevent All check box.
– To detect and log all high priority attacks, select the Detect All check box.
– To prevent the log from becoming overloaded with entries for the same attack, enter a value in the Log Redundancy Filter field. For example, if you entered a value of 30 seconds and there were 100 SubSeven attacks during that period of time, only one attack would be logged during that 30 second period.
6. Repeat Step 3 for the remaining categories as applicable, including Medium Priority Attacks, Low Priority Attacks, IM (Instant Messaging) Applications, and P2P (Peer-to-Peer) Applications.
7. Click Configuring IPS Settings to choose one of the following options:
– If Enable IP Reassembly is enabled, the SonicWALL security appliance reassembles fragmented packets for full application layer inspection.
– If Prevent Invalid Checksum is enabled, the SonicWALL security appliance automatically drops and resets the connection, to prevent the traffic from reaching its destination.
– If Detect Invalid Checksum is enabled, the SonicWALL security appliance logs and alerts any traffic, but does not take any action against the traffic. The connection proceeds to its intended destination.
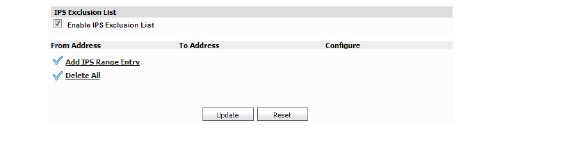
– If Enable IPS Exclusion List is enabled, this SonicWALL security appliance bypasses IPS enforcement for a specified IP range. This requires the addition of an IPS Range (below).
8. To force the firmware to download all signatures, click Update IPS Signature Database.
9. To reset your IPS settings to the defaults, click Reset IPS Settings & Policies.
10. When you are finished, click Update. The settings are changed for each selected SonicWALL appliance. To clear all screen settings and start over, click Reset.
This section allows the administrator to configure settings for individual attacks.
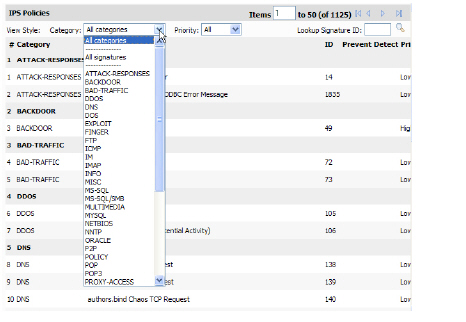
1. Locate the type of attack that you would like to view. To sort by category, select a category from the Categories list box. To sort by priority, select a priority level from the Priority list box.
2. After locating a type of attack to configure, click its Configure Icon (![]() ). The Configure IPS dialog box appears.
). The Configure IPS dialog box appears.
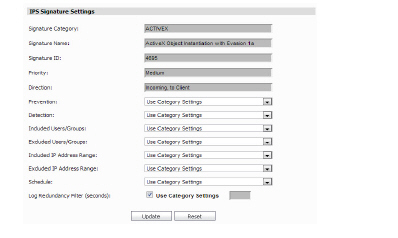
3. Select whether attack detection for this type of attack is enabled, disabled, or uses the default global settings for the attack category from the Prevention list box.
4. Select whether attack prevention for this type of attack is enabled, disabled, or uses the default global settings for the attack category from the Detection list box.
5. Select which users or groups to include for this attack type in the Included Users/Groups list box
6. Select which users or groups to exclude for this attack type in the Excluded Users/Groups list box.
7. Select an IP address range to include for this attack type in the Included IP Address Range list box
8. Select an IP address range to exclude for this attack type in the Excluded IP Address Range list box
9. Select a time range to enforce attack protection on this attack type from the Schedule list box.
10. Enter a timespan (in seconds) to run the Log Redundancy Filter (seconds) field, or select the checkbox to Use Category Settings.
11. When you are finished, click Update. You are returned to the Intrusion Prevention page.
12. Repeat Steps 2 through 16 for each attack to edit.
13. To reset all attacks to their default settings, click Reset ALL IPS Settings and Policies.
Manual Upload of Keyset and Signature Files
GMS now enables you to manually upload signature files in instances when the Internet is not active on your system. This is useful for SonicWALL security appliances that do not have direct Internet connectivity such as those deployed in high-security environments. In these situations, GMS retrieves the new signatures and then uploads them to the SonicWALL security appliance.
To enable manual upload signature files, perform the following steps:
1. Navigate to the Console Panel.
2. Click on the Management menu.
3. Click on the GMS Settings option. The GMS Settings dialog box displays.
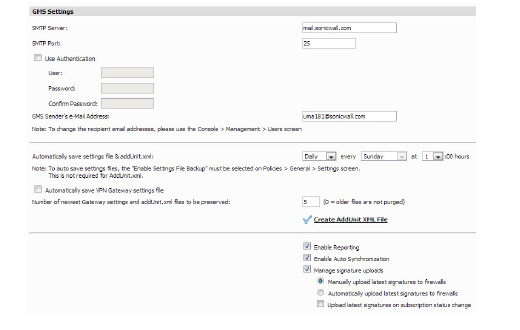
4. Check the Manage Signature Uploads checkbox- This indicates that the SonicWALL appliances managed by GMS cannot directly reach the Internet.
Note Note that keyset files will be uploaded at the time of registering a unit or when there is a change in the user license.
5. In the Policies tab, navigate to the System > Tools page to upload keyset and signature files.
.
6. Click the Upload Signatures Now button.