Policies_Users_GuestAccounts_Snwls
To view statistics on a guest account, move your mouse over the Statistics icon in the line of the guest account. The statistics window will display the cumulative total bytes and packets sent and received for all completed sessions. Currently active sessions will not be added to the statistics until the guest user logs out. To create a guest account, perform the following steps:
1. Expand the Users tree and click on Guest Accounts.

2. Under the list of accounts, click Add Guest.
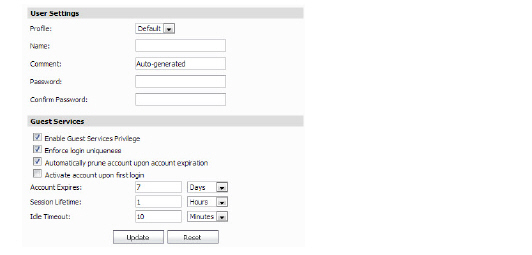
3. Configure the following parameters for the guest account:
– Profile: Select the Guest Profile to generate this account from.
– Name: Enter a name for the account or click Generate. The generated name is the prefix in the profile and a random two or three digit number.
– Comment: Enter a descriptive comment.
– Password: Enter the user account password or click Generate. The generated password is a random string of eight alphabetic characters.
– Confirm Password: If you did not generate the password, re-enter it.
– Enable Guest Services Privilege: Check this for the account to be enabled upon creation.
– Enforce login uniqueness: Check this to allow only one instance of this account to log into the security appliance at one time. Leave it unchecked to allow multiple users to use this account at once.
– Automatically prune account upon account expiration: Check this to have the account removed from the database after its lifetime expires.
– Account Lifetime: This setting defines how long an account remains on the security appliance before the account expires. If Auto-Prune is enabled, the account is deleted when it expires. If the Auto-Prune checkbox is cleared, the account remains in the list of guest accounts with an Expired status, allowing easy reactivation. This setting overrides the account lifetime setting in the profile.
– Session Lifetime: Defines how long a guest login session remains active after it has been activated. By default, activation occurs the first time a guest user logs into an account. Alternatively, activation can occur at the time the account is created by clearing the Activate account upon first login checkbox. The Session Lifetime cannot exceed the value set in the Account Lifetime. This setting overrides the session lifetime setting in the profile.
– Idle Timeout: Defines the maximum period of time when no traffic is passed on an activated guest services session. Exceeding the period defined by this setting expires the session, but the account itself remains active as long as the Account Lifetime hasn't expired. The Idle Timeout cannot exceed the value set in the Session Lifetime. This setting overrides the idle timeout setting in the profile.
4. Click Update.
Configuring Users in SonicOS Standard
The following sections describe how to configure users in SonicOS Standard:
• Configuring an Acceptable Use Policy
• Configuring HTTP URL-Based ULA
• Configuring RADIUS for SonicOS Standard
SonicWALL appliances can be configured to authenticate users through a Remote Authentication Dial-In User Service (RADIUS) server, a local user list, or a combination of both. If authenticated locally or a combination of locally and through RADIUS, SonicWALL appliances can also control user access privileges.
Note In order for changes on this page to take effect, the SonicWALL(s) will automatically be restarted. We recommend configuring these options when network activity is low.
To add a user, perform the following steps:
1. Expand the Users tree and click Settings. The User Settings page displays.

2. Select the authentication method in the User Login Settings section:
– To use RADIUS for all user authentication, select RADIUS from the Authentication method for login pull-down menu.
: •: To only allow users that are configured locally, but to still use RADIUS to authenticate them, select the Allow only users listed below check box.
: •: To grant users the privileges that are configured locally, but to still use RADIUS for authentication, select the Include privileges from users listed locally checkbox.
– To bypass RADIUS and only authenticate using the local user database, select Local Users from the Authentication method for login pull-down menu.
3. To add a user, do the following:
– Enter the user name in the User Name field.
– Select from the following user privileges:
: •: Remote Access—enables the users to access LAN resources from the Internet. This option is only available in Standard mode.
: •: Bypass Filters—enables Bypass Filters if the user can bypass Content Filtering settings.
: •: Access to VPNs—enables the users to send information over the VPN Security Associations.
: •: Access from VPN Client with XAUTH—use if a VPN client is using XAUTH for authentication.
: •: Access Internet Access—enables the users to access the Internet.
: •: L2TP Client—enables the user to connect using an L2TP client.
: •: Wireless Guest Service—enables Wireless Guest Services for this user.
: •: Easy WGS MAC Filtering—enables (and enforces) MAC address filtering for wireless guest service-enabled connections.
: •: Limited Management—allows authorized users limited local management access to the SonicWALL interface. Access is limited to the General page (Status, Network, Time), the Log page (View Log, Log Settings, Log Reports), and the Tools page (Restart, Diagnostics minus Tech Support).
: •: Enter the password in the New Password field and reenter it in the Confirm Password field.
Note Passwords are case-sensitive.
– When you are finished, click Add. Dell SonicWALL GMS creates a task that adds these users for each selected SonicWALL appliance. Repeat this step for each user that you want to add (up to 100 users).
The settings listed below apply to all users when authenticated through the SonicWALL. To configure global user settings, expander the Users tab and click on the Settings tab. The following options are configured in the User Session Settings section:
• Inactivity timeout (minutes): users can be logged out of the SonicWALL after a preconfigured inactivity time. Enter the number of minutes in this field. The default value is 5 minutes.
• Enable login session limit: you can limit the time a user is logged into the SonicWALL by selecting the check box and typing the amount of time, in minutes, in the Login session limit (minutes) field. The default value is 30 minutes.
• Login session timeout: defines how much time a user has to log in before the login page times out. If it times out, a message displays saying they must click before attempting to log in again.
• Show user login status window with logout button: causes a status window to display with a Log Out button during the user’s session. The user can click the Log Out button to log out of their session.
• User's login status window refreshes every: determines how often the users’ status display is updated.
• Enable disconnected user detection: causes the SonicWALL to detect when a user’s connection is no longer valid and end the session.
• User's login status window sends heartbeat every (seconds): sets the frequency of the heartbeat signal used to detect whether the user still has a valid connection
• Allow unauthenticated VPN users to access DNS: allows unauthenticated users access to DNS servers across a VPN tunnel with authentication enforcement.
Configuring an Acceptable Use Policy
The Acceptable Use Policy (AUP) configuration is identical for SonicOS Standard and SonicOS Enhanced. For information on configuring an AUP, refer to the Configuring an Acceptable Use Policy.
This section describes how to configure User Level Authentication (ULA) settings. ULA settings are not available on Enhanced firmware. To configure ULA settings, perform the following steps:
1. Expand the Users tree and click User ULA Settings. The User ULA Settings page displays.
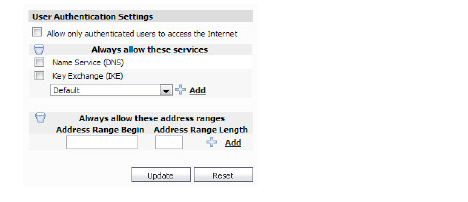
2. To only allow authenticated users to access the Internet, select the Allow only authenticated users to access the Internet check box.
3. To allow unauthenticated users to access a service, select the service in the Always allow these services area and click Add. Repeat this step for each service to add.
4. To specify a range of IP addresses that will always be allowed to access the Internet, enter the IP address in the Begin field and the size of the range in the Length field. Repeat this step for each range to add.
5. When you are finished, click Update. The settings are changed for each selected SonicWALL appliance. To clear all screen settings and start over, click Reset.
Configuring HTTP URL-Based ULA
The HTTP URL-based ULA configuration is identical for SonicOS Standard and SonicOS Enhanced. For information on configuring HTTP URL-based ULA, refer to the Configuring HTTP URL-Based ULA Settings.
Configuring RADIUS for SonicOS Standard
If you selected Use RADIUS for user authentication, you must now configure RADIUS information. To configure RADIUS, perform the following steps.
1. Expand the Users tab and click on RADIUS.
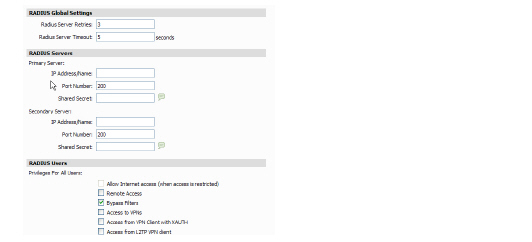
2. Define the number of times the SonicWALL attempts to contact the RADIUS server in the RADIUS Server Retries field. If the RADIUS server does not respond within the specified number of retries, the connection is dropped. This field can range between 0 and 10, however 3 RADIUS server retries is recommended.
3. Define the RADIUS Server Timeout in Seconds. The allowable range is 1-60 seconds with a default value of 5.
RADIUS Servers
1. Specify the following setting for the primary RADIUS server in the Primary Server section:
– Type the IP address of the RADIUS server in the IP Address field.
– Type the Port Number for the RADIUS server.
– Type the RADIUS server administrative password or “shared secret” in the Shared Secret field. The alphanumeric Shared Secret can range from 1 to 31 characters in length. The shared secret is case sensitive.
2. If there is a secondary RADIUS server, type the appropriate information in the Secondary Server section.
RADIUS Users
1. Configure the following privileges for all RADIUS users:
– Allow Internet Access (when access is restricted)—enables the users to access the Internet when Internet access is restricted to authorized users only.
– Bypass Filters—enables Bypass Filters if the user can bypass Content Filtering settings.
– Access to VPNs—enables the users to send information over the VPN Security Associations.
– Access from VPN Client with XAUTH—use if a VPN client is using XAUTH for authentication.
– Access L2TP Client from VPN Client—enables the user to connect using an L2TP client through a secure VPN tunnel.
– Wireless Guest Service—allows access (after RADIUS authentication) for Wireless Guest Services users.
– Easy WGS MAC Filtering—enables (and enforces) MAC address filtering for wireless guest service-enabled connections.
– Limited Management—allows authorized users limited local management access to the SonicWALL interface. Access is limited to the General page (Status, Network, Time), the Log page (View Log, Log Settings, Log Reports), and the Tools page (Restart, Diagnostics minus Tech Support).
– Allow Only Users Listed Locally—Disallows access to RADIUS users, except for those with duplicate local credentials.
RADIUS Client Test
To test your RADIUS Client user name and password, perform the following steps:
1. Navigate to the Diagnostics > Network page.
2. Enter a valid user name in the User field, and the password in the Password field.
3. Click the RADIUS Client Test button.
If the validation is successful, the Status messages changes to Success. If the validation fails, the Status message changes to Failure. Once the SonicWALL has been configured, a VPN Security Association requiring RADIUS authentication prompts incoming VPN clients to type a User Name and Password into a dialogue box.