Policies_Users_RADIUS_Snwls
Configuring RADIUS for SonicOS Enhanced
If you selected Use RADIUS for user authentication or Use RADIUS but also allow locally configured users, you must now configure RADIUS information. To configure RADIUS, perform the following steps.
1. Expand the Users tree and click on RADIUS.
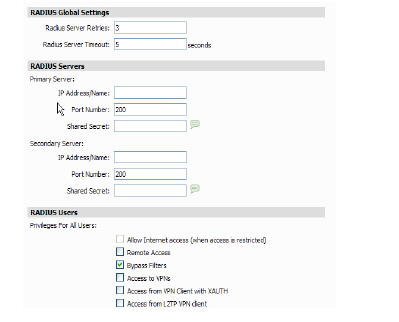
2. Define the number of times the SonicWALL attempts to contact the RADIUS server in the RADIUS Server Retries field. If the RADIUS server does not respond within the specified number of retries, the connection is dropped. This field can range between 0 and 10, however 3 RADIUS server retries is recommended.
3. Define the RADIUS Server Timeout in Seconds. The allowable range is 1-60 seconds with a default value of 5.
RADIUS Servers
1. Specify the following setting for the primary RADIUS server in the Primary Server section:
– Type the IP address of the RADIUS server in the IP Address field.
– Type the Port Number for the RADIUS server.
– Type the RADIUS server administrative password or “shared secret” in the Shared Secret field. The alphanumeric Shared Secret can range from 1 to 31 characters in length. The shared secret is case sensitive.
2. If there is a secondary RADIUS server, type the appropriate information in the Secondary Server section.
RADIUS Users
1. To only allow users that are configured locally, but to still use RADIUS to authenticate them, select the Allow only users listed locally check box.
2. Select the mechanism used for setting user group memberships for RADIUS users from the following list:
– Use SonicWALL vendor-specific attribute on RADIUS server: select to tell the RADIUS server to send vendor-specific attributes back to the SonicWALL appliance.
– Use RADIUS Filter-ID attribute on RADIUS server: select to tell the RADIUS server to send Filter-ID user attributes back to the SonicWALL appliance. Filter-ID attributes include the names of user groups that a user belongs to.
– Enter duplicate RADIUS user names locally on the SonicWALL: select when the RADIUS server contains user names and passwords, but has no user group information. The SonicWALL appliance contains the user group configuration for each user, while RADIUS simply authenticates the password.
3. For a shortcut for managing RADIUS user groups, check Memberships can be set locally by duplicating RADIUS user names. When you create users with the same name locally on the security appliance and manage their group memberships, the memberships in the RADIUS database will automatically change to mirror your local changes.
4. If you have previously configured User Groups on the SonicWALL, select the group from the Default user group to which all RADIUS user belong menu.
5. You can create a new group by choosing Create a new user group... from the list. The Add Group window displays.
RADIUS Client Test
To test your RADIUS Client user name and password, perform the following steps:
1. Navigate to the Diagnostics > Network page.
2. Enter a valid user name in the User field, and the password in the Password field.
3. Click the RADIUS Client Test button.
If the validation is successful, the Status messages changes to Success. If the validation fails, the Status message changes to Failure. Once the SonicWALL has been configured, a VPN Security Association requiring RADIUS authentication prompts incoming VPN clients to type a User Name and Password into a dialogue box.
SonicWALL SSO Agent identifies users by IP address using a SonicWALL ADConnector compatible protocol and automatically determines when a user has logged out to prevent unauthorized access. Based on data from SonicWALL SSO Agent, the SonicWALL security appliance queries LDAP or the local database to determine group membership. Memberships are matched against policy, and based on user privileges, access is granted or denied. The configured inactivity and session limit timers apply with SSO, though users who are logged out are automatically and transparently logged back in when they send further traffic.
To configure SSO settings:
1. On the User > Settings page, if you are using Active Directory for authentication select SonicWALL SSO Agent from the Single sign-on method pull-down list, and then click the Configure button.

2. In the Transparent Authentication Configuration screen, in the Name or IP Address field, enter the host name or IP Address of the workstation on which SonicWALL SSO Agent is installed.
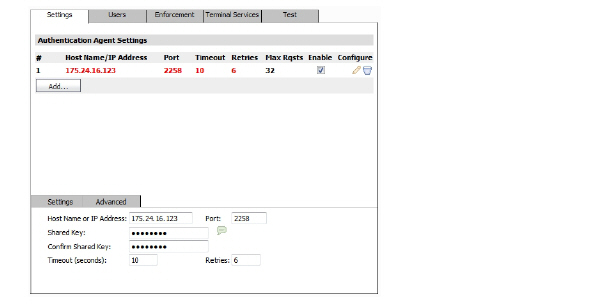
3. In Port Number, enter the port number of the workstation on which SonicWALL SSO Agent is installed. The default port is 2258.
4. In the Shared Key field, enter the shared key that you created or generated in the SonicWALL SSO Agent. The shared key must match exactly. Re-enter the shared key in the Confirm Shared Key field.
5. In the Timeout (seconds) field, enter a number of seconds before the authentication attempt times out.
6. In the Retries field, enter the number of authentication attempts.
7. Click on the Advanced tab inside the Settings tab.
The Maximum requests to send at a time setting is available on the Advanced tab of the SSO agent configuration.
This setting controls the maximum number of requests that can be sent from the appliance to the agent at the same time. The agent processes multiple requests concurrently, spawning a separate thread in the PC to handle each. Sending too many requests at a time can overload the PC on which the agent is running. If the number of requests to send exceeds the maximum, then some are placed on an internal “ring buffer” queue. Requests waiting on the ring buffer for too long could lead to slow response times in SSO authentication.
8. This setting works in conjunction with the automatically calculated number of user requests per message to the agent when polling to check the status of logged in users. The number of user requests per message is calculated based on recent polling response times. SonicOS adjusts this number as high as possible to minimize the number of messages that need to be sent, which reduces the load on the agent and helps reduce network traffic between the appliance and the agent. However, the number is kept low enough to allow the agent to process all of the user requests in the message within the poll period. This avoids potential problems such as timeouts and failures to quickly detect logged out users.
Users Tab
9. Click the Users tab. The User Settings page displays.
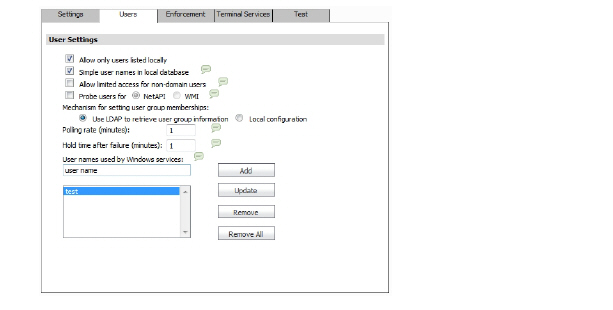
10. Check the box next to Allow only users listed locally to allow only users listed locally to be authenticated.
11. Check the box next to Simple user names in local database to use simple user names. This setting ignores the domain component of a user name. If this box is not checked, user names in the local database must match exactly the full names returned from the agent, including the domain component.
12. Check the box next to Allow limited access for non-domain users to allow limited access to users who are logged in to a computer but not into a domain. These users will not be given access to the Trusted Users user group. They are identified in logs as computer-name/user-name. When performing local authentication and the Simple user names in local database option is disabled, user names must be configured in the local database using the full computer-name/user-name identification.
13. (Available for SonicOS 5.6 and higher.) Select the Probe users for checkbox and select either NetAPI or WMI (depending on which is configured for the SSO Agent) to attempt browser NTLM authentication before the SonicWALL SSO agent attempts to acquire the user information.
This causes the SonicWALL firewall appliance to probe for a response on the NetAPI/WMI port before requesting that the SSO Agent identify a user. If no response occurs, these devices will fail SSO immediately. For a Windows PC the probe will generally work (unless blocked by a personal firewall) and the SonicWALL SSO agent will be used. For a Linux/Mac PC (assuming it is not set up to run Samba server) the probe will fail, the SSO agent will be bypassed and NTLM authentication will be used when HTTP traffic is sent.
NTLM cannot identify the user until they browse with HTTP, so any traffic sent before that will be treated as unidentified. The default CFS policy will be applied, and any rule requiring authenticated users will not let the traffic pass.
If NTLM is configured to be used before the SonicWALL SSO agent, then if HTTP traffic is received first, the user will be authenticated with NTLM. If non-HTTP traffic is received first, the SonicWALL SSO agent will be used for authentication.
14. To use LDAP to retrieve user information, select the Use LDAP to retrieve user group information radio button.
15. To use local configuration, select the Local configuration radio button.
16. In the Polling rate (minutes) field, enter a polling interval, in minutes, that the security appliance will poll the workstation running SSO Agent to verify that users are still logged on.
17. In the Hold time after (minutes) field, enter a time, in minutes, that the security appliance will wait before trying again to identify traffic after an initial failure to do so. This feature rate-limits requests to the agent.
18. (Available for SonicOS 5.6 and higher.) To populate the User names used by Windows services list, type the service login name in the dialog box (the simple name only, without the domain or PC name) add click Add. Repeat as necessary for additional user names, and then click Update.
Note On appliances running SonicOS versions 5.5 and lower, the Enforcement tab is called the Content Filter tab. The configuration is identical, regardless of the name of the tab.
19. Click on the Enforcement tab if you want to bypass SSO for traffic from non-user devices such as internal proxy web servers or IP phones.
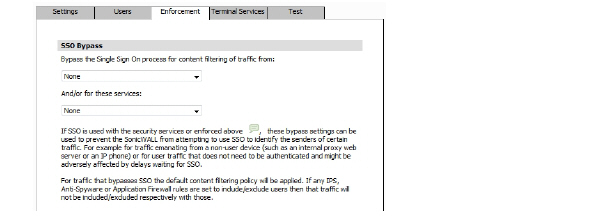
20. (Available in SonicOS releases 5.6 and higher.) To bypass SSO for traffic from certain devices or locations and apply the default content filtering policy to the traffic, select the appropriate address object or address group from the first pull-down menu under SSO Bypass. To bypass SSO for certain services or types of traffic, select the service from the second pull-down menu.
The first setting is used where traffic that would be subject to security services screening can emanate from a device other than a user's workstation (such as an internal proxy Web server or IP phone). It prevents the SonicWALL from attempting to identify such a device as a network user in order to select the content filtering policy to apply. The default content filtering policy will be used for all traffic from the selected IP addresses.
The second setting is appropriate for user traffic that does not need to be authenticated, and triggering SSO might cause an unacceptable delay for the service.
SSO bypass settings do not apply when SSO is triggered by firewall access rules requiring user authentication. To configure this type of SSO bypass, add access rules that do not require user authentication for the affected traffic.
Terminal Services Tab
21. (Available in SonicOS releases 5.6 and higher.) Click on the Terminal Services tab.

22. Click the Add button. The page is updated to display a new row in the table at the top, and new input fields in the lower half of the page.
23. In the Host Name or IP Address(es) field, enter the name or IP address of the terminal server on which SonicWALL TSA is installed. If the terminal server is multi-homed (has multiple IP addresses) and you are identifying the host by IP address rather than DNS name, enter all the IP addresses as a comma-separated list.
As you type in values for the fields, the row at the top is updated in red to highlight the new information.
24. In the Port field, enter the port number of the workstation on which SonicWALL TSA is installed. The default port is 2259. Note that agents at different IP addresses can have the same port number.
Note In global view, a maximum of 256 TSA agents can be configured. On the unit level, the maximum depends on the type of SonicWALL appliance.
25. In the Shared Key field, enter the shared key that you created or generated in the SonicWALL TSA. The shared key must match exactly. Re-enter the shared key in the Confirm Shared Key field.
26. Repeat Steps 22 through 25 to add additional TSA agents.
27. Click the General Settings tab inside the Terminal Services tab.

28. The Allow traffic from services on the terminal server to bypass user authentication in access rules checkbox is selected by default. This allows traffic such as Windows updates or anti-virus updates, which is not associated with any user login session, to pass without authentication. If you clear this checkbox, traffic from services can be blocked if firewall access rules require user authentication. In this case, you can add rules to allow access for “All” to the services traffic destinations, or configure the destinations as HTTP URLs that can bypass user authentication in access rules.
Content Filter Tab
29. Click on the Content Filter tab if you are using the SonicWALL Content Filtering Service (CFS) and there is a proxy server in your network.
Note The Content Filter tab is only displayed for SonicOS releases 5.5 and lower, and if Premium CFS is enabled on the SonicWALL security appliance. For SonicOS releases 5.6 and higher, the Content Filter tab is combined with the Enforcement tab. See Enforcement Tab for more information.
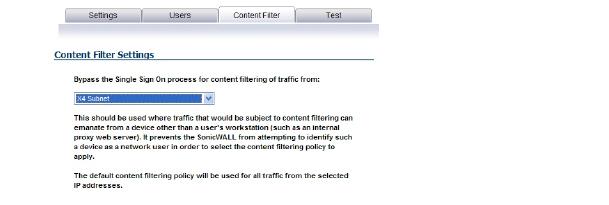
30. To bypass SSO for content filtering traffic and apply the default content filtering policy to the traffic, select the appropriate address object or address group from the pull-down list. This setting should be used where traffic that would be subject to content filtering can emanate from a device other than a user's workstation (such as an internal proxy web server). It prevents the SonicWALL from attempting to identify such a device as a network user in order to select the content filtering policy to apply. The default content filtering policy will be used for all traffic from the selected IP addresses.
Test Tab
31. You can test the Transparent Authentication Configuration settings on the Policies > Diagnostics > Network page. For more information, click the Test tab.
32. When finished, click OK.