Configuring_WWAN_Options
SonicWALL appliances such as the TZ 190, TZ 200, and TZ 210 have a WWAN capability that can be used for the following:
• WAN Failover to a connection that is not dependent on wire or cable.
• Temporary networks where a pre-configured connection may not be available, such as trade-shows and kiosks.
• Mobile networks, where the SonicWALL appliance is based in a vehicle.
• Primary WAN connection where wire-based connections are not available and cellular is.
Wireless WAN support requires a wireless card and a contract with a wireless network provider. See the SonicWALL documentation that comes with the security appliance for more information.
GMS provides for complete management of SonicWALL security appliances that are WWAN/3G-capable, and running SonicOS Enhanced 3.6 and above.
Configuring the Connection Profile
A profile is a list of connection settings that can be used by a SonicWALL appliance.
To configure a connection profile, perform the following steps:
1. In the TreeControl pane, select a group view or a SonicWALL appliance to manage. The appliance must be running SonicOS Enhanced 3.6 or higher, and must support WWAN functionality.
2. Click the Policies tab.
3. In the center pane, navigate to the 3G/Modem > Connection Profiles. The profile configuration page displays. For a group view, the page is slightly different to accommodate both Modem and WWAN settings.
4. Perform the following procedures to configure the Connection Configuration, General Settings, IP Address Settings, Parameters, and Data Usage Limiting sections in the 3G/Modem > Connection Profiles screen. See the following procedures:
– To Configure the Connection Configuration and General settings:.
– To Configure the IP Address Settings:
– To Configure Data Usage Limiting:
5. Click Delete Profile to delete the profile specified in the Profile Name field.
6. Click RESET to clear all fields and start over.
7. Click UPDATE to save the settings to the specified connection profile.
To Configure the Connection Configuration and General settings:
1. To edit an existing profile or use an existing profile as a template, select a profile from the Current Profile pull-down menu.

Note If you are editing an existing profile, the name in the Current Profile field must match the existing profile name. If there are no existing profiles, the Current Profile will display the static message No profiles available.
2. To create a new profile, enter the name of the profile in the Profile Name field.
3. In the Country pull-down list, select the country where the SonicWALL TZ 190 appliance is deployed.
4. In the Service Provider pull-down list, select the service provider that you have a cellular account with. Note that only service providers supported in the country you selected are displayed in the pull-down list.
5. In the Plan Type window, select the WWAN plan you have subscribed to with the service provider, or select Other. If your specific plan type is listed in the pull-down menu, the rest of the fields in the General section are automatically provisioned. Verify that these fields are correct and continue in the Parameters section.
6. Verify that the appropriate Connection Type is selected. Note that this field is automatically provisioned for most service providers.
7. Verify that the Dialed Number is correct. Note that the dialed number is *99# for most service providers.
8. Enter your username and password in the User Name, User Password, and Confirm User Password fields, respectively.
9. Enter the Access Point Name in the APN field. APNs are required only by GPRS devices and will be provided by the service provider.
To Configure the IP Address Settings:
1. Under IP Address Settings, select one of the following IP Address options:
– If the account obtains an IP address dynamically, select Obtain an IP Address Automatically. By default, WWAN connection profiles are configured to obtain IP addresses automatically.
– To specify a static IP address, select Use the following IP Address and type the IP address in the field.
2. Select from the following DNS Server options:
– If the account obtains DNS server information from the ISP, select Obtain an IP Address Automatically. By default, WWAN connection profiles are configured to obtain DNS server addresses automatically.
– If the account uses a specific DNS servers, select Use the following IP Address and type the IP addresses of the primary and secondary DNS servers in the fields.
1. Select from the following Dial Type options:
– If the SonicWALL appliance(s) will continuously use the WWAN to stay connected to the Internet, select Persistent Connection.
– If the SonicWALL appliance(s) will only connect to the Internet when data is being sent, select Dial On Data. To configure the SonicWALL appliance for remotely triggered dial-out, the Dial Type must be Dial on Data. Refer to the Configuring Advanced Settings
– If the SonicWALL appliance(s) will connect to the Internet manually, select Manual Dial.
2. Select the Enable Inactivity Disconnect checkbox and enter the number of minutes of inactivity during which the WWAN connection stays alive before disconnecting from the Internet. Note that this option is not available if the Dial Type is Persistent Connection.
3. Select the Enable Max Connection Time checkbox and enter the number of minutes after which the WWAN connection disconnects, regardless of whether the session is inactive or not. Enter a value in the Delay Before Reconnect to have the SonicWALL appliance automatically reconnect after the specified number of minutes.
4. Select the Dial Retries per Phone Number checkbox and enter a number in the field to specify the number of times the SonicWALL appliance can attempt to reconnect.
5. Select the Delay Between Retries checkbox and enter a number in the field to specify the number of seconds between retry attempts.
6. Select the Disable VPN when Dialed checkbox to disable VPN connections over the WWAN interface.
To Configure Data Usage Limiting:
1. Select the Enable Data Usage Limiting checkbox to have the WWAN interface become automatically disabled when the specified data or time limit has been reached for the month.
Tip If your WWAN account has a monthly data or time limit, it is strongly recommended that you enable Data Usage Limiting.
2. Select the day of the month to start tracking the monthly data or time usage in the Billing Cycle Start Date pull-down menu.
3. Enter a value in the Limit field and select the appropriate limiting factor: either GB, MB, KB, or Minutes.
To configure the WWAN settings for one or more SonicWALL appliances, perform the following steps:
1. In the left pane, select the SonicWALL appliance to manage. The appliance must be running SonicOS Enhanced 3.6 or higher, and must support WWAN functionality.
2. Click the Policies tab.
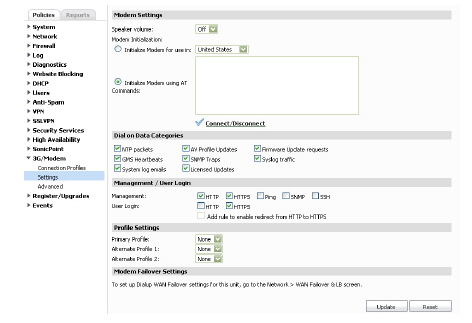
3. In the center pane, navigate to 3G/Modem > Settings.

4. In the Dial on Data Categories section, select the check boxes for any combination of the following dial on data categories:
– NTP packets
– GMS Heartbeats
– System log emails
– AV Profile Updates
– SNMP Traps
– Licensed Updates
– Firmware Update requests
– Syslog traffic
These settings allow you to configure the WWAN interface to automatically connect to the WWAN service provider when the SonicWALL appliance detects specific types of traffic. To configure the SonicWALL appliance for Connect on Data operation, you must select Dial on Data as the Dial Type for the Connection Profile. Refer to the To Configure Parameters:.
5. In the Management/User Login section, select the check boxes for any combination of the following Management methods:
– HTTP
– HTTPS
– Ping
– SNMP
– SSH
6. Select the check boxes for any combination of the following User Login methods:
– HTTP
– HTTPS
– Select Add rule to enable redirect from HTTP to HTTPS to have the SonicWALL automatically convert HTTP requests to HTTPS requests for added security.
7. Under Profile Settings, select a primary profile from the Primary Profile pull-down menu. Optionally, select alternate profiles from Alternate Profile 1 and Alternate Profile 2.
Note: To set up WWAN Interface Monitoring for this unit, go to the Network > WAN Failover & LB screen.
8. To return all fields to their default settings and start over, click RESET.
9. To save settings, click UPDATE.
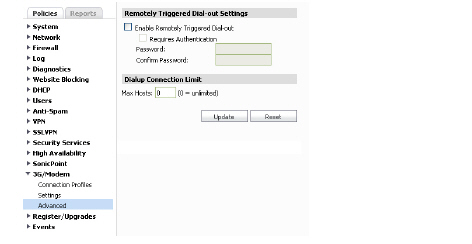
The 3G/Modem > Advanced page is used to configure the Remotely Triggered Dial-Out feature on the SonicWALL appliance. The Remotely Triggered Dial-Out feature enables network administrators to remotely initiate a WWAN connection to a SonicWALL appliance.
Before configuring the Remotely Triggered Dial-Out feature, ensure that your configuration meets the following prerequisites:
• The WWAN profile is configured for dial-on-data.
• The SonicWALL Security Appliance is configured to be managed using HTTPS, so that the device can be accessed remotely.
• It is recommended that you enter a value in the Enable Max Connection Time field. This field is located in the 3G/Modem > Connection Profiles screen in the Parameters section. Refer to the To Configure Parameters: for more information. If you do not enter a value in this field, dial-out calls will remain connected indefinitely, and you will have to manually terminate sessions by clicking the Disconnect button.
To configure advanced WWAN settings, perform the following steps:
1. In the left pane, select the SonicWALL appliance to manage. The appliance must be running SonicOS Enhanced 3.6 or higher, and must support WWAN functionality.
2. Click the Policies tab.
3. In the center pane, navigate to 3G/Modem > Advanced.

4. To enable remotely triggered dial-out, check the Enable Remotely Triggered Dial-out box.
5. If your remotely triggered dial-out requires authentication, check the Requires Authentication box and enter your password in the Password and Confirm Password fields.
6. Under WWAN Connection Limit, type the number of simultaneous connections that are allowed, or enter zero for no limit in the Max Hosts field.
7. To return all fields to their default settings and start over, click RESET.
8. When you are finished, click UPDATE.