Policies_Wireless_IDS_Snwls
Configuring Intrusion Detection Settings
The Intrusion Detection System (IDS) greatly increase the security capabilities of the SonicWALL security appliance by enabling it to recognize and even take countermeasures against the most common types of illicit wireless activity. IDS consists of three types of services, namely, Sequence Number Analysis, Association Flood Detection, and Rogue Access Point Detection.
This section describes how to configure group level and unit level intrusion detection settings (IDS) for wireless SonicWALL appliances.
Viewing the Wireless > IDS page
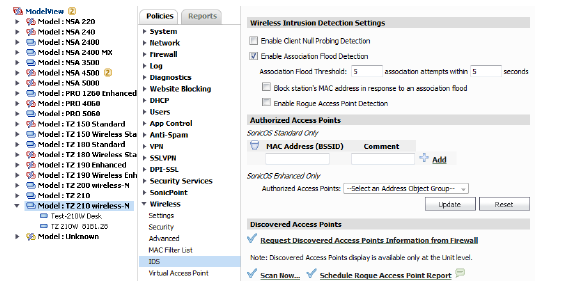
The Wireless > IDS page can be viewed at a group or unit level, depending on the model or appliance selected in the left navigational management interface.
Group Level View
This view does not display the detected wireless access points, but offers a link to schedule a Rouge Access Point report. To access the group level view, select a group of appliances from the list.
Unit Level View
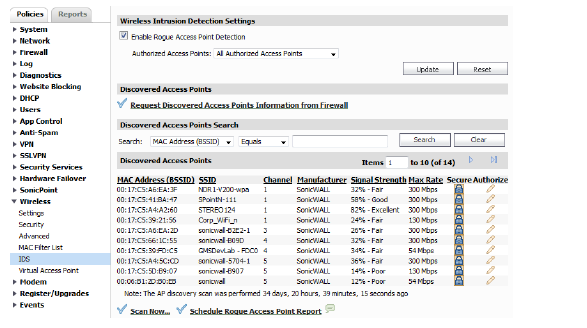
This view displays all the wireless access points detected by the SonicWALL security appliance and information about each discovered access point. To access the unit level view, select an appliance from the Model View list.
Configuring Wireless Intrusion Detection System Settings
To configure the Wireless > IDS settings, preform the following steps:
At Group level
1. Navigate to the Wireless > IDS page.
2. Select an appliance Group from the Model View list.

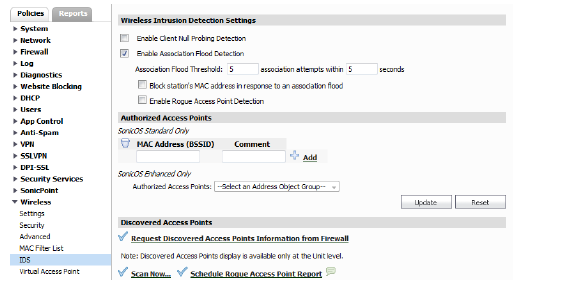
3. Select Enable Client Null Probing Detection to enable client null probe detection.
4. Select the Enable Association Flood Detection checkbox.
Hackers can cause a Denial-of-Service (DoS) attack by flooding a wireless network with association requests. The Enable Association Flood Detection option combats this.
a. The default association flood threshold is 10 association attempts within 5 seconds. To change this setting, enter new flood threshold values.
b. To block the MAC address of a computer or device attempting this attack, select the Block station's MAC address in response to an association flood field.
At Unit level
1. Navigate to the Wireless > IDS page.
2. Select a Unit from the Model View list.

To access a network, hackers can set up a rogue access point that will intercept communications with legitimate users attempting to access a legitimate access point. This “man-in-the-middle” attack can expose passwords and other network resources.
3. To enable detection of Rogue Access Points, select the checkbox for Enable Rogue Access Point Detection.
4. Click the Authorized Access Points pull-down and select a access point from the list.
5. Click the Update button. To put the IDS settings back to default, click the Reset button.
Note: IDS logging and notification can be enabled under Log > Enhanced Log Settings by selecting the WLAN IDS checkboxes under the Categories section.
In the Group level view, you can specify authorized access points for SonicOS Standard and Enhanced. Preform the following steps to enter authorized access points:
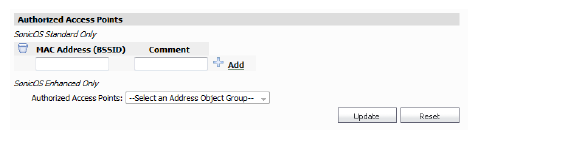
SonicOS Standard
In SonicOS Standard only, to prevent rogue access points, you must specify each authorized access point within the network.
1. Enter the MAC address of an access point in the MAC Address (BSSID) field.
2. Enter a comment about the access point.
3. Click the Add button.
The Modify Task Description and Schedule pop-up window displays.
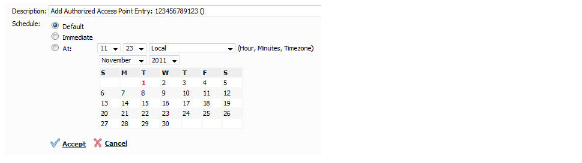
4. Enter a Description.
5. Select a Schedule:
• Default
• Immediate
• At: (select a custom date and time)
6. Click the Update button. To clear all screen settings and start over, click Reset.
SonicOS Enhanced
For SonicOS Enhanced only, to authorize access points:
1. Select one of the options from the Authorized Access Points pull-down list.
2. Click the Update button. To clear all screen settings and start over, click Reset.
You can have many wireless access points within reach of the signal of the wireless appliance on your network. The Wireless > IDS page reports on all access points the SonicWALL security appliance can find by scanning the 802.11a, 802.11g, and 802.11n radio bands. This section details the steps to configure your Discovered Access Point settings.
Note Wireless Discovered Access Points is supported on SonicOS Enhanced 5.6 or higher firmware.
Requesting Discovered Access Points
You can use a wireless appliance to discover information about access points.
1. Navigate to the Wireless > IDS page.
2. Click the link for Request Discovered Access Points Information from Firewall.
The Modify Task Description and Schedule pop-up window displays.
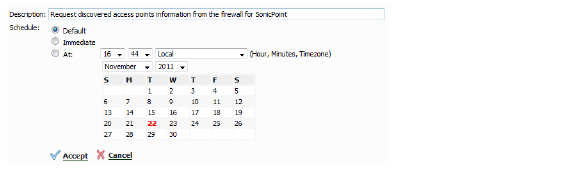
3. Enter a Description.
4. Select a Schedule:
• Default
• Immediate
• At: (select a custom date and time)
5. Click the Accept button.
The discovered access points populate in the Discovered Access Points list.
Searching for Discovered Access Points
The Wireless > IDS page offers a search feature to filter the list of discovered access points. Preform the following steps to search for a discovered access point.
Note The search feature is only available at unit level.
1. Navigate to the Wireless > IDS page.
2. In the Discovered Access Points Search panel, do the following:

a. Click the Search pull-down lists.
b. Select MAC Address (BSSID), SSID, or Manufacture.
c. Select Equals, Starts With, Ends With, or Contains.
d. Enter a value in the text-box.
e. Click the Search button.
Scanning Access Points
Active scanning occurs when the security appliance starts up, and at any time Scan Now is clicked on the Wireless > IDS page. When the security appliance performs a scan, a temporary interruption of wireless clients occurs for no more than a few seconds. This interruption manifests itself as follows:
• Non-persistent, stateless protocols (such as HTTP) should not exhibit any ill-effects.
• Persistent connections (protocols such as FTP) are impaired or severed.
• WiFiSec connections should automatically re-establish and resume with no noticeable interruption to the client.
WARNING If service disruption is a concern, it is recommended that the Scan Now feature not be used while the SonicWALL security appliance is in Access Point mode until such a time that no clients are active, or the potential for disruption becomes acceptable.
Scanning for Access Points
1. Navigate to the Wireless > IDS page.
2. Click the Scan Now... button.
A warning message displays.

3. Click the OK button.
The Modify Task Description and Schedule pop-up window displays.

4. Enter a Description.
5. Select a Schedule:
• Default
• Immediate
• At: (select a custom date and time)
6. Click the Accept button.
Viewing the Discovered Access Points List
The Discovered Access points displays information on every access point that is detected by the Wireless radio:
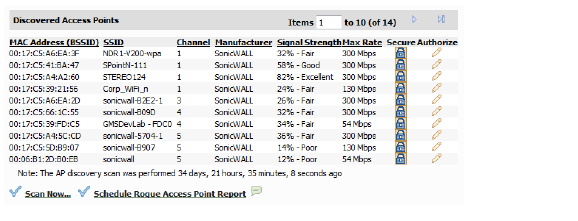
Table 12 Discovered Access Points
|
Authorizing Access Points on Your Network
Access Points detected by the security appliance are regarded as rogues until they are identified to the security appliance as authorized for operation. Preform the following steps to authorize an access point:
1. In the Discovered Access Points list, locate the desired Rogue Access Point and click the Edit icon in the Authorize column.

The Edit pop-up window displays.
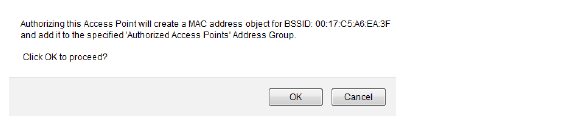
2. Click OK.
Note To unauthorize an access point, remove it from the “Address Object Group of Authorized Access Points”.