The panel object is now preceded by a
Console_Management_Users_Snwls
To operate in complex environments, Dell SonicWALL GMS is designed to support multiple users, each with his or her own set of permissions and access rights. This section contains the following subsections:
• Configuring Appliance Access
• Configuring Action Permissions
Note If you do not want to restrict access to SonicWALL appliances or Dell SonicWALL GMS functions, but want to divide Dell SonicWALL GMS responsibility among multiple users, use views to provide specific criteria to display groups of SonicWALL appliances. Depending on the type of task they are trying to perform, users can switch between these views as often as necessary. For more information, refer to the Configuring Action Permissions.
Note All of the user configuration options are available through the command-line interface. For more information, refer to the Global Management System Command-Line Interface Guide.
A user group (or user type) is a group of Dell SonicWALL GMS users who perform similar tasks and have similar permissions.
Dell SonicWALL GMS provides three pre-configured groups:
• Administrators—Full view and update privileges.
• Operators—View privileges only.
• End Users—No privileges.
• Guest Users—No privileges.
To create a new group, perform the following steps:
1. Click the Console tab, expand the Management tree and click Users. The General Page of the User screen displays.
2. In the middle pane, right-click All Users and select Add User Types from the pop-up menu. A new user group dialog box displays.
3. In the dialog box, enter the name of the new user type and then click OK. The new user type is added to the list under All Users.
4. In the right pane, enter any comments regarding the new user group in the Comments field.
5. Select a default view for the new user group from the Default View pull-down menu. This view will be displayed for members of the user group when they first log in to Dell SonicWALL GMS.
6. To force all users in the user group to change their passwords, select the Change Password checkbox.
7. To delete the user type when it becomes inactive, select the Delete Inactive checkbox.
8. To set a date when the user type will become inactive, click in the Active Until field and then select a date from the popup calendar.
9. To keep the user type active at all times without an end date, select the Always Active checkbox.
10. Select the schedule for when the user group is active from the pull-down list in the Schedule field.
11. Click Update. The new user group is added. By default, the new group has no privileges. To configure screen access settings, refer to the Moving a User.
This section describes how to create a new user. Although the user will inherit all group settings, individual user settings will override the group settings.
To add a new user, perform the following steps:
1. Click the Console tab, expand the Management tree and click Users. The General Page of the User configuration screen displays.
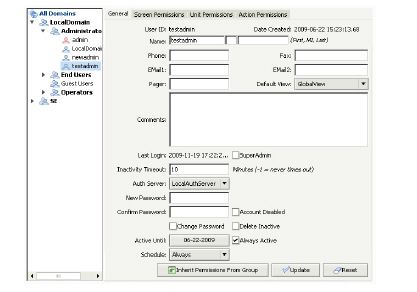
2. Right-click a user group and select Add User from the pop-up menu. The Add User window displays.
3. In the dialog box, enter a username and a password and click OK. In the main window, the new user displays beneath the group to which it is assigned.
Note The username and password are case-sensitive. Do not enter the single quote character (‘) in the User ID field.
4. Select the new user.
5. Enter the full name of the user in the Name field.
6. Enter contact information for the user in the Phone, Fax, Pager, and Email fields.
7. Select the default view for the user from the Default View list box.
8. Enter any comments regarding the new user in the Comments field.
9. Check the SuperAdmin checkbox to enable privileges for this user across all domains.
Note By default, permissions for users exist only within the domain to which they belong. By checking the SuperAdmin option, permissions are extended across all domains.
10. Enter the number of minutes that the user can be inactive on his computer before the session times out in the Inactivity Timeout field. Enter -1 to never time out.
11. To change the password for the user, type in the password in the New Password field, and then type it again in Confirm Password.
12. To disable the user without deleting the entire entry, select the Account Disabled checkbox.
13. To force the user to change his password, select the Change Password checkbox.
14. To delete the user when the account becomes inactive, select the Delete Inactive checkbox.
15. To set a date when the user will become inactive, click in the Active Until field and select a date from the popup calendar.
16. To keep the user active without an end date, select the Always Active checkbox. If this is selected, the date in the Active Until field is ignored.
17. Select a schedule when the user is active from the pull-down list in the Schedule field.
18. Do one of the following:
– Click Inherit Permissions from Group. The user will inherit the permissions from the group that you right-clicked to begin this procedure.
– Click Update. The new user is added. You will need to configure the user’s permissions. See “Moving a User,” below and Configuring Appliance Access.
– Click Reset to change all fields in this screen to their default values and start over.
Note To temporarily disable a user account, select the Account Disabled check box and click Update.
When new users log in to SonicWALL GMS for the first time, they will be considered guest users and will only have limited access. One way to configure user privileges is to more the user to the appropriate group.
To change a SonicWALL GMS user’s group:
1. Have the user login to GMS.
The user will be logged in as a guest user with limited privileges.
An administrator can now upgrade the account to a separate user class.
2. Login as the remote domain’s administrator.
3. Navigate to the Console tab.
4. Navigate to the Management > Users page.
You’ll see that there are currently four different categories of users: Administrators, End Users, Guest Users, and Operators. These categories can be further opened to list the users that comprise them.

5. Select the new user from the Guest Users list.
6. Right-click the new user’s name in the Guest Users list and select Move User from the pull down menu.
7. In the Move User dialog box, select the appropriate new level for the new user, and select Inherit permissions defined from the new user type permission.
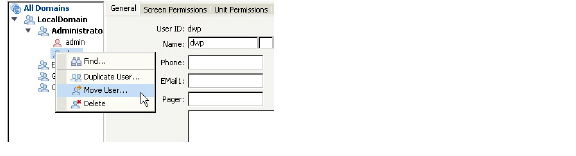
8. Click OK.
The Screen Permissions page contains a hierarchical list of all screens that appear within Dell SonicWALL GMS. From this screen, you can control access to individual screens or all screens within a section. This includes permissions for users or groups to view, or view and update reports.
Note By default, a new user group has no privileges.
To configure screen access settings for a user or user group, perform the following steps:
1. Navigate to Console > Management and open the Users configuration screen.
2. Select a user or user group under All Users.
3. Click the Screen Permissions tab.
4. Under All Screens, select a panel, section, or screen. For example, for REPORTS_PANEL, you can select the whole panel, the unit type section such as Firewall, SRA, CDP, or Email Security, the group of reports for that type of unit, or the individual report or screen that you want to set permissions for. In this example, we chose the Firewall > Bandwidth panel.
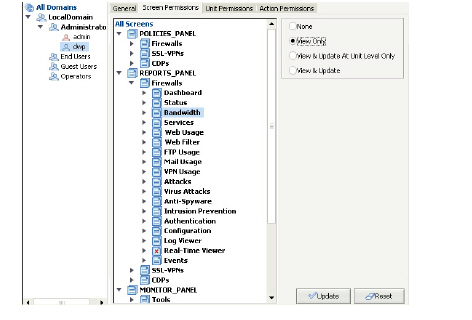
5. On the right side of the pane, select from the following:
– To prevent any access to the object, select None.
– To allow view only access, select View Only.
– To allow the user or group to make updates only for unit-level screens and not for group-level screens, select View & Update At Unit Level Only. This option is only available for objects in the Policies Panel and Reports Panel.
– To allow unrestricted access to the object, select View and Update.
For this example, we select the View Only option to allow our executive team to view the firewall bandwidth panel.

6. Click the Update button to apply the permission changes.
7. You may see a warning screen if you are applying permission changes to a group, verify that you wish to apply these changes to the group and all users within that group and click the OK button.
The panel object is now preceded by a ![]() .
.
Note The more specific settings override the more general settings. For example, if you select View Only for the Status group of reports and select None for the Up-Time over Time report, then the selected user will only see the Up-Time Summary report in the Status reports and have View Only permission for that report.
8. To clear all screen settings and start over, click Reset.
9. When finished, click Update.
The Appliance Permissions page contains a hierarchical list of all SonicWALL appliances that appear within Dell SonicWALL GMS. From this screen, you can control access to SonicWALL groups or individual SonicWALL appliances.
To configure appliance access settings for a user, perform the following steps:
1. Open the Users configuration screen.
2. Select a user.
3. Click the Unit Permissions tab.
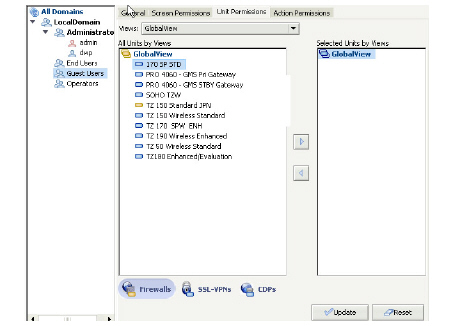
4. Select a View from the Views pull-down menu.
5. To provide the user with access to a SonicWALL group or appliance, select a SonicWALL group or appliance in the left pane of the window and click Add. The group or appliance displays in the right pane.
6. Repeat Step 5 for each group or appliance to add.
7. To prevent the user from accessing a SonicWALL group or appliance, select the group or appliance in the right pane of the window and click Remove. The group or appliance is deleted from the right pane.
8. Repeat Step 7 for each group or appliance to remove.
Configuring Action Permissions
The Action Permissions tab contains a list of action and view options that can be enabled/disabled for a group or user.
To configure the action permissions, perform the following steps:
1. Navigate to the Console > Management > Users page.
2. Select the user or group.
3. Click the Action Permissions tab.

4. Select the unit actions you wish to be available for the group or user in the Units section.
|
5. Select the view options you wish to be available for the group or user in the Views section:
|
6. Select the SonicToday options for the group or user.
|
7. Select any remaining options for the group or user in the Others section:
|
8. Click the Update button.