Appliance_Deployment_Role
The role that you assign to your Dell SonicWALL GMS instance defines the Dell SonicWALL Universal Management Suite services that it will provide. Dell SonicWALL GMS uses these services to perform management, monitoring, and reporting tasks.
Your Dell SonicWALL GMS instance can be deployed in any of the following roles:
• All In One
• Database Only
• Console
• Agent
• Reports Summarizer
• Monitor
• Event
• Syslog Collector
• Flow Server
• All in One-Flow Server (Demo Mode Only
In the UMH or UMA system management interface, clicking Details in the same row as a role provides a list of the services that run on a system in that role, and information about using the role.
As the number of managed appliances increases, a more distributed deployment provides better performance. To manage large numbers of SonicWALL appliances, you can use several SonicWALL GMS appliances operating in different roles in a distributed deployment. You can also use Windows Server machines running SonicWALL GMS in any of the roles.
You can include the MySQL database installation with any role. The All In One or Database Only roles automatically include the MySQL database.
If you are configuring a role that includes a Console, such as the Console or All In One role, the system can be configured as a redundant Console. The Include Redundancy checkbox is used to configure the GMS deployment to have a redundant Console.
You can scale your deployment to handle more units and more reporting by adding more systems in the Agent role. Agents provide built-in redundancy capability, meaning that if an Agent goes down, other Agents can perform the configuration tasks and other tasks of the Agent that went down.
Note: When configuring the role for the first appliance in a distributed deployment, you should either include the database or be prepared to provide the IP address of an existing database server.
You can meet this database objective in one of the following ways:
• By selecting a role that includes the database automatically, such as All In One or Database Only
• By selecting the Include Database (MYSQL) checkbox if configuring the appliance with any other role
• By setting up a compatible database on another machine and providing that IP address when prompted
You can configure the role of the SonicWALL UMA EM5000 appliance without using the Role Configuration Tool.
All role configuration is performed in the appliance management interface, available at the URL: http://<IP address>:<port>/appliance/
Refer to the following sections for instructions on manually configuring the system role:
• Configuring the All In One Role
• Configuring the Database Only Role
• Configuring the Console Role
• Configuring the Reports Summarizer Role
• Configuring the Monitor Role
• Configuring the Syslog Collector Role
• Configuring the Flow Server Role
• Configuring the All in One-Flow Server (Demo Mode Only).
Configuring the All In One Role
All In One deployments are ideal for managing a small number of SonicWALL appliances or for test environments.
Note SonicWALL recommends that you use a multi-system distributed deployment in production environments, with the database on a dedicated server and the other services on one or more systems. When only one other system is deployed, the Console role should be assigned to it.
The All In One role provides all services utilized by SonicWALL GMS:
• Syslog Collector
• Reports Scheduler
• Update Manager
• Reports Summarizer
• SNMP Manager
• Scheduler
• Monitoring Manager
• Web Server
• Database
• Flow Server
The All In One role allows Gateway configurations for the following:
• None— No gateway is specified.
If you do not wish to configure a gateway, perform the following:
a. Click the None radio button.

b. Select the HTTP or HTTPS radio button for the MSM Server Protocol.
c. Click the MSM Server Port text-field, then enter the MSM Server port number.
d. Click the Syslog Server Port text-field, then enter the Syslog Server port number.
e. To apply your changes, click Update. To change the settings on this page back to the defaults, click Reset.
• NAT Device— Use this option when a NAT device is configured as the gateway. The GMS appliance does not have to login to the unit for any reason and all NAT configurations are taken care of by the network Administrator directly through the device’s management interface. To configure the NAT device, perform the following:
a. Select the NAT Device radio button.

b. Click the NAT Device IP text-field, then enter the NAT Device IP address.
c. Click the NAT Device Syslog Port text-field, then enter the NAT Device Syslog port number. This is the Syslog port used for Syslogs sent from the managed units.
d. Select the HTTP or HTTPS radio button for the MSM Server Protocol.
e. Click the MSM Server Port text-field, then enter the MSM Server port number.
f.: Click the Syslog Server Port text-field, then enter the Syslog Server port number.
g. To apply your changes, click Update. To change the settings on this page back to the defaults, click Reset.
• GMS Gateway— Use this option when a SonicWALL device is acting as a Gateway. Using a SonicWALL appliance is recommended, but can be setup as a NAT Device if all units are managed using SSL. To configure the GMS Gateway, perform the following:
a. Click the GMS Gateway radio button.

b. If the SonicWALL GMS will connect to managed appliances through a GMS gateway, click the GMS Gateway IP text-field, then enter the internal IP address of the device.
If you change the GMS gateway IP address or password, you must also change the settings on this page. To determine if a GMS Gateway is required, see the SonicWALL Getting Started Guide for your product
c. Click the GMS Gateway Port text-field, then enter the management port used to sign into the device.
d. Click the GMS Gateway User text-field, then enter the username used to sign into the device.
e. Click the GMS Gateway Password text-field, then enter the password used to sign into the device.
f.: Confirm the GMS Gateway Password you entered.
g. Click the GMS Gateway Syslog Port text-field, then enter the Syslog port used for syslogs sent from the managed units.
h. Select the HTTP or HTTPS radio button for the MSM Server Protocol.
i.: Click the MSM Server Port text-field, then enter the MSM Server port number.
j.: Click the Syslog Server Port text-field, then enter the Syslog Server port number.
k. To apply your changes, click Update. To change the settings on this page back to the defaults, click Reset.
Configuring the Database Only Role
The Database Only role is used in a multi-server SonicWALL GMS deployment. In this role, the server is configured to run only the database service. SonicWALL recommends that one of the servers in a multi-server GMS deployment is assigned a Database Only role.

Only the SonicWALL Universal Management Suite Database service runs on a Database Only system.
The MySQL database engine is pre-installed along with the SonicWALL GMS installation. SonicWALL GMS can also use a MySQL database or a Microsoft SQL Server database installed on a server. Only the MySQL database included in the installer is supported. On the Deployment > Role page in the SonicWALL GMS appliance management interface, you can configure your SonicWALL GMS systems to use either a MySQL or a SQL Server database.
To deploy your SonicWALL GMS in the Database Only role, perform the steps described in the Configuring Database Settings section, on page 885.
The Console role is used in a multi-server, distributed SonicWALL GMS deployment. In this role, the SonicWALL GMS installation will run all SonicWALL Universal Management Suite services except for the Database service. In this scenario, the Database role is assigned to a separate appliance or server.
In the Console role, the SonicWALL GMS behaves as an Agent, and also provides the following functions:
• Provides Web user interface for the SonicWALL GMS application
• Emails Scheduled Reports
• Performs Event Management tasks
• Performs various periodic checks, such as checking for new appliances that can be managed, checking for new firmware versions of managed appliances, and similar functions
The Console role allows Gateway configurations for the following:
• None— No gateway is specified.
If you do not wish to configure a gateway, perform the following:
a. Click the None radio button.

b. Select the HTTP or HTTPS radio button for the MSM Server Protocol.
c. Click the MSM Server Port text-field, then enter the MSM Server port number.
d. Click the Syslog Server Port text-field, then enter the Syslog Server port number.
e. To apply your changes, click Update. To change the settings on this page back to the defaults, click Reset.
• NAT Device— Use this option when a NAT device is configured as the gateway. The GMS appliance does not have to login to the unit for any reason and all NAT configurations are taken care of by the network Administrator directly through the device’s management interface. To configure the NAT device, perform the following:
a. Select the NAT Device radio button.

b. Click the NAT Device IP text-field, then enter the NAT Device IP address.
c. Click the NAT Device Syslog Port text-field, then enter the NAT Device Syslog port number. This is the Syslog port used for Syslogs sent from the managed units.
d. Select the HTTP or HTTPS radio button for the MSM Server Protocol.
e. Click the MSM Server Port text-field, then enter the MSM Server port number.
f.: Click the Syslog Server Port text-field, then enter the Syslog Server port number.
g. To apply your changes, click Update. To change the settings on this page back to the defaults, click Reset.
• GMS Gateway— Use this option when a SonicWALL device is acting as a Gateway. Using a SonicWALL appliance is recommended, but can be setup as a NAT Device if all units are managed using SSL. To configure the GMS Gateway, perform the following:
a. Click the GMS Gateway radio button.
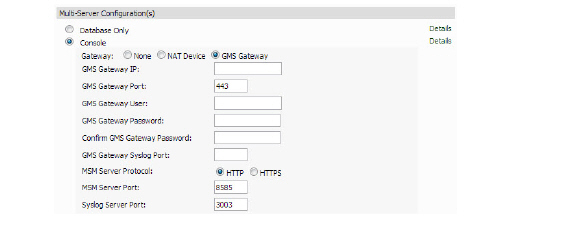
b. If the SonicWALL GMS will connect to managed appliances through a GMS gateway, click the GMS Gateway IP text-field, then enter the internal IP address of the device.
If you change the GMS gateway IP address or password, you must also change the settings on this page. To determine if a GMS Gateway is required, see the SonicWALL Getting Started Guide for your product
c. Click the GMS Gateway Port text-field, then enter the management port used to sign into the device.
d. Click the GMS Gateway User text-field, then enter the username used to sign into the device.
e. Click the GMS Gateway Password text-field, then enter the password used to sign into the device.
f.: Confirm the GMS Gateway Password you entered.
g. Click the GMS Gateway Syslog Port text-field, then enter the Syslog port used for syslogs sent from the managed units.
h. Select the HTTP or HTTPS radio button for the MSM Server Protocol.
i.: Click the MSM Server Port text-field, then enter the MSM Server port number.
j.: Click the Syslog Server Port text-field, then enter the Syslog Server port number.
k. To apply your changes, click Update. To change the settings on this page back to the defaults, click Reset.
The Agent role can be used in a distributed deployment of SonicWALL GMS. The primary functions of this role include the following:
• Manages units by acquiring them, pushing configuration tasks to the units and tracking their up/down status
• Performs monitoring based on ICMP probes, TCP probes, and SNMP OID retrievals
• Collects and stores syslog messages
• Performs report summarization
The following SonicWALL Universal Management Suite services run on an Agent system:
• Syslog Collector
• Reports Summarizer
• SNMP Manager
• Scheduler
• Monitoring Manager
The Agent role allows Gateway configurations for the following:
• None— No gateway is specified. The agent is facing the unit directly without any device between them
If you do not wish to configure a gateway, perform the following:
a. Click the None radio button.

b. Select the HTTP or HTTPS radio button for the MSM Server Protocol.
c. Click the MSM Server Port text-field, then enter the MSM Server port number.
d. Click the Syslog Server Port text-field, then enter the Syslog Server port number.
e. To apply your changes, click Update. To change the settings on this page back to the defaults, click Reset.
• NAT Device— Use this option when a NAT device is configured as the gateway. The GMS appliance does not have to login to the unit for any reason and all NAT configurations are taken care of by the network Administrator directly through the device’s management interface. To configure the NAT device, perform the following:
a. Select the NAT Device radio button.

b. Click the NAT Device IP text-field, then enter the NAT Device IP address.
c. Click the NAT Device Syslog Port text-field, then enter the NAT Device Syslog port number. This is the Syslog port used for Syslogs sent from the managed units.
d. Select the HTTP or HTTPS radio button for the MSM Server Protocol.
e. Click the MSM Server Port text-field, then enter the MSM Server port number.
f.: Click the Syslog Server Port text-field, then enter the Syslog Server port number.
g. To apply your changes, click Update. To change the settings on this page back to the defaults, click Reset.
• GMS Gateway— Use this option when a SonicWALL device is acting as a Gateway. The GMS appliance needs to be able to login to the unit and pull additional information such the WAN IP of the device. This type of device is typically used when Units managed by the Agent are either on the management tunnel or an existing tunnel. In the case of SSL, a GMS gateway is really not necessary. Using a SonicWALL is recommended, but can be setup as a NAT Device if all units are managed using SSL. To configure the GMS Gateway, perform the following:
a. Click the GMS Gateway radio button.

b. If this SonicWALL GMS will connect to managed appliances through a GMS gateway, click the GMS Gateway IP text-field, then enter the internal IP address of the device.
If you change the GMS gateway IP address or password, you must also change the settings on this page. To determine if a GMS Gateway is required, see the SonicWALL Getting Started Guide for your product
c. Click the GMS Gateway Port text-field, then enter the management port used to sign into the device.
d. Click the GMS Gateway User text-field, then enter the username used to sign into the device.
e. Click the GMS Gateway Password text-field, then enter the password used to sign into the device.
f.: Confirm the GMS Gateway Password you entered.
g. Click the GMS Gateway Syslog Port text-field, then enter the Syslog port used for syslogs sent from the managed units.
h. Select the HTTP or HTTPS radio button for the MSM Server Protocol.
i.: Click the MSM Server Port text-field, then enter the MSM Server port number.
j.: Click the Syslog Server Port text-field, then enter the Syslog Server port number.
k. To apply your changes, click Update. To change the settings on this page back to the defaults, click Reset.
Configuring the Reports Summarizer Role
The Reports Summarizer role is used to dedicate a server for performing only summarization of reports in a multi-server GMS deployment. Syslogs collected by the Syslog Collector service are consumed by the Reports Summarizer service to create generate reports. In such a deployment, it is essential that the Syslog Collectors running on various GMS Servers write syslogs to folders that are accessible by Reports Summarizer systems.
The following services run on a Summarizer system:
• SonicWALL Universal Management Suite - Reports Summarizer
• SonicWALL Universal Management Suite - Web Service Server
To deploy your SonicWALL GMS in the Reports Summarizer role, perform the following steps in the appliance management interface:
1. Navigate to the Deployment > Role page. Under Host Role Configuration, select the Reports Summarizer radio button.

2. To include the MySQL database on this system, select the Include Database (MYSQL) checkbox. To use a MySQL or Microsoft SQL Server database on another system, do not select this checkbox.
3. Configure the database settings as described in the Configuring Database Settings section, on page 885.
4. Configure the Web port settings as described in the Configuring Server Settings section, on page 887.
5. To apply your changes, click Update.
To change the settings on this page back to the defaults, click Reset.
The Monitor role is used to dedicate the SonicWALL GMS installation to monitoring appliances and applications in a multi-server SonicWALL GMS deployment. The monitoring is based on ICMP probes, TCP probes, and SNMP OID retrievals.
Only the SonicWALL Universal Management Suite Monitoring Manager service runs on a Monitor system.
To deploy your SonicWALL GMS in the Monitor role, perform the following steps in the appliance management interface:
1. Navigate to the Deployment > Role page. Under Host Role Configuration, select the Monitor radio button.

2. To include the MySQL database on this system, select the Include Database (MYSQL) checkbox. To use a MySQL or Microsoft SQL Server database on another system, do not select this checkbox.
3. Configure the database settings as described in the Configuring Database Settings section, on page 885.
4. Configure the Web port settings as described in the Configuring Server Settings section, on page 887.
5. To apply your changes, click Update.
To change the settings on this page back to the defaults, click Reset.
The Event, or Event Management, role of a GMS Server is used to dedicate a server for performing only event based alerting of appliances and applications in a multi-server SonicWALL GMS deployment.
The following services run on an Event Management system:
• SonicWALL Universal Management Suite - Event Manager
• SonicWALL Universal Management Suite - Web Service Server
To deploy your SonicWALL GMS in the Event role, perform the following steps in the appliance management interface:
1. Navigate to the Deployment > Role page. Under Host Role Configuration, select the Event radio button.

2. To include the MySQL database on this system, select the Include Database (MYSQL) checkbox. To use a MySQL or Microsoft SQL Server database on another system, do not select this checkbox.
3. Configure the database settings as described in the Configuring Database Settings section, on page 885.
4. Configure the Web port settings as described in the Configuring Server Settings section, on page 887.
5. To apply your changes, click Update.
To change the settings on this page back to the defaults, click Reset.
Configuring the Syslog Collector Role
The Syslog Collector role can be assigned to a SonicWALL GMS installation in a multi-server deployment of SonicWALL GMS. In this role, the SonicWALL GMS installation is dedicated to collecting syslog messages on the configured port (by default, port 514). The syslog messages are stored in the SonicWALL GMS file system.
The syslog messages are used by the Reports Summarizer service running on another SonicWALL GMS server or SonicWALL GMS in the distributed deployment. The folder where the Syslog Collector service stores the syslog messages must be accessible by the server running the Reports Summarizer service.
Only the SonicWALL Universal Management Suite Syslog Collector service runs on a Syslog Collector system.
To deploy your SonicWALL GMS in the Syslog Collector role, perform the following steps in the appliance management interface:
1. Navigate to the Deployment > Role page. Under Host Role Configuration, select the Syslog Collector radio button.

2. If this SonicWALL GMS listens for syslog messages on a non-standard port, type the port number into the Syslog Server Port field. The default port is 514.
3. To include the MySQL database on this system, select the Include Database (MYSQL) checkbox. To use a MySQL or Microsoft SQL Server database on another system, do not select this checkbox.
4. Configure the database settings as described in the Configuring Database Settings section, on page 885.
5. Configure the Web port settings as described in the Configuring Server Settings section, on page 887.
6. To apply your changes, click Update.
To change the settings on this page back to the defaults, click Reset.
Configuring the Flow Server Role
The Flow Server role can be used in a distributed deployment of SonicWALL GMS. The primary functions of this role include the following:
• Collect and stores flows from the firewalls
• Performs report summarization
The following SonicWALL Universal Management Suite services run on an Agent system:
• Dell SonicWALL Universal Management Suite - Flow Server
The single service that runs in this role is Dell SonicWALL Universal Management Suite - Flow Server. The flows are collected and stored in internal databases. To be able to create reports out of these flows, you will need to have a GMS server in this deployment with a minimum version of 7.1 and a role of "Console" or "All in One", etc. You will also need to make sure that the following ports are open:
• UDP 2055
• UDP 5055
• TCP 9063
• TCP 9064
• TCP 9065
• TCP 9066
• TCP 9067
To deploy your SonicWALL GMS in the Flow Server role, perform the following steps in the appliance management interface:
1. Navigate to the Deployment > Role page. Under Host Role Configuration, select the Flow Server radio button.
2. Configure the database settings as described in the Configuring Database Settings section, on page 885.
3. Configure the Web port settings as described in the Configuring Server Settings section, on page 887.
4. To apply your changes, click Update.
To change the settings on this page back to the defaults, click Reset.
Configuring the All in One-Flow Server (Demo Mode Only).
All In One deployments are ideal for managing a small number of SonicWALL appliances or for test environments.
Note SonicWALL recommends that you use a multi-system distributed deployment in production environments, with the database on a dedicated server and the other services on one or more systems. When only one other system is deployed, the Console role should be assigned to it.
The All in One - Flow Server configuration is to be used for demonstrating the Flow Server functionality and should NOT be used in production environments.
Following services run on an All in One-Flow Server Management system:
• Dell SonicWALL Universal Management Suite - Database
• Dell SonicWALL Universal Management Suite - Event Manager
• Dell SonicWALL Universal Management Suite - Flow Server
• Dell SonicWALL Universal Management Suite - Monitoring Manager
• Dell SonicWALL Universal Management Suite - Reports Database
• Dell SonicWALL Universal Management Suite - Reports Scheduler
• Dell SonicWALL Universal Management Suite - Reports Summarizer
• Dell SonicWALL Universal Management Suite - Scheduler
• Dell SonicWALL Universal Management Suite - Syslog Collector
• Dell SonicWALL Universal Management Suite - Update Manager
• Dell SonicWALL Universal Management Suite - Web Server
• Dell SonicWALL Universal Management Suite - Web Services
The All In One role allows Gateway configurations for the following:
• None— No gateway is specified.
If you do not wish to configure a gateway, perform the following:
a. Click the None radio button.

b. Select the HTTP or HTTPS radio button for the MSM Server Protocol.
c. Click the MSM Server Port text-field, then enter the MSM Server port number.
d. Click the Syslog Server Port text-field, then enter the Syslog Server port number.
e. To apply your changes, click Update. To change the settings on this page back to the defaults, click Reset.
• NAT Device— Use this option when a NAT device is configured as the gateway. The GMS appliance does not have to login to the unit for any reason and all NAT configurations are taken care of by the network Administrator directly through the device’s management interface. To configure the NAT device, perform the following:
a. Select the NAT Device radio button.

b. Click the NAT Device IP text-field, then enter the NAT Device IP address.
c. Click the NAT Device Syslog Port text-field, then enter the NAT Device Syslog port number. This is the Syslog port used for Syslogs sent from the managed units.
d. Select the HTTP or HTTPS radio button for the MSM Server Protocol.
e. Click the MSM Server Port text-field, then enter the MSM Server port number.
f.: Click the Syslog Server Port text-field, then enter the Syslog Server port number.
g. To apply your changes, click Update. To change the settings on this page back to the defaults, click Reset.
• GMS Gateway— Use this option when a SonicWALL device is acting as a Gateway. Using a SonicWALL appliance is recommended, but can be setup as a NAT Device if all units are managed using SSL. To configure the GMS Gateway, perform the following:
a. Click the GMS Gateway radio button.

b. If the SonicWALL GMS will connect to managed appliances through a GMS gateway, click the GMS Gateway IP text-field, then enter the internal IP address of the device.
If you change the GMS gateway IP address or password, you must also change the settings on this page. To determine if a GMS Gateway is required, see the SonicWALL Getting Started Guide for your product
c. Click the GMS Gateway Port text-field, then enter the management port used to sign into the device.
d. Click the GMS Gateway User text-field, then enter the username used to sign into the device.
e. Click the GMS Gateway Password text-field, then enter the password used to sign into the device.
f.: Confirm the GMS Gateway Password you entered.
g. Click the GMS Gateway Syslog Port text-field, then enter the Syslog port used for syslogs sent from the managed units.
h. Select the HTTP or HTTPS radio button for the MSM Server Protocol.
i.: Click the MSM Server Port text-field, then enter the MSM Server port number.
j.: Click the Syslog Server Port text-field, then enter the Syslog Server port number.
k. To apply your changes, click Update. To change the settings on this page back to the defaults, click Reset.
Database settings configuration is largely the same for any role when you choose to include the database on that appliance. For roles that automatically include the default MySQL database, such as All In One or Database Only, the Database Type, Database Host, and Database Port fields are not editable. This is also the case for any role when the Include Database (MYSQL) checkbox is selected. The Administrator Credentials fields are displayed only if the role has been defined to include the installation of the MySQL database. These are not available when a SQL Server database is selected.
This section describes the options for configuring the database settings for either the MySQL database or the Microsoft SQL Server database. The SonicWALL GMS can run the MySQL database, but SonicWALL GMS can also use either a MySQL or a SQL Server database running on a Windows Server machine in a multi-system deployment.
To configure the database settings for any role, perform the following steps in the appliance management interface:
1. Navigate to the Deployment > Role page and select the role for this appliance.
2. To run the MySQL database on this SonicWALL GMS, select the Include Database (MYSQL) checkbox. To use a MySQL or Microsoft SQL Server database on another system, do not select this checkbox.
3. Under Database Configuration, if Include Database (MYSQL) was not selected in the previous step, select either MYSQL or SQL Server from the Database Type pull-down list. This field is not editable if you previously selected Include Database (MYSQL) or if the selected role is All In One or Database Only.

4. In the Database Host field, type in the IP address of the database server or accept the default, localhost, if this SonicWALL GMS includes the database. This field is not editable if you previously selected Include Database (MYSQL) or if the selected role is All In One or Database Only.
Note If your deployment requires an instance name for the SQL server database, when completing the Database Host field, enter the Host or IP address, followed by a back slash and the instance name. The format should look as follows: 10.20.30.40\INSTANCE.
5. To use a different port when SonicWALL GMS accesses the database, type the port into the Database Port field. The default port is 3306.
6. To use a different user name when SonicWALL GMS accesses the database, type the user name into the Database User field. The default user name is “sa”.
7. Type the password that SonicWALL GMS will use to access the database into both the Database Password and Confirm Database Password fields.
8. If your deployment uses a custom database driver, type the value into the Database Driver field. Otherwise, accept the default, com.mysql.jdbc.Driver.
9. If your deployment uses a custom database URL, type the value into the Database URL field. If you are using a different port, change the default port, 3306, in the URL. Otherwise, accept the default URL, jdbc:mysql://localhost:3306.