|
1
|
To enable Wireless networking on this device, select Enable WLAN Radio.
|
|
2
|
For SonicOS Standard, configure Use Time Constraints to set hours of operation for this wireless device. For SonicOS Enhanced, select the schedule from the Schedule list box.
|
|
3
|
For SonicOS Standard only, select WiFiSec Enforcement to enable WiFiSec security over this wireless device.
|
|
4
|
Enter the Service Set Identifier (SSID) or wireless network name in the SSID field (maximum: 32 characters).
|
|
5
|
When you are finished, click Update. The settings are changed for the selected SonicWALL appliance. To clear all screen settings and start over, click Reset.
|
|
1
|
|
2
|
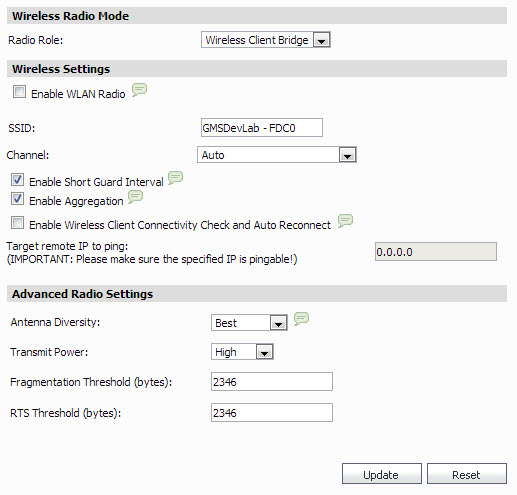
To enable Wireless networking on this device, select Enable WLAN Radio.
|
|
3
|
Enter your Service Set Identification (SSID) in the SSID text-field.
|
|
4
|
Click the Channel drop-down menu, then select the desired channel.
|
|
5
|
Select Enable Short Guard Interval to enable a higher Tx/Rx rate (if the client supports it). This option only applies for 802.11n mode.
|
|
6
|
Select Enable Aggregation to aggregate the wireless packets on L2 to earn higher performance (if the client supports it). This option only applies for 802.11n mode
|
|
7
|
Select Enable Wireless Client Connectivity Check and Auto Reconnect to periodically check the wireless client connectivity by pinging a user defined IP address. In case of connection lost, complete an auto reconnection.
Enter the target remote IP address to ping in the text-field. |
|
8
|
Click the Antenna Diversity drop-down menu, then select one of the following:
|
|
•
|
|
•
|
Antenna 1 — antenna closest to the power supply
|
|
9
|
Click the Transmit Power drop-down menu, then select one of the following:
|
|
•
|
|
•
|
|
•
|
|
•
|
|
10
|
Enter the desired fragmentation threshold (in bytes) in the Fragmentation Threshold text-field.
|
|
11
|
Enter the desired Request-to-Send (RTS) threshold (in bytes) in the RTS Threshold text-field.
|