|
2
|
Click the Policies tab.
|
|
3
|
|
4
|
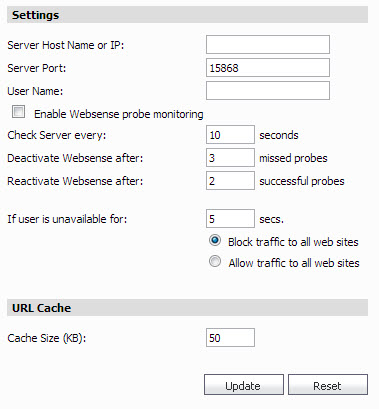
Enter the Websense server name or IP address in the Server Host Name or IP field.
|
|
5
|
Enter the port used for Websense packets in the Server Port field (default: 15868).
|
|
6
|
Enter the username associated with the Websense account in the User Name field.
|
|
7
|
Click the Enable Websense probe monitoring to activate the Websense probe, then enter the desired probe settings:
|
|
8
|
The if User is unavailable for: field defines what action is taken if the Websense Enterprise server is unavailable. The default value for timeout of the server is five seconds, but you can enter a value between 1 and 10 seconds. select the action that the SonicWALL appliance(s) will take after that period of time:
|
|
•
|
Selecting the Block traffic to all Web sites option blocks traffic to all Web sites except Allowed Domains until the Websense Enterprise server is available.
|
|
•
|
Selecting the Allow traffic to all Web sites option allows traffic to all Web sites without Websense Enterprise server filtering. However, Forbidden Domains and Keywords, if enabled, are still blocked.
|
|
9
|
Enter the size of the URL cache in the URL Cache Size field. A larger URL cache can improve browser response times. The default cache size is 50.
|
|
10
|
When you are finished, click Update. The scheduler displays.
|
|
11
|
Expand Schedule by clicking the plus icon.
|
|
12
|
Select Immediate or specify a future date and time.
|
|
13
|
Click Accept.
|