System_Status
This section provides an overview of the System > Status page and a description of the configuration tasks available on this page.
• Registering Your SRA Appliance from System Status
• Configuring Network Interfaces
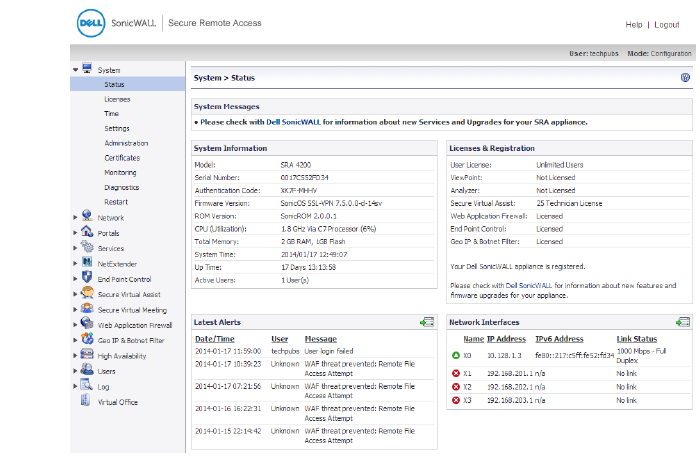
The System > Status page provides the administrator with current system status for the SRA appliance, including information and links to help manage the SRA appliance and Dell SonicWALL Security Services licenses. This section provides information about the page display and instructions to perform the configuration tasks on the System > Status page.

Overviews of each area of the System > Status page are provided in the following sections:
The System Messages section displays text about recent events and important system messages, such as system setting changes. For example, if you do not set an outbound SMTP server, you will see the message, “Log messages and one-time passwords cannot be sent because you have not specified an outbound SMTP server address.”
The System Information section displays details about your specific SRA appliance. The following information is displayed in this section:
Table 11 System Information
|
The Latest Alerts section displays text about recent invasive events, irregular system behavior, or errors. Latest Alerts includes information about the date and time of the event, the host of the user that generated the event and a brief description of the event.
Any messages relating to system events or errors are displayed in this section. Clicking the arrow button located in upper right corner of this section displays the Log > Log View page.
Fields in the Latest Alerts section are:
• Date/Time - The date and time when the message was generated.
• User - The name of the user that generated the message.
• Message - A message describing the error.
The Licenses & Registration section indicates the user license allowance and registration status of your SRA appliance. The status of your Analyzer, ViewPoint, Secure Virtual Assist, Spike License, and Web Application Firewall licenses are also displayed here.
To register your appliance on MySonicWALL and manually enter the registration code in the available field at the bottom of this section, see Registering Your SRA Appliance from System Status.
To register your appliance on MySonicWALL from the System > Licenses page and allow the appliance to automatically synchronize registration and license status with the Dell SonicWALL server, see Registering the SRA Appliance from System > Licenses.
The Network Interfaces section provides the administrator with a list of SRA appliance interfaces by name. For each interface, the Network Interfaces tab provides the IP address that has been configured and the current link status.
For information about configuration tasks related to the Network Interfaces section, refer to Configuring Network Interfaces.
Registering Your SRA Appliance from System Status
Register with MySonicWALL to get the most out of your SRA appliance. Complete the steps in the following sections to register.
Before You Register
Verify that the time, DNS, and default route settings on your Dell SonicWALL SRA are correct before you register your appliance. These settings are generally configured during the initial SRA appliance setup process. To verify or configure the time settings, navigate to the System > Time page. To verify or configure the DNS setting, navigate to the Network > DNS page. To verify or configure the default route, navigate to the Network > Routes page. For more information about time and DNS setting configuration, refer to Setting the Time, Configuring DNS Settings and Configuring a Default Route for the SRA Appliance.
Note You need a MySonicWALL account to register the Dell SonicWALL SRA.
Creating a MySonicWALL Account from System > Licenses
1. On the System > Licenses page, click Activate, Upgrade, or Renew services. The License Management page is displayed.
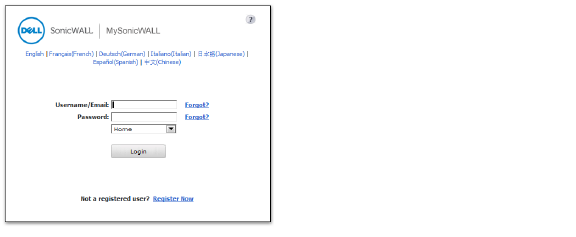
2. If you do not have a MySonicWALL account or if you forgot your user name or password, click the https://www.mysonicwall.com link at the bottom of the page. The MySonicWALL User Login page is displayed.
Do one of the following:
– If you forgot your user name, click the Forgot Username? link.
– If you forgot your password, click the Forgot Password? link.
– If you do not have a MySonicWALL account, click the Not a registered user? link.
3. Follow the instructions to activate your MySonicWALL account.
Registering with MySonicWALL
There are two ways to register your SRA appliance:
• Log into your MySonicWALL account directly from a browser or click the Dell SonicWALL link on the System > Status page to access MySonicWALL, enter the appliance serial number and other information there, and then enter the resulting registration code into the field on the System > Status page. This manual registration procedure is described in this section.
• Use the link on the System > Licenses page to access MySonicWALL, then enter the serial number and other information into MySonicWALL. When finished, your view of the System > Licenses page shows that the appliance has been automatically synchronized with the licenses activated on MySonicWALL. This procedure is described in Registering the SRA Appliance from System > Licenses.
To register your SRA appliance:
1. If you are not logged into the Dell SonicWALL SRA management interface, log in with the username admin and the administrative password you set during initial setup of your SRA appliance (the default is password). For information about configuring the administrative password, refer to the Dell SonicWALL SRA Getting Started Guide.
2. If the System > Status page is not automatically displayed in the management interface, click System in the left-navigation menu, and then click Status.
3. Record your Serial Number and Authentication Code from the Licenses & Registration section.
4. Do one of the following to access the MySonicWALL Web page:
– Click the Dell SonicWALL link in the Licenses & Registration section.
– Type http://www.mysonicwall.com into the Address or Location field of your Web browser.
The MySonicWALL User Login page is displayed.

5. Enter your MySonicWALL account user name and password.
Note If you are not a registered MySonicWALL user, you must create an account before registering your SonicWALL product. Click the Not a registered user? link at the bottom of the page to create your free MySonicWALL account.
6. Navigate to Products in the left hand navigation bar.
7. Enter your Serial Number and Authentication Code in the appropriate fields.
8. Enter a descriptive name for your SRA appliance in the Friendly Name field.
9. Select the product group for this appliance, if any, from the Product Group drop-down list.
10. Click the Register button.
11. When the MySonicWALL server has finished processing your registration, the Registration Code is displayed along with a statement that your appliance is registered. Click Continue.
12. On the System > Status page of the SRA appliance management interface, enter the Registration Code into the field at the bottom of the Licenses & Registration section, and then click Update.
Configuring Network Interfaces
The IP settings and interface settings of the SRA appliance may be configured by clicking on the blue arrow in the corner of the Network Interfaces section of the System > Status page. The link redirects you to the Network > Interfaces page, which can also be accessed from the navigation bar. From the Network > Interfaces page, a SRA appliance administrator can configure the IP address of the primary (X0) interface, and also optionally configure additional interfaces for operation.
For a port on your SRA appliance to communicate with a firewall or target device on the same network, you need to assign an IP address and a subnet mask to the interface.
For more information about configuring interfaces, refer to Network > Interfaces.