Portal1
Adding or Editing a Domain with Local User Authentication
To add or edit a domain for local database authentication, perform the following steps:
1. Navigate to the Portals > Domains window and click the Add Domain button or the Configure icon for the domain to edit. The Add Domain or Edit Domain window is displayed.
If adding the domain, select Local User Database from the Authentication Type drop-down list.
3. If adding the domain, enter a descriptive name for the authentication domain in the Domain Name field (maximum 24 characters). This is the domain name users will select to log into the SRA portal.
4. Select the name of the layout in the Portal Name field. Additional layouts may be defined in the Portals > Portals page.
5. Optionally, force all users in the Local User Database to change their password at set intervals or the next time they login. To force users to change their password at set intervals, type the expiration interval in the Passwords expire in x days field. To force users to change their password the next time they log in, check the Change password at next logon check box.
Note A specific local domain user can be forced to change their password. Use the General tab on the Users > Local Users > Edit page.
6. If you set a password expiration interval, type the number of days before expiration that users should receive notifications in the Show warning x days before password expiration field.
When configured and a password is expiring, a notification is displayed on the user’s Virtual Office page or the Administrator’s management console identifying the number of days before their password will expire. Notifications also include a link to a screen where the password can be changed.
7. Optionally add the number of unique new passwords that will be associated with a user account before an old password can be re-used for the account in the Enforce password history, x passwords remembered field. The value specified must be between 0 and 10 passwords.
8. Optionally Enforce password minimum length by entering a value between 1 and 14 characters. This is the minimum amount of characters accepted for a user password.
9. Optionally Enforce password complexity by selecting the check box. When this option is enforced, at least three of the four following parameters must be met when setting a password:
– English uppercase characters (A through Z)
– English lowercase characters (a through z)
– Base 10 digits (0 through 9)
– Non-alphabetic characters (for example, !, $, #, %)
10. Optionally select the Allow password changes check box. This allows users to change their own passwords after their account is set up.
11. Optionally select the Enable client certificate enforcement check box to require the use of client certificates for login. By checking this box, you require the client to present a client certificate for strong mutual authentication. Two additional fields will appear:
• Verify user name matches Common Name (CN) of client certificate - Select this check box to require that the user’s account name match their client certificate.
• Verify partial DN in subject - Use the following variables to configure a partial DN that will match the client certificate:
– User name: %USERNAME%
– Domain name: %USERDOMAIN%
– Active Directory user name: %ADUSERNAME%
– Wildcard: %WILDCARD%
12. Optionally select the One-time passwords check box to enable the One-time password feature. A drop-down list will appear, in which you can select if configured, required for all users, or using domain name. These are defined as:
• if configured - Only users who have a One Time Password email address configured will use the One Time Password feature.
• required for all users - All users must use the One Time Password feature. Users who do not have a One Time Password email address configured will not be allowed to login.
• using domain name - Users in the domain will use the One Time Password feature. One Time Password emails for all users in the domain will be sent to username@domain.com.
13. If you select using domain name, an E-mail domain field appears below the drop-down list. Type in the domain name where one-time password emails will be sent (for example, abc.com).
14. Click Accept to update the configuration. Once the domain has been added, the domain will be added to the table on the Portals > Domains page.
Adding or Editing a Domain with Active Directory Authentication
To configure Windows Active Directory authentication, perform the following steps:
1. Click Add Domain or the Configure icon for the domain to edit. The Add Domain or Edit Domain window is displayed.
Note Of all types of authentication, Active Directory authentication is most sensitive to clock skew, or variances in time between the SRA appliance and the Active Directory server against which it is authenticating. If you are unable to authenticate using Active Directory, refer to “Active Directory Troubleshooting.
2. If adding the domain, select Active Directory from the Authentication type drop-down list. The Active Directory configuration fields will be displayed.
3. If adding the domain, enter a descriptive name for the authentication domain in the Domain Name field. This is the domain name users will select in order to log into the SRA appliance portal. It can be the same value as the Server Address field or the Active Directory Domain field, depending on your network configuration.
4. Enter the Active Directory domain name in the Active Directory Domain field.
5. Enter the IP address or host and domain name of the Active Directory server in the Server Address field.
6. Enter the IP address or host and domain name of the back up server in the Backup Server Address field.
7. Enter the name of the layout in the Portal Name field. Additional layouts may be defined in the Portals > Portals page.
8. Optionally select the Allow Password Changes Check Box. Enabling this feature allows a user to change their password through the Virtual Office portal by selecting the Options button on the top of the portal page. User must submit their old password, along with a new password and a re-verification of the newly selected password.
9. Optionally select the Use SSL/TLS check box. This option allows for the needed SSL/TLS encryption to be used for Active Directory password exchanges. This check box should be enabled when setting up a domain using Active Directory authentication.
10. Optionally select the Enable client certificate enforcement check box to require the use of client certificates for login. By checking this box, you require the client to present a client certificate for strong mutual authentication. Two additional fields will appear:
• Verify user name matches Common Name (CN) of client certificate - Select this check box to require that the user’s account name match their client certificate.
• Verify partial DN in subject - Use the following variables to configure a partial DN that will match the client certificate:
– User name: %USERNAME%
– Domain name: %USERDOMAIN%
– Active Directory user name: %ADUSERNAME%
– Wildcard: %WILDCARD%
11. Select the Delete external user accounts on logout check box to delete users who are not logged into a domain account after they log out.
12. Check the Only allow users listed locally check box to allow only users with a local record in the Active Directory to login.
13. Select the Auto-assign groups at login check box to assign users to a group when they log in.
Users logging into Active Directory domains are automatically assigned in real time to SRA groups based on their external AD group memberships. If a user’s external group membership has changed, their SRA group membership automatically changes to match the external group membership.
14. Optionally, select the One-time passwords check box to enable the One Time Password feature. A drop-down list will appear, in which you can select if configured, required for all users, or using domain name. These are defined as:
• if configured - Only users who have a One Time Password email address configured will use the One Time Password feature.
• required for all users - All users must use the One Time Password feature. Users who do not have a One Time Password email address configured will not be allowed to login.
• using domain name - Users in the domain will use the One Time Password feature. One Time Password emails for all users in the domain will be sent to username@domain.com.
15. If you selected if configured or required for all users in the One-time passwords drop-down list, the Active Directory AD e-mail attribute drop-down list will appear, in which you can select mail, mobile, pager, userPrincipalName, or custom. These are defined as:
• mail - If your AD server is configured to store email addresses using the “mail” attribute, select mail.
• mobile or pager - If your AD server is configured to store mobile or pager numbers using either of these attributes, select mobile or pager, respectively. Raw numbers cannot be used, however, SMS addresses can.
• userPrincipalName - If your AD server is configured to store email addresses using the “userPrincipalName” attribute, select userPrincipalName.
• custom - If your AD server is configured to store email addresses using a custom attribute, select custom. If the specified attribute cannot be found for a user, the email address assigned in the individual user policy settings will be used. If you select custom, the Custom attribute field will appear. Type the custom attribute that your AD server uses to store email addresses. If the specified attribute cannot be found for a user, the email address will be taken from their individual policy settings.
If you select using domain name, an E-mail domain field appears below the drop-down list. Type in the domain name where one-time password emails will be sent (for example, abc.com).
16. Select the type of user from the User Type drop-down list. All users logging in through this domain will be treated as this user type. The choices depend on user types defined already. Some possible choices are:
• External User – Users logging into this domain are treated as normal users without administrative privileges.
• External Administrator – Users logging into this domain are treated as administrators, with local SRA admin credentials. These users are presented with the admin login page.
This option allows the SRA administrator to configure a domain that allows SRA admin privileges to all users logging into that domain.
Dell SonicWALL recommends adding filters that allow administrative access only to those users who are in the correct group. You can do so by editing the domain on the Users > Local Groups page.
• Read-only Administrator – Users logging into this domain are treated as read-only administrators and can view all information and settings, but cannot apply any changes to the configuration. These users are presented with the admin login page.
17. Click Accept to update the configuration. Once the domain has been added, the domain will be added to the table on the Portals > Domains page.
Active Directory Troubleshooting
If your users are unable to connect using Active Directory, verify the following configurations:
• The time settings on the Active Directory server and the SRA appliance must be synchronized. Kerberos authentication, used by Active Directory to authenticate clients, permits a maximum 15-minute time difference between the Windows server and the client (the SRA appliance). The easiest way to solve this issue is to configure Network Time Protocol on the System > Time page of the SRA Web-based management interface and check that the Active Directory server has the correct time settings.
• Confirm that your Windows server is configured for Active Directory authentication. If you are using Window NT4.0 server, then your server only supports NT Domain authentication. Typically, Windows 2000 and 2003 servers are also configured for NT Domain authentication to support legacy Windows clients.
Adding or Editing a Domain with LDAP Authentication
To configure a domain with LDAP authentication, perform the following steps:
1. Click Add Domain or the Configure icon for the domain to edit. The Add Domain or Edit Domain window is displayed.
2. If adding the domain, select LDAP from the Authentication Type menu. The LDAP domain configuration fields are displayed.

3. If adding the domain, enter a descriptive name for the authentication domain in the Domain Name field. This is the domain name users will select in order to log into the SRA appliance user portal. It can be the same value as the Primary LDAP Server Address field.
4. Enter the search base for LDAP queries in the LDAP baseDN field. An example of a search base string is CN=Users,DC=yourdomain,DC=com.
Tip It is possible for multiple OUs to be configured for a single domain by entering each OU on a separate line in the LDAP baseDN field. In addition, any sub-OUs will be automatically included when parents are added to this field.
Note Do not include quotes (“”) in the LDAP BaseDN field.
5. Enter the IP address or domain name of the Primary LDAP server in the Server Address field.
6. Enter the common name and password of a user that has been delegated control of the primary server in the Login Username and Login Password fields.
Note When entering Login Username and Login Password, remember that the SRA appliance binds to the LDAP tree with these credentials and users can log in with their sAMAccountName.
7. Optionally enter the IP address or domain name of a backup LDAP server in the Server Address field, under the Backup LDAP server section.
8. Optionally enter the common name and password of a user that has been delegated control of the backup server in the Login User Name and Login Password fields, under the Backup LDAP server section.
9. Enter the name of the layout in the Portal Name field. Additional layouts may be defined in the Portals > Portals page.
10. Optionally select the Allow password changes (if allowed by LDAP server) check box. This option, if allowed by your LDAP server, will enable users to change their LDAP password during an SRA session.
11. Optionally select the Use SSL/TLS check box. This option allows for the SSL/TLS encryption to be used for LDAP password exchanges. This option is disabled by default as not all LDAP servers are configured for SSL/TLS.
12. Optionally select the Enable client certificate enforcement check box to require the use of client certificates for login. By checking this box, you require the client to present a client certificate for strong mutual authentication. Two additional fields will appear:
• Verify user name matches Common Name (CN) of client certificate - Select this check box to require that the user’s account name match their client certificate.
• Verify partial DN in subject - Use the following variables to configure a partial DN that will match the client certificate:
– User name: %USERNAME%
– Domain name: %USERDOMAIN%
– Active Directory user name: %ADUSERNAME%
– Wildcard: %WILDCARD%
13. Select the Auto-assign groups at login check box to assign users to a group when they log in.
Users logging into LDAP domains are automatically assigned in real time to SRA groups based on their external LDAP attributes. If a user’s external group membership has changed, their SRA group membership automatically changes to match the external group membership.
14. Optionally select the One-time passwords check box to enable the One Time Password feature. A drop-down list will appear, in which you can select if configured, required for all users, or using domain name. These are defined as:
• if configured - Only users who have a One Time Password email address configured will use the One Time Password feature.
• required for all users - All users must use the One Time Password feature. Users who do not have a One Time Password email address configured will not be allowed to login.
• using domain name - Users in the domain will use the One Time Password feature. One Time Password emails for all users in the domain will be sent to username@domain.com.
If you selected if configured or required for all users in the One-time passwords drop-down list, the LDAP e-mail attribute drop-down list will appear, in which you can select mail, userPrincipalName, or custom. These are defined as:
• mail - If your LDAP server is configured to store email addresses using the “mail” attribute, select mail.
• mobile or pager - If your AD server is configured to store mobile or pager numbers using either of these attributes, select mobile or pager, respectively. Raw numbers cannot be used, however, SMS addresses can.
• userPrincipalName - If your LDAP server is configured to store email addresses using the “userPrincipalName” attribute, select userPrincipalName.
• custom - If your LDAP server is configured to store email addresses using a custom attribute, select custom. If the specified attribute cannot be found for a user, the email address assigned in the individual user policy settings will be used. If you select custom, the Custom attribute field will appear. Type the custom attribute that your LDAP server uses to store email addresses. If the specified attribute cannot be found for a user, the email address will be taken from their individual policy settings.
If using domain name is selected in the One-time passwords drop-down list, the E-mail domain field will appear instead of the LDAP e-mail attribute drop-down list. Type in the domain name where one-time password emails will be sent (for example, abc.com).
15. Select the type of user from the User Type drop-down list. All users logging in through this domain will be treated as this user type. The choices depend on user types defined already. Some possible choices are:
• External User – Users logging into this domain are treated as normal users without administrative privileges.
• External Administrator – Users logging into this domain are treated as administrators, with local SRA admin credentials. These users are presented with the admin login page.
This option allows the SRA administrator to configure a domain that allows SRA admin privileges to all users logging into that domain.
Dell SonicWALL recommends adding filters that allow administrative access only to those users who are in the correct group. You can do so by editing the domain on the Users > Local Groups page.
• Read-only Administrator – Users logging into this domain are treated as read-only administrators and can view all information and settings, but cannot apply any changes to the configuration. These users are presented with the admin login page.
16. Click Accept to update the configuration. Once the domain has been added, the domain will be added to the table on the Portals > Domains page.
Adding or Editing a Domain with NT Domain Authentication
To configure a domain with NT Domain authentication, perform the following steps:
1. On the Portals > Domains page, click Add Domain or the Configure icon for the domain to edit. The Add Domain or Edit Domain window is displayed.
2. If adding the domain, select NT Domain from the Authentication Type menu. The NT Domain configuration fields will be displayed.
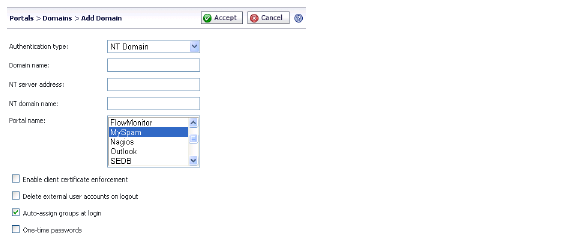
3. If adding the domain, enter a descriptive name for the authentication domain in the Domain Name field. This is the domain name selected by users when they authenticate to the SRA appliance portal. It may be the same value as the NT Domain Name.
4. Enter the IP address or host and domain name of the server in the NT Server Address field.
5. Enter the NT authentication domain in the NT Domain Name field. This is the domain name configured on the Windows authentication server for network authentication.
6. Enter the name of the layout in the Portal Name field. Additional layouts may be defined in the Portals > Portals page.
7. Optionally select the Enable client certificate enforcement check box to require the use of client certificates for login. By checking this box, you require the client to present a client certificate for strong mutual authentication. Two additional fields will appear:
• Verify user name matches Common Name (CN) of client certificate - Select this check box to require that the user’s account name match their client certificate.
• Verify partial DN in subject - Use the following variables to configure a partial DN that will match the client certificate:
– User name: %USERNAME%
– Domain name: %USERDOMAIN%
– Active Directory user name: %ADUSERNAME%
– Wildcard: %WILDCARD%
8. Select the Delete external user accounts on logout check box to delete users who are not logged into a domain account after they log out.
9. Select the Auto-assign groups at login check box to assign users to a group when they log in.
Users logging into NT domains are automatically assigned in real time to SRA groups based on their external NT group memberships. If a user’s external group membership has changed, their SRA group membership automatically changes to match the external group membership.
10. Optionally select the One-time passwords check box to enable the One-time password feature. A drop-down list will appear, in which you can select if configured, required for all users, or using domain name. These are defined as:
• if configured - Only users who have a One Time Password email address configured will use the One Time Password feature.
• required for all users - All users must use the One Time Password feature. Users who do not have a One Time Password email address configured will not be allowed to login.
• using domain name - Users in the domain will use the One Time Password feature. One Time Password emails for all users in the domain will be sent to username@domain.com.
11. If you select using domain name, an E-mail domain field appears below the drop-down list. Type in the domain name where one-time password emails will be sent (for example, abc.com).
12. Click Accept to update the configuration. Once the domain has been added, the domain will be added to the table on the Portals > Domains page.
Adding or Editing a Domain with RADIUS Authentication
To configure a domain with RADIUS authentication, perform the following steps:
1. On the Portals > Domains page, click Add Domain or the Configure icon for the domain to edit. The Add Domain or Edit Domain window is displayed.
2. If adding the domain, select RADIUS from the Authentication Type menu. The RADIUS configuration field is displayed.
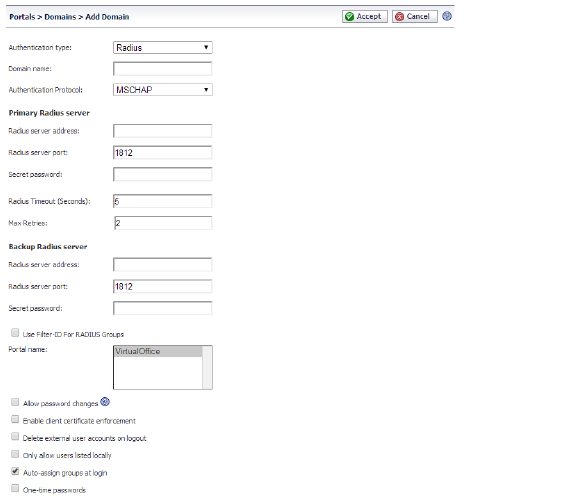
3. If adding the domain, enter a descriptive name for the authentication domain in the Domain Name field. This is the domain name users will select in order to log into the SRA appliance portal.
4. Select the proper Authentication Protocol for your RADIUS server. Choose from PAP, CHAP, MSCHAP, or MSCHAPV2.
5. Under Primary Radius Server, enter the IP address or domain name of the RADIUS server in the RADIUS Server Address field.
6. Enter the RADIUS server port in the RADIUS server port field.
7. If required by your RADIUS configuration, enter an authentication secret in the Secret Password field.
8. Enter a number (in seconds) for RADIUS timeout in the RADIUS Timeout (Seconds) field.
9. Enter the maximum number of retries in the Max Retries field.
10. Under Backup Radius Server, enter the IP address or domain name of the backup RADIUS server in the RADIUS Server Address field.
11. Enter the backup RADIUS server port in the RADIUS server port field.
12. If required by the backup RADIUS server, enter an authentication secret for the backup RADIUS server in the Secret Password field.
13. Optionally, if using RADIUS for group-based access, select the Use Filter-ID for RADIUS Groups check box.
14. Click the name of the layout in the Portal Name drop-down list.
15. If you selected the Authentication Protocol for your RADIUS server as MSCHAP or MSCHAPV2, you have the option to Allow password changes by selecting the check box. Note that if you enable password changes, you must also deploy the LAN Manager authentication.
16. Optionally select the Enable client certificate enforcement check box to require the use of client certificates for login. By checking this box, you require the client to present a client certificate for strong mutual authentication. Two additional fields will appear:
• Verify user name matches Common Name (CN) of client certificate - Select this check box to require that the user’s account name match their client certificate.
• Verify partial DN in subject - Use the following variables to configure a partial DN that will match the client certificate:
– User name: %USERNAME%
– Domain name: %USERDOMAIN%
– Active Directory user name: %ADUSERNAME%
– Wildcard: %WILDCARD%
17. Select the Delete external user accounts on logout check box to delete users who are not logged into a domain account after they log out.
18. Select the Auto-assign groups at login check box to assign users to a group when they log in.
Users logging into RADIUS domains are automatically assigned in real time to SRA groups based on their external RADIUS filter-IDs. If a user’s external group membership has changed, their SRA group membership automatically changes to match the external group membership.
19. Optionally select the One-time passwords check box to enable the One-time password feature. A drop-down list will appear, in which you can select if configured, required for all users, or using domain name. These are defined as:
• if configured - Only users who have a One Time Password email address configured will use the One Time Password feature.
• required for all users - All users must use the One Time Password feature. Users who do not have a One Time Password email address configured will not be allowed to login.
• using domain name - Users in the domain will use the One Time Password feature. One Time Password emails for all users in the domain will be sent to username@domain.com.
20. If you select using domain name, an E-mail domain field appears below the drop-down list. Type in the domain name where one-time password emails will be sent (for example, abc.com).
21. Click Accept to update the configuration. Once the domain has been added, the domain will be added to the table on the Portals > Domains page.
22. Click the configure button next to the RADIUS domain you added. The Test tab of the Edit Domain page displays.
Enter your RADIUS user ID in the User ID field and your RADIUS password in the Password field.
24. Click Test. The SRA appliance will connect to your RADIUS server.
25. If you receive the message Server not responding, check your user ID and password and click the General tab to verify your RADIUS settings. Try running the test again.
Note The SRA appliance will attempt to authenticate against the specified RADIUS server using PAP authentication. It is generally required that the RADIUS server be configured to accept RADIUS client connections from the SRA appliance. Typically, these connections will appear to come from the SRA appliance X0 interface IP address. Refer to your RADIUS server documentation for configuration instructions.
Configuring Two-Factor Authentication
Two-factor authentication is an authentication method that requires two independent pieces of information to establish identity and privileges. Two-factor authentication is stronger and more rigorous than traditional password authentication that only requires one factor (the user’s password).
For more information on how two-factor authentication works see Two-Factor Authentication Overview.
Dell SonicWALL’s implementation of two-factor authentication either uses two separate RADIUS authentication servers, or partners with two of the leaders in advanced user authentication: RSA and VASCO. If you are using RSA, you must have the RSA Authentication Manager and RSA SecurID tokens. If you are using VASCO, you must have the VASCO IdentiKey and Digipass tokens.
To configure two-factor authentication, you must first configure a RADIUS domain. For information see Adding or Editing a Domain with RADIUS Authentication.
The following sections describe how to configure the supported third-party authentication servers:
• Configuring the RSA Authentication Manager
• Configuring the VASCO IdentiKey Solution
Configuring the RSA Authentication Manager
The following sections describe how to configure the RSA Authentication Manager version 6.1 to perform two-factor authentication with your SRA appliance:
• Adding an Agent Host Record for the SRA Appliance
• Adding the SRA Appliance as a RADIUS Client
• Importing Tokens and Adding Users
Note This configuration procedure is specific to RSA Authentication Manager version 6.1. If you are using a different version of RSA Authentication Manager, the procedure will be slightly different.
If you will be using VASCO instead of RSA, see Configuring the VASCO IdentiKey Solution.
Adding an Agent Host Record for the SRA Appliance
To establish a connection between the SRA appliance and the RSA Authentication Manager, an Agent Host record must be added to the RSA Authentication Manager database. The Agent host record identifies the SRA appliance within its database and contains information about communication and encryption.
To create the Agent Host record for the SRA appliance, perform the following steps:
1. Launch the RSA Authentication Manager.
2. On the Agent Host menu, select Add Agent Host. The Add Agent Host window displays.
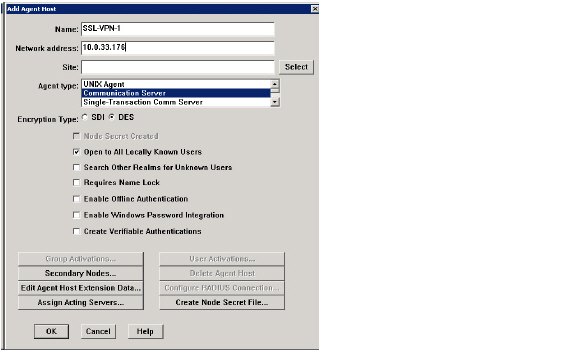
3. Enter a hostname for the SRA appliance in the Name field.
4. Enter the IP address of the SRA appliance in the Network address field.
5. Select Communication Server in the Agent type window.
6. By default, the Enable Offline Authentication and Enable Windows Password Integration options are enabled. Dell SonicWALL recommends disabling all of these options except for Open to All Locally Known Users.
7. Click OK.
Adding the SRA Appliance as a RADIUS Client
After you have created the Agent Host record, you must add the SRA appliance to the RSA Authentication Manager as a RADIUS client. To do so, perform the following steps:
1. In RSA Authentication Manager, go to the RADIUS menu and select Manage RADIUS Server. The RSA RADIUS Manager displays.
2. Expand the RSA RADIUS Server Administration tree and select RADIUS Clients.
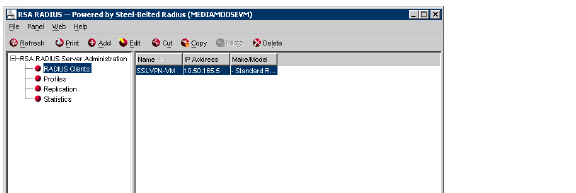
3. Click Add. The Add RADIUS Client window displays.
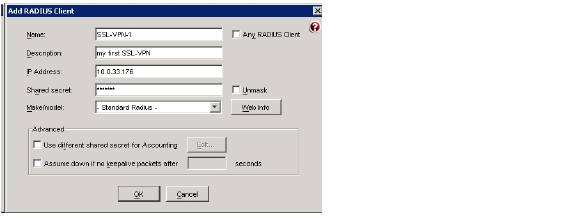
4. Enter a descriptive name for the SRA appliance.
5. Enter the IP address of the SRA in the IP Address field.
6. Enter the shared secret that is configured on the SRA in the Shared secret field.
7. Click OK and close the RSA RADIUS Manager.
Because two-factor authentication depends on time synchronization, it is important that the internal clocks for the RSA Authentication Manager and the SRA appliance are set correctly.
Importing Tokens and Adding Users
After you have configured the RSA Authentication Manager to communicate with the SRA appliance, you must import tokens and add users to the RSA Authentication Manager.
To import tokens and add users, perform the following steps:
1. To import the token file, select Token > Import Tokens.
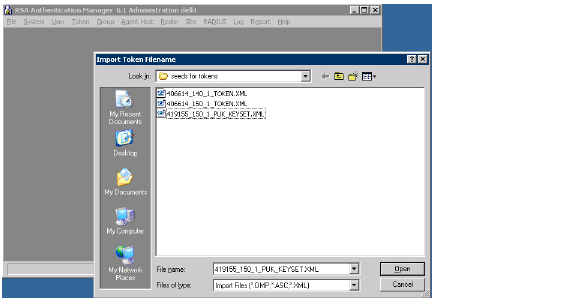
2. When you purchase RSA SecurID tokens, they come with an XML file that contains information on the tokens. Navigate to the token XML file and click Open. The token file is imported.
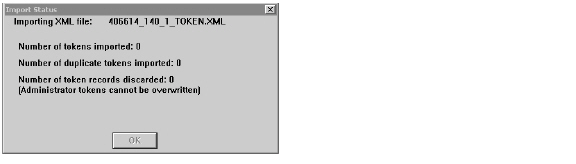
3. The Import Status window displays information on the number of tokens imported to the RSA Authentication Manager.
4. To create a user on the RSA Authentication Manager, click on User > Add user.

5. Enter the user’s First and Last Name.
6. Enter the user’s username in the Default Login field.
7. Select either Allowed to Create a PIN or Required to Create a PIN. Allowed to Create a PIN gives users the option of either creating their own PIN or having the system generate a random PIN. Required to Create a PIN requires the user to create a PIN.
8. To assign a token to the user, click on the Assign Token button. Click Yes on the confirmation window that displays. The Select Token window displays.
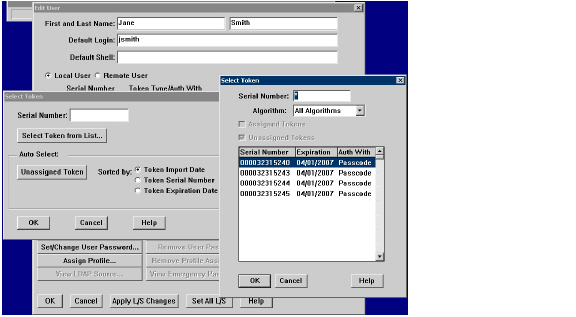
9. You can either manually select the token or automatically assign the token:
– To manually select the token for the user, click Select Token from List. In the window that displays, select the serial number for the token and click OK.
– To automatically assign the token, you can optionally select the method by which to sort the token: the token’s import date, serial number, or expiration date. Then click the Unassigned Token button and the RSA Authentication Manager assigns a token to the user. Click OK.
10. Click OK in the Edit User window. The user is added to the RSA Authentication Manager.
11. Give the user their RSA SecurID Authenticator and instructions on how to log in, create a PIN, and user the RSA SecurID Authenticator. See the Dell SonicWALL SRA User Guide for more information.
Configuring the VASCO IdentiKey Solution
The VASCO IdentiKey solution works with SRA 5.0 or higher. The following sections describe how to configure two-factor authentication using VASCO’s IdentiKey version 3.2:
• Setting DNS and the Default Route on page 147
• Setting NetExtender Client Address Range and Route on page 147
• Creating a Portal Domain with RADIUS Authentication on page 147
• Configuring a Policy on VASCO IdentiKey on page 147
• Registering the SRA as a Client on page 148
• Configuring a VASCO IdentiKey User on page 148
• Importing DIGIPASS on page 148
• Assigning a DIGIPASS to a User on page 148
• Verifying Two-Factor Authentication on page 149
Note This configuration procedure is specific to VASCO IdentiKey version 3.2. If you are using a different version of VASCO IdentiKey, the procedure will be slightly different.
If you will be using RSA instead of VASCO, see Configuring the RSA Authentication Manager.
The DIGIPASS token is based on time synchronization. Since the two-factor authentication depends on time synchronization, it is important that the internal clocks for the SRA appliance and the VASCO IdentiKey are set correctly.
Navigate to System > Time on the SRA appliance to select the correct time zone.
Setting DNS and the Default Route
The default route for the SRA appliance is an interface on the firewall that corresponds with the DMZ Zone. The IP address of this firewall DMZ interface needs to be configured as the default route for the SRA appliance.
To configure Domain Name Service and the default route:
1. On the SRA management interface, navigate to Network > DNS and set the correct DNS settings and/ or WINS Settings.
2. Navigate to Network > Routes and set the correct Default Route for the SRA X0 interface.
Setting NetExtender Client Address Range and Route
To configure the NetExtender client address range and route on the SRA appliance:
1. Navigate to NetExtender > Client Addresses to set the NetExtender Client Address Range.
Client Addresses will be assigned in the same subnet of the SRA X0 interface. Exclude the SRA appliance X0 interface and the firewall DMZ interface IP address.
2. Navigate to NetExtender > Client Routes.
Click the Add Client Route button to select the correct Client Routes for the authenticated remote users accessing the private networks via the SRA connection.
The client route corresponds with the subnet connected to the X0 (LAN) interface of the Dell SonicWALL NSA or TZ firewall.
Creating a Portal Domain with RADIUS Authentication
To create a domain using RADIUS authentication on the SRA appliance:
1. Navigate to Portal > Domains and click Add Domain.
2. Select Radius from the Authentication Type drop-down list.
3. Enter the Domain Name that users will use in order to log into the SRA appliance portal.
Configuring a Policy on VASCO IdentiKey
Follow these steps to add a new policy in the VASCO Identikey Web Administration interface:
1. Log in to the Vasco Identikey Web Administration window.
2. Click the Policies tab and select Create.
Note There are policies available by default, and you can also create new policies to suit your needs
3. Fill in a policy name and choose the option most suitable in your situation. If you want the policy to inherit a setting from another policy, choose the inherit option. If you want to copy an existing policy, choose the copy option, and if you want to make a new policy, choose the create option.
Note Configure the policy properties to use the appropriate back-end server. This may be the same authentication service as previously used in the SRA appliance.
Use the following settings for the policy:
|
Registering the SRA as a Client
To register the SRA appliance as a VASCO client:
1. In the Vasco Identikey Web Administration window, click the Clients Tab and choose Register.
2. Select RADIUS Client for Client Type.
3. Enter the IP address of the SRA appliance.
4. In the Policy ID field, select your new policy.
5. Fill in the Shared Secret you entered for the RADIUS server properties on the SRA appliance.
6. Click Create.
Configuring a VASCO IdentiKey User
To create a new user:
1. In the Vasco Identikey Web Administration window, click the Users tab and select Create.
2. Fill in the User ID field.
3. Select the Domain.
4. Select the Organizational Unit.
5. Click the Create button.
The user appears in the list of users in the Vasco Identikey Web Administration management interface.
To import a DIGIPASS:
1. In the Vasco Identikey Web Administration window, click on the DIGIPASS tab and select Import.
2. Browse for the *.DPX file.
3. Enter the Transport Key.
4. Click UPLOAD.
A confirmation message pops up when the DIGIPASS is imported successfully.
Assigning a DIGIPASS to a User
There are two ways to assign a DIGIPASS to a user. You can search for a DIGIPASS and assign it to a user or search for a user and assign the user to a DIGIPASS.
1. Do one of the following:
• On the Users tab, select the check box next to the user and then click Assign DIGIPASS.
• On the DIGIPASS tab, select the check box next to the DIGIPASS and then click NEXT.
Note If the User ID is left blank, press the Find button and a list of all the available users in the same domain will appear. If no users appear, make sure the domains of the DIGIPASS and the user match.
When a user is assigned to a DIGIPASS, a confirmation message will pop up.
Verifying Two-Factor Authentication
To test the two-factor authentication SRA connectivity with VASCO IdentiKey:
1. Connect your PC on the WAN (X1) interface of the Dell SonicWALL firewall by pointing your browser to its IP address.
2. Login to the Local Domain as an Administrator.
3. Navigate to Portal > Domains and click Configure to test the RADIUS connectivity to VASCO IdentiKey.
4. If the RADIUS Authentication is successful, log out of the Administrator account and log in to the WAN (X1) interface of the Dell SonicWALL firewall with the User Name you created.