|
1
|
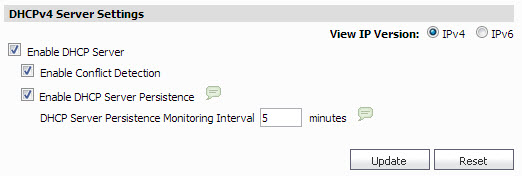
The DHCP > Settings page displays IPv4 and IPv6 radio buttons. Select a button to view the desired IP version.
|
|
2
|
Click Enable DHCP Server to enable the DHCP server. Or, if IPv6 is selected, click Enable DHCPv6 Server.
|
|
•
|
To enable conflict detection, click Enable Conflict Detection.
|
|
•
|
To enable DHCP server persistence, click Enable DHCP Server Persistence. When DHCP Server is enabled, this setting allows the current state of the DHCP leases in the network to be periodically written to flash. Upon reboot, the system restores the previous DHCP server network DHCP IP allocation knowledge, based upon the IP/Lease times stored in Flash.
|
|
•
|
Enter a value (in minutes) for DHCP Server Persistence Monitoring Interval. This setting controls how often changes in the network are examined, and if necessary, written to flash.
|
|
4
|
Click Update when finished.
|
