To edit MAC-IP Anti-Spoof settings within the Network Security Appliance management interface, go to the Network > MAC-IP Anti-spoof page.
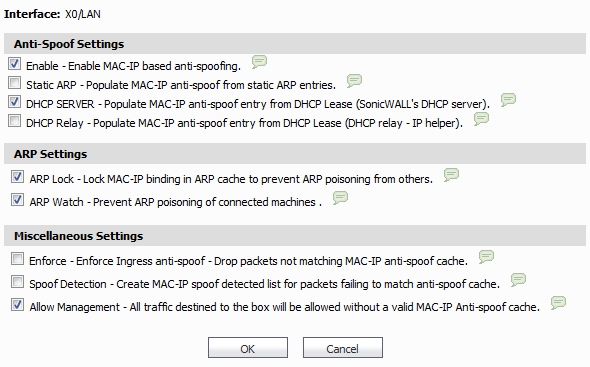
To configure settings for a particular interface, click the pencil icon in the Configure column for the desired interface. The Settings window is displayed for the selected interface.
In this window, the following settings can be enabled or disabled by clicking on the corresponding check box. After your setting selections for this interface are complete, click OK. The following options are available:
|
•
|
Enable: To enable the MAC-IP Anti-Spoof subsystem on traffic through this interface
|
|
•
|
Static ARP: Allows the Anti-Spoof cache to be built from static ARP entries
|
|
•
|
DHCP Server: Allows the Anti-Spoof cache to be built from active DHCP leases from the SonicWALL DHCP server
|
|
•
|
DHCP Relay: Allows the Anti-Spoof cache to be built from active DHCP leases, from the DHCP relay, based on IP Helper
|
|
•
|
ARP Lock: Locks ARP entries for devices listed in the MAC-IP Anti-Spoof cache. This applies egress control for an interface through the MAC-IP Anti-Spoof configuration, and adds MAC-IP cache entries as permanent entries in the ARP cache. This controls ARP poisoning attacks, as the ARP cache is not altered by illegitimate ARP packets.
|
|
•
|
ARP Watch: Enables generation of unsolicited unicast ARP responses towards the client’s machine for every MAC-IP cache entry on the interface. This process helps prevent man-in-the-middle attacks.
|
|
•
|
Enforce: Enables ingress control on the interface, blocking traffic from devices not listed in the MAC-IP Anti-Spoof cache.
|
|
•
|
Spoof Detection: Logs all devices that fail to pass Anti-spoof cache and lists them in the Spoof Detected List.
|
|
•
|
Allow Management: Allows through all packets destined for the appliance’s IP address, even if coming from devices currently not listed in the Anti-Spoof cache.
|
|
1
|
Click Add Anti-Spoof Cache.
|
|
2
|
Enter the IP address for the device.
|
|
3
|
Enter the MAC addresses for the device. Enter the information in the provided fields.
|
|
4
|
Check the a router setting to allow traffic coming from behind this device.
|
|
5
|
Check the a blacklisted device setting to block packets from this device, irrespective of its IP address.
|
|
6
|
Click OK.
|
If you need to edit a static Anti-Spoof cache entry, click the pencil icon, under the Configure column, on the same line.
Single, or multiple, static anti-spoof cache entries can be deleted. To do this, select the “delete check box” next to each entry, then click Delete Anti-Spoof Cache(s).
The Anti-Spoof Cache Search section provides the ability to search the entries in the cache.
|
7
|
|
8
|
|
10
|
Click Search. Matching entries in the MAC-IP Anti-Spoof cache are displayed.
|
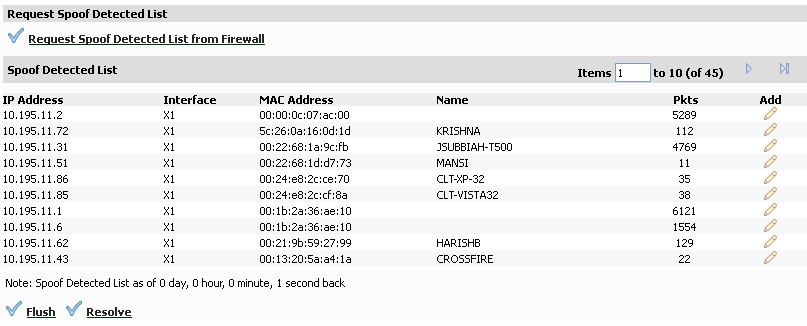
The Spoof Detect List displays devices that failed to pass the ingress anti-spoof cache check. Entries on this list can be added as a static anti-spoof entry. To view the Spoof Detect List, click the Request Spoof Detected List from Firewall link.
Entries can be flushed from the list by clicking Flush. The name of each device can also be resolved using NetBios, by clicking Resolve.


