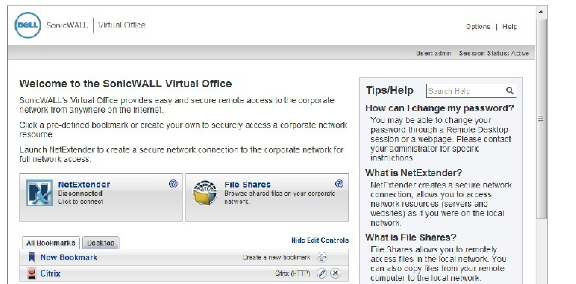
user_bookmarks
Bookmarks provide a convenient way for you to access Web, FTP, or other services on the remote network that you will connect to frequently. To define bookmarks, perform the following:
1. In the Virtual Office window at the top of the bookmarks table, click Show Edit Controls and then click Create a new bookmark.
2. In the Add Bookmark screen, enter a descriptive name in the Bookmark Name field.
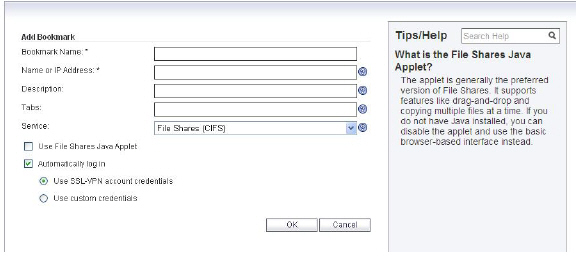
3. Enter the domain name, IP address, or IPv6 address of a host machine on the LAN in the Name or IP Address field. IPv6 addresses should be enclosed in brackets (i.e. the [ and ] symbols). You may also enter the wildcard variable %USERNAME% to display the current user name. Variables are case-sensitive.
4. In the Description field, optionally enter a friendly description to be displayed in the bookmark table.
5. Select the user permissions level from the Allow user to edit/delete drop-down list. You can select Use user policy, Allow, or Deny.
6. Select the service type in the Service drop-down list. You can select from the following services:
• Terminal Services (RDP - ActiveX)
• Terminal Services (RDP - Java)
• Terminal Services (RDP - HTML5)
• Terminal Services (Using Tunnel)
• Virtual Network Computing (VNC)
• Virtual Network Computing (VNC - HTML5)
• Citrix Portal (Citrix)
• Web (HTTP)
• Secure Web (HTTPS)
• External Web Site
• Mobile Connect
• File Shares (CIFS)
• File Transfer Protocol (FTP)
• Telnet
• Secure Shell version 1 (SSHv1)
• Secure Shell version 2 (SSHv2)
The following sections provide additional details about adding the different types of bookmarks:
• RDP ActiveX, Java, and HTML5 Bookmarks
• Terminal Services (Using Tunnel)
Once the configuration has been updated, the new bookmark will be displayed in the Virtual Office Bookmarks table. Click a bookmark description to go to the bookmark location that you have defined.
For Citrix bookmarks, you can select the following options:
• The Dell SonicWALL SRA appliance will always perform the Citirix client detection when using Citrix Bookmarks. Click the Disable client detection by Citrix server check box to disable this feature wen using Citrix Bookmarks. Note that this feature is compatible with Citrix XenAPP 5.0 or later.
• Designate that it be a secure Citrix connection by selecting the HTTPS Mode check box.
• Select Always use Java in Internet Explorer to use Java to access the Citrix Portal when using Internet Explorer. Without this setting, a Citrix ActiveX client or plugin must be used with IE. This setting lets users avoid installing a Citrix client or plugin specifically for IE browsers. Java is used with Citrix by default on other browsers and also works with IE. Enabling this check box leverages this portability.
• Select Always use specified Citrix ICA Server to explicitly specify the Citrix ICA Server Address for the Citrix ICA Session. By default, the Bookmark uses the information provided in the ICA configuration on the Citrix server.

RDP ActiveX, Java, and HTML5 Bookmarks
ActiveX, Java, and HTML5 RDP bookmarks offer several features that are not available in other bookmarks.
Tip The ActiveX client is only supported on the Internet Explorer browser, while the Java client is supported on all platforms and browsers that are compatible with Dell SonicWALL SSL VPN.
1. Enter the desired Bookmark Name.
2. Enter the Name or IP Address of the resource you are trying to reach. You can also use an IPv6 address.
3. In the Description field, type a brief description of the bookmark.
4. In the Tabs field, create a comma-separate list of tabs showing where the bookmark should be displayed.
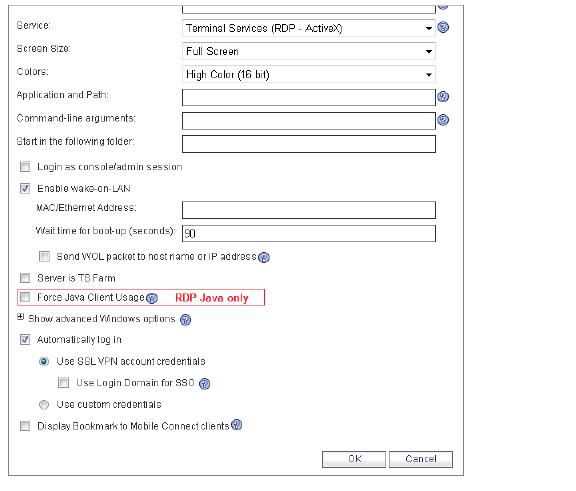
5. Select Terminal Services (RDP - ActiveX) ,Terminal Services (RDP -Java), or Terminal Services (RDP - HTML5) from the Services list. Standard tabs (Desktop, Web, Files, Terminal, Mobile) do not need to be included.
6. Continue to configure the RDP ActiveX, Java, or HTML5 Bookmark as follows:
|
Tip The ActiveX client is only supported on the Internet Explorer browser, while the Java client is supported on all platforms and browsers that are compatible with Dell SonicWALL SSL VPN.
7. When you are finished. Click the Add button to add this bookmark to your Virtual Office list.
Determining the Remote Computer’s Full Name or IP Address
Complete the following steps to determine the full name of the computer to which the RDP bookmark is pointing:
1. Right click the My Computer icon on the desktop of the remote computer, and select Properties.
2. Click the Remote tab.
3. The full computer name will be listed under Remote Desktop.
Complete the following steps to determine the IP address of your computer.
1. In the Windows Start menu on the remote computer, navigate to Run...
2. Type cmd to open the command interpreter and click OK.
3. Type ipconfig. The IP address of your computer is displayed.
Configuring Remote Desktop Access on the Remote Computer
Complete the following steps to allow remote desktop access to the computer that is the target of the RDP bookmark:
1. Right click the My Computer icon on the desktop, and select Properties.
2. Click the Remote tab.
3. Under Remote Desktop, select the check box for Allow users to connect remotely to this computer.
4. Click OK.
Terminal Services (Using Tunnel)
The Terminal Services (Using Tunnel) Bookmark uses the NetExtender Client to tunnel RDP data, and does not need Browser Plug-ins to function. This bookmark should be used if your system is experiencing issues with RDP disconnect/reconnect that commonly occur when using the Windows 8 OS.
This bookmark works just like the existing RDP bookmarks, and the bookmark setting page is same as RDP ActiveX/Java bookmark. All the advanced options are exactly same, but this bookmark starts the NetExtender Client first before launching the native RDC client. So this bookmark needs the NetExtender connection allowed to the portal.
This bookmark would start the NetExtender connection if it’s not connected, and add host route to the NetExtender adapter. If the NetExtender connection is done by this RDP bookmark, after the RDP connection is closed, it need to be auto disconnect the NetExtender connection.
For HTTP(S) bookmarks, you can select Use SSL-VPN account credentials to log in or configure custom credentials for use with Single Sign-On. To disable the use of SSO, clear the
Automatically log in check box. Select the Forms-based Authentication check box to use this method, and then fill in the following fields that are exposed:
• Configure the User Form Field to be the same as the ‘name’ or ‘id’ attribute of the HTML element representing User Name in the Login form, for example:
<input type=text name=’userid’>
• Configure the Password Form Field to be the same as the ‘name’ or ‘id’ attribute of the HTML element representing Password in the Login form, for example:
<input type=password name=’PASSWORD’ id=’PASSWORD’ maxlength=128>
For External Web Site bookmarks, select HTTPS Mode to encrypt Web communication with SSL. External Web Site bookmarks are used to access an offloaded Web site or portal using a bookmark. Select Disable security warning if you do not want a security warning dialog box to be displayed when a user clicks this bookmark. If left unchecked, the warning dialog will allow the user to select a “Do not show this warning again” option if the user has permissions to edit this bookmark (set above).

For more information about offloaded applications, see the Application Offloading section in the Dell SonicWALL SSL VPN Administrator Guide.
For FTP bookmarks, click Show advance server configuration to select the character encoding. You can also select Use SSL-VPN account credentials to log in or configure custom credentials for use with Single Sign-On. To disable the use of SSO, clear the
Automatically log in check box.
The Mobile Connect bookmark allows a custom bookmark to be defined for display in Mobile Connect after the user is connected. This bookmark is meant to support any third-party app, whether an in-house app or a public app in the App Store or Google Play. The bookmark also enables calling third-party apps that have defined a custom URL scheme, for example ‘comgoogleearth://’ for Google Earth. The Mobile Connect bookmark is only available for edit from normal browsers and is intended for use only on mobile devices.
Note The Mobile Connect bookmark may also be used for ‘http://’ or ‘https://’ URL schemes, however, Dell SonicWALL recommends using HTTP or HTTPS bookmarks for these schemes.
For SSHv2 bookmarks, you must have SUN JRE 1.6.0_10 or higher and must be connecting to a server that supports SSHv2. There are also options to Automatically accept host key and to Bypass username. The bypass option should only be used for SSHv2 servers that do not require authentication in the initial connection session (such as Dell SonicWALL security appliances).
You can change the IP address, domain name, or IPv6 address as well as the service and other settings associated with an existing bookmark.
Note Only user-created Bookmarks can be edited or deleted by the user. Global or Group Bookmarks pre-defined by the Administrator cannot be edited or deleted.
To edit a bookmark to change its name or associated IP address, perform the following steps:
1. Identify a bookmark in the Virtual Office Bookmarks list for which you want to change an IP address or domain name or other settings.
2. In the Virtual Office Bookmarks list, click the Configure icon for an existing bookmark. The Edit Bookmark dialog box displays.
3. To change the bookmark name, domain name or IP address of the bookmark, edit the names in the Bookmark Name or Name or IP Address fields.
4. To change the service, select a new Service from the drop-down menu.
5. Optionally change other settings specific to the Service type.
6. Optionally enable or disable the Automatically log in setting, or change the credentials selection.
7. Click Apply. The Virtual Office home page displays with the new IP address or domain name.
To remove a bookmark, perform the following steps:
1. Identify a bookmark in the Virtual Office Bookmarks list that you want to remove.
2. In the Virtual Office Bookmarks list, click the delete icon ![]() for the bookmark you want to remove. The bookmark disappears from the list.
for the bookmark you want to remove. The bookmark disappears from the list.
The following sections describe how to use the various types of bookmarks:
• Using Remote Desktop Bookmarks
• Using Mobile Connect Bookmarks