A zone is a logical grouping of one or more interfaces designed to make management, such as
the definition and application of Access Rules, a simpler and more intuitive process than following strict physical interface scheme. Zone-based security is a powerful and flexible method of managing both internal and external network segments, allowing the administrator to separate and protect critical internal network resources from unapproved access or attack.
A network security zone is simply a logical method of grouping one or more interfaces with
friendly, user-configurable names, and applying security rules as traffic passes from one zone to another zone. Security zones provide an additional, more flexible, layer of security for the firewall. With the zone-based security, the administrator can group similar interfaces and apply the same policies to them, instead of having to write the same policy for each interface.
For more information on configuring interfaces, see
“Network > Interfaces”
.
SonicOS Enhanced zones allows you to apply security policies to the inside of the network. This
allows the administrator to do this by organizing network resources to different zones, and allowing or restricting traffic between those zones. This way, access to critical internal resources such as payroll servers or engineering code servers can be strictly controlled.
Zones also allow full exposure of the NAT table to allow the administrator control over the traffic
across the interfaces by controlling the source and destination addresses as traffic crosses from one zone to another. This means that NAT can be applied internally, or across VPN tunnels, which is a feature that users have long requested. SonicWALL security appliances can also drive VPN traffic through the NAT policy and zone policy, since VPNs are now logically grouped into their own VPN zone.
An easy way to visualize how security zones work is to imagine a large new building, with
several rooms inside the building, and a group of new employees that do not know their way around the building. This building has one or more exits, which can be thought of as the WAN interfaces. The rooms within the building have one or more doors, which can be thought of as interfaces. These rooms can be thought of as zones inside each room are a number of people. The people are categorized and assigned to separate rooms within the building. People in each room going to another room or leaving the building, must talk to a doorperson on the way out of each room. This doorperson is the inter-zone/intra-zone security policy, and the doorperson’s job to consult a list and make sure that the person is allowed to go to the other room, or to leave the building. If the person is allowed (i.e. the security policy lets them), they can leave the room via the door (the interface).
Upon entering the hallway, the person needs to consult with the hallway monitor to find out
where the room is, or where the door out of the building is located. This hallway monitor provides the routing process because the monitor knows where all the rooms are located, and how to get in and out of the building. The monitor also knows the addresses of any of the remote offices, which can be considered the VPNs. If the building has more than one entrance/exit (WAN interfaces), the hallway monitor can direct people to use the secondary entrance/exit, depending upon how they’ve been told to do so (i.e. only in an emergency, or to distribute the traffic in and out of the entrance/exits). This function can be thought of as WAN Load Balancing.
There are times that the rooms inside the building have more than one door, and times when
there are groups of people in the room who are not familiar with one another. In this example, one group of people uses only one door, and another group uses the other door, even though groups are all in the same room. Because they also do not recognize each other, in order to speak with someone in another group, the users must ask the doorperson (the security policy) to point out which person in the other group is the one with whom they wish to speak. The doorperson has the option to not let one group of people talk to the other groups in the room. This is an example of when zones have more than one interface bound to them, and when intra-zone traffic is not allowed.
Sometimes, people will wish to visit remote offices, and people may arrive from remote offices
to visit people in specific rooms in the building. These are the VPN tunnels. The hallway and doorway monitors check to see if this is allowed or not, and allow traffic through. The doorperson can also elect to force people to put on a costume before traveling to another room, or to exit, or to another remote office. This hides the true identity of the person, masquerading the person as someone else. This process can be thought of as the NAT policy.
The predefined zones on your the SonicWALL security appliance depend on the device.The
predefined security zones on the SonicWALL security appliance are not modifiable and are defined as follows:
|
|
•
|
WAN
: This zone can consist of either one or two interfaces. If you’re using the security appliance’s WAN failover capability, you need to add the second Internet interface to the WAN zone.
|
|
|
•
|
LAN
: This zone can consist of one to five interfaces, depending on your network design. Even though each interface will have a different network subnet attached to it, when grouped together they can be managed as a single entity.
|
|
|
•
|
DMZ
: This zone is normally used for publicly accessible servers. This zone can consist of one to four interfaces, depending on you network design.
|
|
|
•
|
VPN
: This virtual zone is used for simplifying secure, remote connectivity. It is the only zone that does not have an assigned physical interface.
|
|
|
•
|
MULTICAST
: This zone provides support for IP multicasting, which is a method for sending IN packets from a single source simultaneously to multiple hosts.
|
|
|
•
|
WLAN
: This zone provides support to SonicWALL SonicPoints. When assigned to the Opt port, it enforces SonicPoint Enforcement, automatically dropping all packets received from non-SonicPoint devices. The WLAN zone supports SonicPoint Discovery Protocol (SDP) to automatically poll for and identify attached SonicPoints. It also supports SonicWALL Simple Provisioning Protocol to configure SonicPoints using profiles.
|
Each zone has a security type, which defines the level of trust given to that zone. There are five
security types:
|
|
•
|
Trusted
: Trusted is a security type that provides the highest level of trust—meaning that the least amount of scrutiny is applied to traffic coming from trusted zones. Trusted security can be thought of as being on the LAN (protected) side of the security appliance. The LAN zone is always Trusted.
|
|
|
•
|
Encrypted
: Encrypted is a security type used exclusively by the VPN zone. All traffic to and from an Encrypted zone is encrypted.
|
|
|
•
|
Wireless
: Wireless is a security type applied to the WLAN zone or any zone where the only interface to the network consists of SonicWALL SonicPoint devices. Wireless security type is designed specifically for use with SonicPoint devices. Placing an interface in a Wireless zone activates SDP (SonicWALL Discovery Protocol) and SSPP (SonicWALL Simple Provisioning Protocol) on that interface for automatic discovery and provisioning of SonicPoint devices. Only traffic that passes through a SonicPoint is allowed through a Wireless zone; all other traffic is dropped.
|
|
|
•
|
Public
: A Public security type offers a higher level of trust than an Untrusted zone, but a lower level of trust than a Trusted zone. Public zones can be thought of as being a secure area between the LAN (protected) side of the security appliance and the WAN (unprotected) side. The DMZ, for example, is a Public zone because traffic flows from it to both the LAN and the WAN. By default traffic from DMZ to LAN is denied. But traffic from LAN to ANY is allowed. This means only LAN initiated connections will have traffic between DMZ and LAN. The DMZ will only have default access to the WAN, not the LAN.
|
|
|
•
|
Untrusted
: The Untrusted security type represents the lowest level of trust. It is used by both the WAN and the virtual Multicast zone. An Untrusted zone can be thought of as being on the WAN (unprotected) side of the security appliance.By default, traffic from Untrusted zones is not permitted to enter any other zone type without explicit rules, but traffic from every other zone type is permitted to Untrusted zones.
|
The
Allow Interface Trust
setting in the Add Zone
window automates the creation of Access Rules to allow traffic to flow between the interface of a zone instance. For example, if the LAN zone has both the LAN
and X3
interfaces assigned to it, checking Allow Interface Trust
on the LAN zone creates the necessary Access Rules to allow hosts on these interfaces to communicate with each other.
You can enable SonicWALL Security Services for traffic across zones. For example, you can
enable SonicWALL Intrusion Prevention Service for incoming and outgoing traffic on the WLAN zone to add more security for internal network traffic. You can enable the following SonicWALL Security Services on zones:
|
|
•
|
Enable Gateway Anti-Virus
- Enforces gateway anti-virus protection on multiple interfaces in the same Trusted, Public or WLAN zones.
|
|
|
•
|
Enable IPS
- Enforces intrusion detection and prevention on multiple interfaces in the same Trusted, Public or WLAN zones.
|
|
|
•
|
Enable Anti-Spyware Service
- Enforces anti-spyware detection and prevention on multiple interfaces in the same Trusted, Public or WLAN zones.
|
|
|
•
|
Create Group VPN
- Creates a GroupVPN policy for the zone, which is displayed in the VPN Policies table on the VPN > Settings
page. You can customize the GroupVPN policy on the VPN > Settings
page. If you uncheck Create Group VPN
, the GroupVPN policy is removed from the VPN > Settings
page.
|
The
Zone Settings
table displays a listing of all the SonicWALL security appliance default predefined zones as well as any zones you create. The table displays the following status information about each zone configuration:
|
|
•
|
Name
: Lists the name of the zone. The predefined LAN
, WAN
, WLAN
, VPN
, and Encrypted
zone names cannot be changed.
|
|
|
•
|
Security Type
: Displays the security type: Trusted
, Untrusted
, Public
, Wireless
, or Encrypted
.
|
|
|
•
|
Interface Trust
: A check mark indicates the Allow Interface Trust
setting is enabled for the zone.
|
|
|
•
|
Content Filtering
: A check mark indicates SonicWALL Content Filtering Service is enabled for traffic coming in and going out of the zone.
|
|
|
•
|
Client Anti-Virus
: A check mark indicates SonicWALL Client Anti-Virus is enabled for traffic coming in and going out of the zone. SonicWALL Client Anti-Virus manages an anti-virus client application on all clients on the zone.
|
|
|
•
|
Gateway Anti-Virus
: A check mark indicates SonicWALL Gateway Anti-Virus is enabled for traffic coming in and going out of the zone. SonicWALL Gateway Anti-Virus manages the anti-virus service on the SonicWALL appliance.
|
|
|
•
|
Anti-Spyware Service
- A check mark indicates SonicWALL Anti-Spyware detection and prevention is enabled for traffic through interfaces in the zone.
|
|
|
•
|
IPS
: A check mark indicates SonicWALL Intrusion Prevention Service is enabled for traffic coming in and going out of the zone.
|
|
|
•
|
Configure
: Clicking the  icon displays the Edit Zone window. Clicking the delete icon icon displays the Edit Zone window. Clicking the delete icon  deletes the zone. The delete icon is dimmed for the predefined zones. You cannot delete these zones. deletes the zone. The delete icon is dimmed for the predefined zones. You cannot delete these zones.
|
To add a new zone, click
Add
under the Zone Settings
table. The Add Zone
window is displayed.
|
Step 2
|
Select a security type
Trusted
, Public
or Wireless
from the Security Type
menu. Use Trusted
for zones that you want to assign the highest level of trust, such as internal LAN segments. Use Public
for zones with a lower level of trust requirements, such as a DMZ interface. Use Wireless
for the WLAN interface.
|
|
|
–
|
SonicWALL Content Filtering Service
- Enforces content filtering on multiple interfaces in the same Trusted, Public and WLAN zones. To apply a Content Filtering Service (CFS) policy to the zone, select the policy from the CFS Policy
pull-down menu.
|
|
|
–
|
SonicWALL Enforce Client Anti-Virus Service
- Enforces Client Anti-Virus protection on multiple interfaces in the same Trusted, Public or WLAN zones, using the SonicWALL Client Anti-Virus client on your network hosts.
|
|
|
–
|
Enable Gateway Anti-Virus Service
- Enforces gateway anti-virus protection on your SonicWALL security appliance for all clients connecting to this zone. SonicWALL Gateway Anti-Virus manages the anti-virus service on the SonicWALL appliance.
|
|
|
–
|
Enable Anti-Spyware Service
- Enforces anti-spyware detection and prevention on multiple interfaces in the same Trusted, Public or WLAN zones.
|
|
|
–
|
Create Group VPN
- Automatically creates a SonicWALL GroupVPN Policy for this zone. You can customize the GroupVPN Policy in the VPN > Settings
page.
|
|
|
Caution
|
Unsetting the
Create Group VPN
checkbox will remove any corresponding GroupVPN policy.
|
|
|
–
|
Enable SSL Control
- Enables SSL Control on the zone. All new SSL connections initiated from that zone will now be subject to inspection. Note that SSL Control must first be enabled globally on the Firewall > SSL Control
page. For more information, see “Firewall Settings > SSL Control”
.
|
|
Step 5
|
Click
OK
. The new zone is now added to the SonicWALL security appliance.
|
You can delete a user-created zone by clicking the delete icon in the
Configure
column. The Delete icon is unavailable for the predefined zones. You cannot delete these zones. Any zones that you create can be deleted.
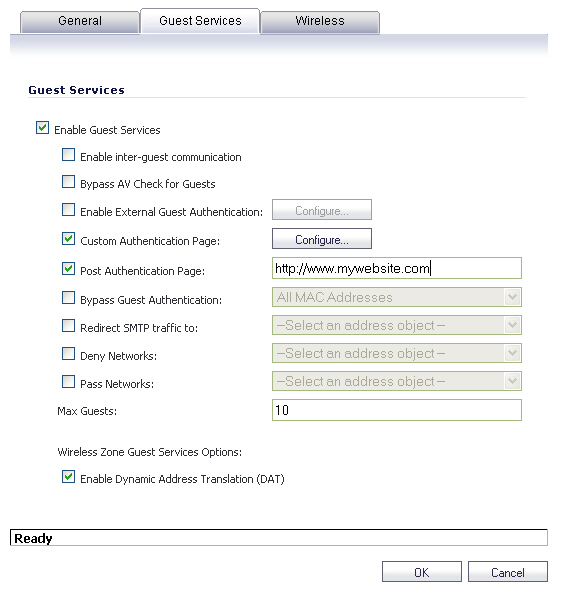
SonicWALL User Guest Services providesd network administrators with an easy solution for
creating wired and wireless guest passes and/or locked-down Internet-only network access for visitors or untrusted network nodes. This functionality can be extended to wireless or wired users on the WLAN, LAN, DMZ, or public/semi-public zone of your choice.
To configure Guest Services feature:
|
Step 1
|
Navigate to the
Network > Zones
page in the SonicOS management interface.
|
|
Step 2
|
Click the
Configure
button for the zone you wish to add Guest Services to.
|
|
|
–
|
Enable External Guest Authentication
- Requires guests connecting from the device or network you select to authenticate before gaining access. This feature, based on Lightweight Hotspot Messaging (LHM) is used for authenticating Hotspot users and providing them parametrically bound network access.
|
|
|
–
|
Custom Authentication Page
- Redirects users to a custom authentication page when they first connect to the network. Click Configure to set up the custom authentication page. Enter either a URL to an authentication page or a custom challenge statement in the text field, and click OK.
|
|
|
–
|
Post Authentication Page
- Directs users to the page you specify immediately after successful authentication. Enter a URL for the post-authentication page in the field.
|
|
|
–
|
Bypass Guest Authentication
- Allows the Guest Services feature to integrate into environments already using some form of user-level authentication. This feature automates the authentication process, allowing wireless users to reach Guest Services resources without requiring authentication. This feature should only be used when unrestricted Guest Service access is desired, or when another device upstream is enforcing authentication.
|
|
|
–
|
Redirect SMTP traffic to
- Redirects SMTP traffic incoming on this zone to an SMTP server you specify. Select the address object to redirect traffic to.
|
|
|
–
|
Deny Networks
- Blocks traffic to the networks you name. Select the subnet, address group, or IP address to block traffic to.
|
|
|
–
|
Pass Networks
- Allows traffic through the Guest Service-enabled zone to the networks you select.
|
|
|
–
|
Max Guests
- Specifies the maximum number of guest users allowed to connect to this zone. The default setting is 10.
|
|
|
–
|
Enable Dynamic Address Translation (DAT)
- Guest Services provides spur of the moment “hotspot” access to wireless-capable guests and visitors. For easy connectivity, Guest Services allows wireless users to authenticate and associate, obtain IP settings, and authenticate using any Web-browser. Without DAT, if a guest user is not a DHCP client, but instead has static IP settings incompatible with the Wireless WLAN network settings, network connectivity is prevented until the user’s settings change to compatible values. Dynamic Address Translation (DAT) is a form of Network Address Translation (NAT) that allows the system to support any IP addressing scheme for guest users. For example, the Wireless WLAN interface is configured with its default address of 172.16.31.1, and one guest client has a static IP address of 192.168.0.10 and a default gateway of 192.168.0.1, while another has a static IP address of 10.1.1.10 and a gateway of 10.1.1.1, and DAT enables network communication for both of these clients.
|
|
Step 5
|
Click
OK
to apply these settings to this zone.
|
|
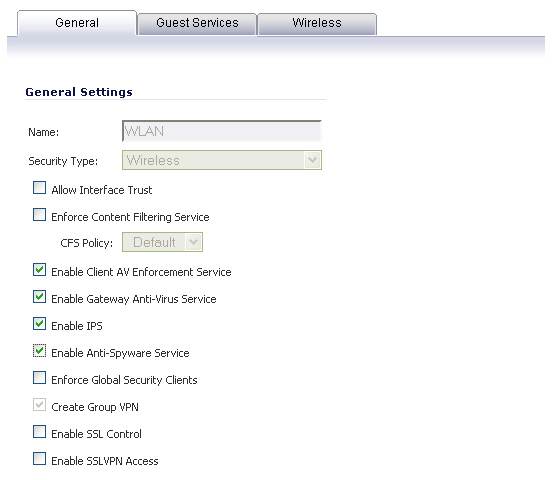
Step 2
|
In the
General
tab, select the Allow Interface Trust
setting to automate the creation of Access Rules to allow traffic to flow between the interfaces of a zone instance. For example, if the LAN zone has both the LAN
and X3
interfaces assigned to it, checking Allow Interface Trust
on the LAN zone creates the necessary Access Rules to allow hosts on these interfaces to communicate with each other.
|
|
|
–
|
Enforce Client Anti-Virus Service
- Enforces managed anti-virus protection on multiple interfaces in the same Trusted, Public or WLAN zones. SonicWALL Client Anti-Virus manages an anti-virus client application on all clients on the zone.
|
|
|
–
|
Enable Gateway Anti-Virus
- Enforces gateway anti-virus protection on multiple interfaces in the same Trusted, Public or WLAN zones. SonicWALL Gateway Anti-Virus manages the anti-virus service on the SonicWALL appliance.
|
|
|
–
|
Enable IPS
- Enforces intrusion detection and prevention on multiple interfaces in the same Trusted, Public or WLAN zones.
|
|
|
–
|
Enable Anti-Spyware Service
- Enforces anti-spyware detection and prevention on multiple interfaces in the same Trusted, Public or WLAN zones.
|
|
|
–
|
Create Group VPN
- creates a GroupVPN policy for the zone, which is displayed in the VPN Policies table on the VPN > Settings
page. You can customize the GroupVPN policy on the VPN > Settings
page. If you uncheck Create Group VPN, the GroupVPN policy is removed from the VPN > Settings
page.
|
|
Step 5
|
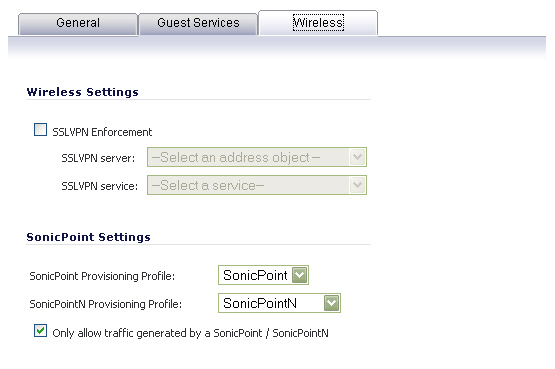
In the
Wireless Settings
section, check Only allow traffic generated by a SonicPoint
to allow only traffic from SonicWALL SonicPoints to enter the WLAN zone interface. This allows maximum security of your WLAN. Uncheck this option if you want to allow any traffic on your WLAN zone regardless of whether or not it is from a wireless connection.
|
|
|
Tip
|
Uncheck
Only allow traffic generated by a SonicPoint
and use the zone on a wired interface to allow guest services on that interface.
|
|
Step 6
|
Select
SSL VPN Enforcement
to require that all traffic that enters into the WLAN zone be authenticated through a SonicWALL SSL VPN appliance.
|
|
Step 7
|
In the
SSL VPN Server
list, select an address object to direct traffic to the SonicWALL SSL VPN appliance. You can select:
|
|
Step 8
|
In the
SSL VPN Service
list, select the service or group of services you want to allow for clients authenticated through the SSL VPN.
|
|
Step 9
|
Under the
SonicPoint Settings
heading, select the SonicPoint Provisioning Profile
you want to apply to all SonicPoints connected to this zone. Whenever a SonicPoint connects to this zone, it will automatically be provisioned by the settings in the SonicPoint Provisioning Profile, unless you have individually configured it with different settings.
|
|
Step 10
|
Select
Only allow traffic generated by a SonicPoint
to block non-SonicPoint wireless traffic.
|
|
Step 11
|
Click
OK
to apply these settings to the WLAN zone.
|