SonicPoint_wlanSonicPointRfmView
This chapter details the SonicWALL Radio Frequency (RF) Monitoring feature and provides configuration examples for easy deployment. This chapter contains the following sections:
Understanding Radio Frequency Monitoring
The following section provides an overview of the RF Monitoring feature and contains the following subsections:
Radio Frequency (RF) technology used in today’s 802.11-based wireless networking devices poses an attractive target for intruders. If left un-managed, RF devices can leave your wireless (and wired) network open to a variety of outside threats, from Denial of Service (DoS) to network security breaches.
In order to help secure your SonicPoint Wireless Access Point (AP) stations, SonicWALL takes a closer look at these threats. By using direct RF monitoring, SonicWALL helps detect threats without interrupting the current operation of your wireless or wired network.
SonicWALL RF Monitoring provides real-time threat monitoring and management of SonicPoint radio frequency traffic. In addition to its real-time threat monitoring capabilities, SonicWALL RF monitoring provides network administrators a system for centralized collection of RF threats and traffic statistics; offering a way to easily manage RF capabilities directly from the SonicWALL security appliance gateway
SonicWALL RF monitoring is:
Real-Time - View logged information as it happens
Transparent - No need to halt legitimate network traffic when managing threats
Comprehensive - Provides detection of many types of RF threats. For complete descriptions of the above types of RF Threat Detection, see the Practical RF Monitoring Field Applications.
Features in SonicPoint RF Monitoring
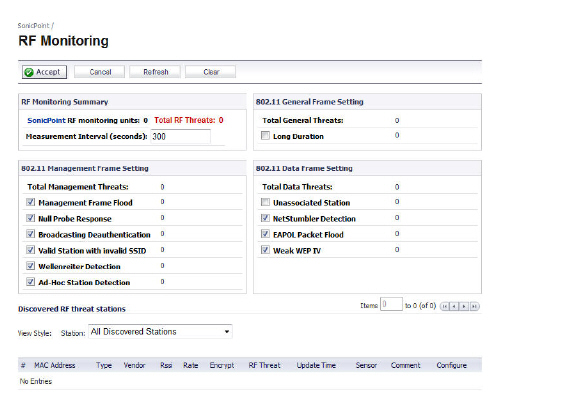
The SonicPoint > RF Monitoring management interface provides a central location for selecting RF signature types, viewing discovered RF threat stations, and adding discovered threat stations to a watch list. This section describes the entities on the SonicPoint > RF Monitoring page.
Figure 50:4 SonicPoint > RF Monitoring
Table 6 RF Monitoring Panels
|

|

|

Table 9 802.11 General Frame Setting
|
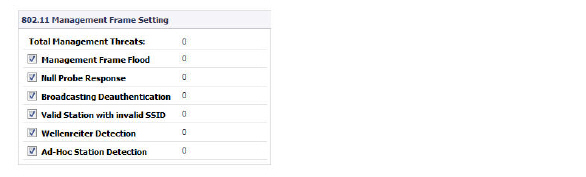
Table 10 802.11 Management Fame Setting
Clicking the checkboxes enables/disables the following monitors.
|

Table 11 802.11 Data Frame Setting
Clicking the checkboxes enables/disables the following monitors.
|

Table 12 Discovered RF Threat Stations
|
Tip Did you know? It is possible to find approximate locations of RF Threat devices by using logged threat statistics. For more practical tips and information on using the RF Management threat statistics, see the Practical RF Monitoring Field Applications
Configuring the RF Monitoring Feature
This section includes procedures for configuring the RF Monitoring feature. Refer to Management Interface Overview for details on using the
SonicPoint > RF Monitoring management interface. This section includes the following subsections:
Configuring RF Monitoring on SonicPoint(s)
In order for RF Monitoring to be enforced, you must enable the RF Monitoring option on all available SonicPoint devices. The following section provides instructions to re-provision all available SonicPoints with RF Monitoring enabled.
Navigate to SonicPoint > SonicPoints in the SonicWALL security appliance management interface.
Click the Configure button corresponding to the desired SonicPoint Provisioning Profile.
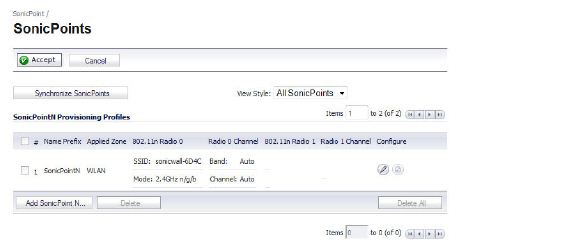
In the Settings tab, click the Enable RF Monitoring checkbox.
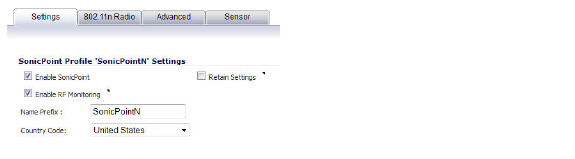
Next, to ensure all SonicPoints are updated with the RF Monitoring feature enabled, it is necessary to delete all current SonicPoints from the SonicPoint table and re-synchronize these SonicPoints using the profile you just created.
Click the Delete All button at the bottom right corner of the SonicPoints table.
Click the Synchronize SonicPoints button at the top of the page.
Your SonicPoints will now reboot with the RF Monitoring feature enabled. Be patient as the reboot process may take several minutes.Selecting RF Signature Types
The RF Monitoring management interface allows you to select which types of RF threats your SonicWALL monitors and logs.
Navigate to SonicPoint > RF Monitoring in the SonicWALL security appliance management interface. RF threat types are displayed, with a checkbox next to each.
Click the checkbox next to the RF threat to enable/disable management of that threat. By default, all RF threats are checked as managed.
Tip For a complete list of RF Threat types and their descriptions, see 802.11 Management Fame Setting of this document.
Adding a Threat Station to the Watch List
The RF Monitoring Discovered Threat Stations “Watch List” feature allows you to create a watch list of threats to your wireless network. The watch list is used to filter results in the Discovered RF Threat Stations list.
To add a station to the watch list:
In the SonicPoint > RF Monitoring page, navigate to the Discovered RF threat stations section.
Click the  icon that corresponds to the threat station you wish to add to the watch list.
A confirmation screen will appear. Click OK to add the station to the watch list.
If you have accidentally added a station to the watch list, or would otherwise like a station removed from the list, click the  icon that corresponds to the threat station you wish to remove.
Tip Once you have added one or more stations to the watch list, you can filter results to see only these stations in the real-time log by choosing Only Stations in Watch List Group from the View Type drop-down list.
Practical RF Monitoring Field Applications
This section provides an overview of practical uses for collected RF Monitoring data in detecting Wi-Fi threat sources. Practical RF Monitoring Field Applications are provided as general common-sense suggestions for using RF Monitoring data.
This section contains the following subsections:
When using RF data to locate threats, keep in mind that wireless signals are affected by many factors. Before continuing, take note of the following:
Signal strength is not always a good indicator of distance - Obstructions such as walls, wireless interference, device power output, and even ambient humidity and temperature can affect the signal strength of a wireless device.
A MAC Address is not always permanent - While a MAC address is generally a good indicator of device type and manufacturer, this address is susceptible to change and can be spoofed. Likewise, originators of RF threats may have more than one hardware device at their disposal.
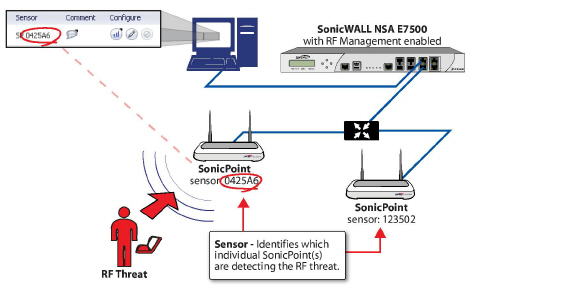
Using Sensor ID to Determine RF Threat Location
In the Discovered RF Threat Stations list, the Sensor field indicates which Sonic Point is detecting the particular threat. Using the sensor ID and MAC address of the SonicPoint allows you to easily determine the location of the SonicPoint that is detecting the threat.
Timesaver For this section in particular (and as a good habit in general), you may find it helpful to keep a record of the locations and MAC addresses of your SonicPoint devices.
Navigate to the SonicPoint > RF Monitoring page in the SonicWALL Management Interface.
In the Discovered RF Threat Stations table, locate the Sensor for the SonicPoint that is detecting the targeted RF threat and record the number.
Navigate to SonicPoint > SonicPoints.
In the SonicPoints table, locate the SonicPoint that matches the Sensor number you recorded in Step 2.
Record the MAC address for this SonicPoint and use it to find the physical location of the SonicPoint.
The RF threat is likely to be in the location that is served by this SonicPoint.
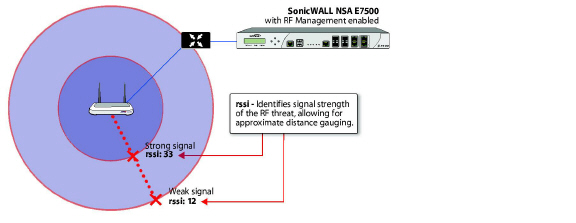
Using RSSI to Determine RF Threat Proximity
This section builds on what was learned in the Using Sensor ID to Determine RF Threat Location. In the Discovered RF Threat Stations list, the Rssi field indicates the signal strength at which a particular Sonic Point is detecting an RF threat.
The Rssi field allows you to easily determine the proximity of an RF threat to the SonicPoint that is detecting that threat. A higher Rssi number generally means the threat is closer to the SonicPoint.
Tip It is important to remember that walls serve as barriers for wireless signals. While a very weak Rssi signal may mean the RF threat is located very far from the SonicPoint, it may also indicate a threat located near, but outside the room or building.
Navigate to the SonicPoint > RF Monitoring page in the SonicWALL Management Interface.
In the Discovered RF Threat Stations table, locate the Sensor and Rssi for the SonicPoint that is detecting the targeted RF threat and record these numbers.
Navigate to the SonicPoint > SonicPoints page.
In the SonicPoints table, locate the SonicPoint that matches the Sensor number you recorded in Step 2.
Record the MAC address for this SonicPoint and use it to find the physical location of the SonicPoint.
A high Rssi usually indicates an RF threat that is closer to the SonicPoint. A low Rssi can indicate obstructions or a more distant RF threat.